This homemade Pie Crust recipe includes a full tutorial for making perfect pie crust every time! The BEST tender, buttery, and flaky pie crust recipe, and it’s so easy!
Looking for more pie crust recipes? Try my Oreo Pie Crust or Graham Cracker Crust!
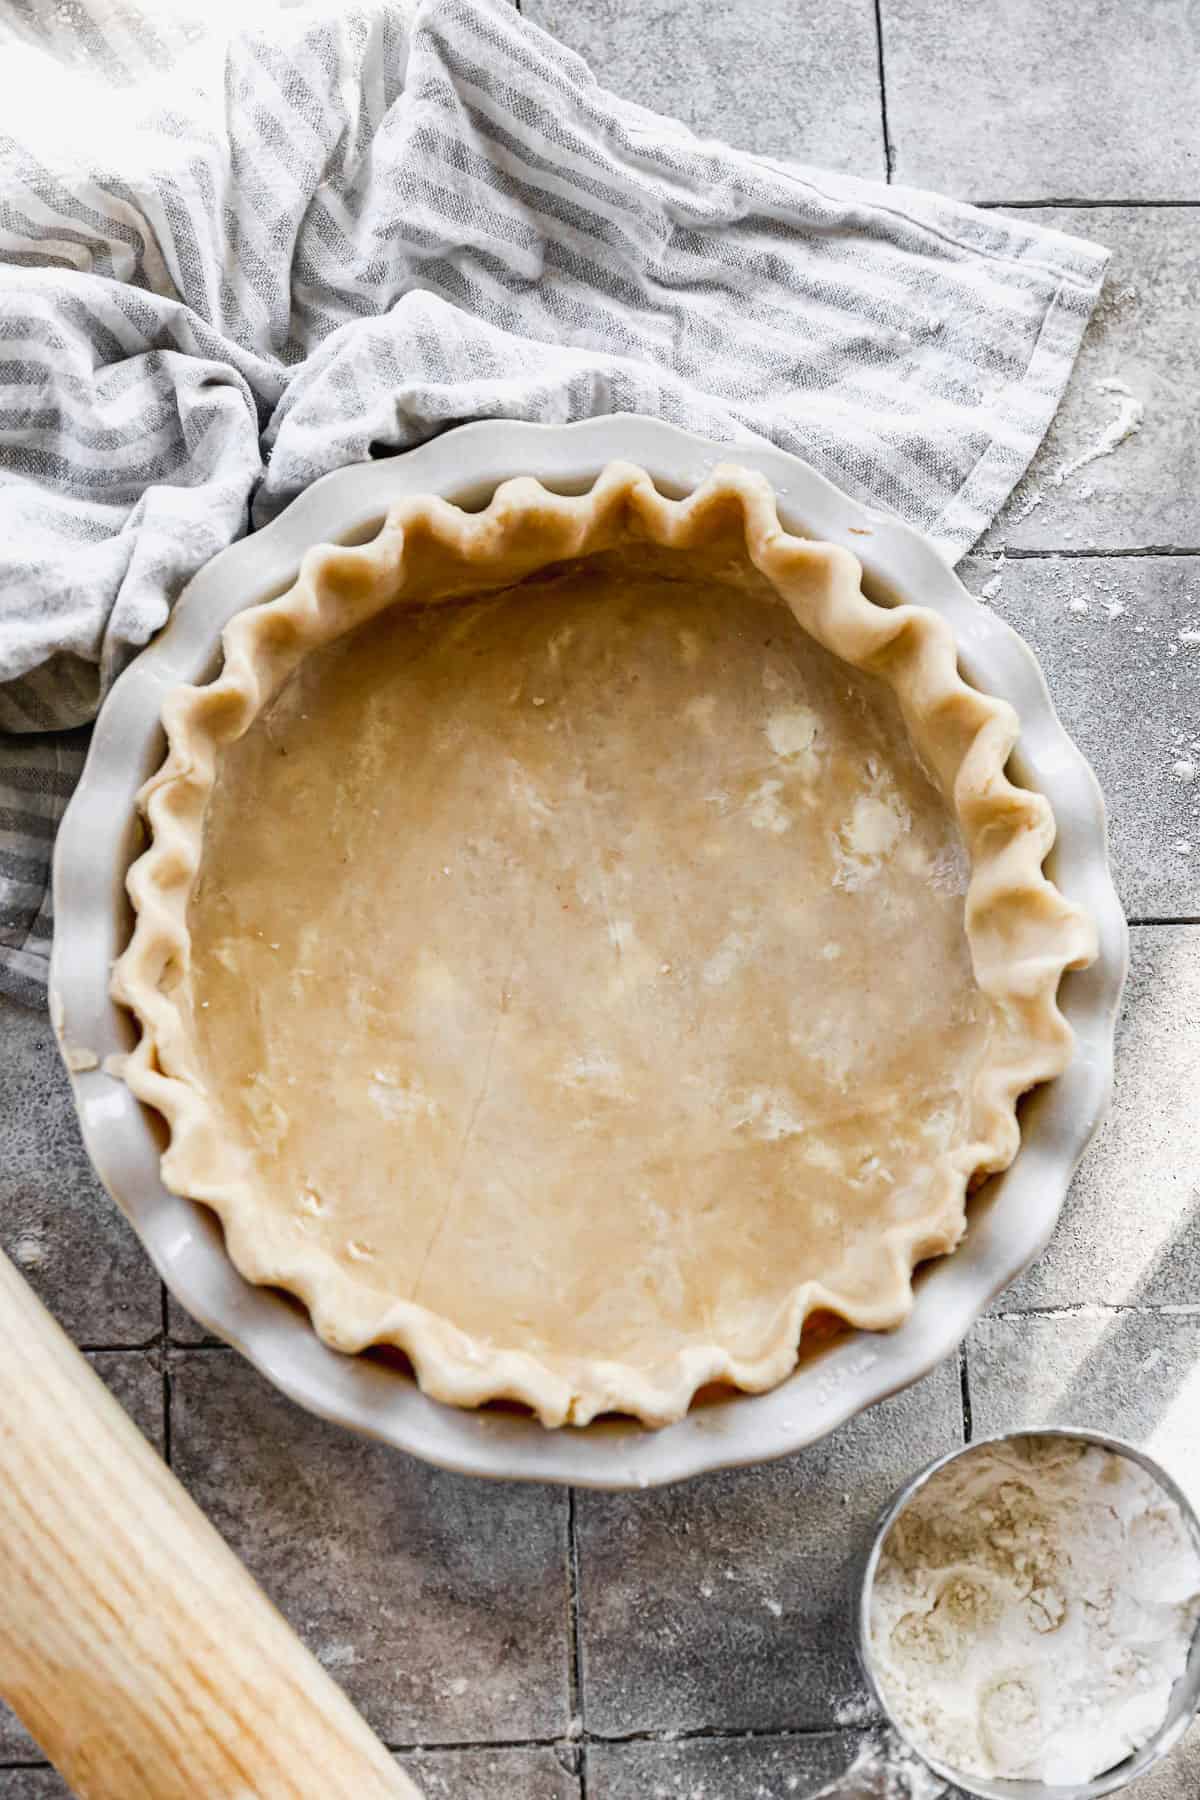
Why I love this recipe:
- Butter AND Shortening – I combine both butter and shortening since they have different melting points. This ensures great stability and tenderness, while still having that delicious buttery taste we all love.
- Makes Two Crusts, perfect for those recipes that require a bottom and top crust, or simply freeze the other one for a different day.
- Simple – This easy pie crust recipe is definitely at the top of the list when it comes to recipes I ALWAYS make from scratch. It’s completely fool-proof, and the taste just can’t be beat!
How to make a Pie Crust:
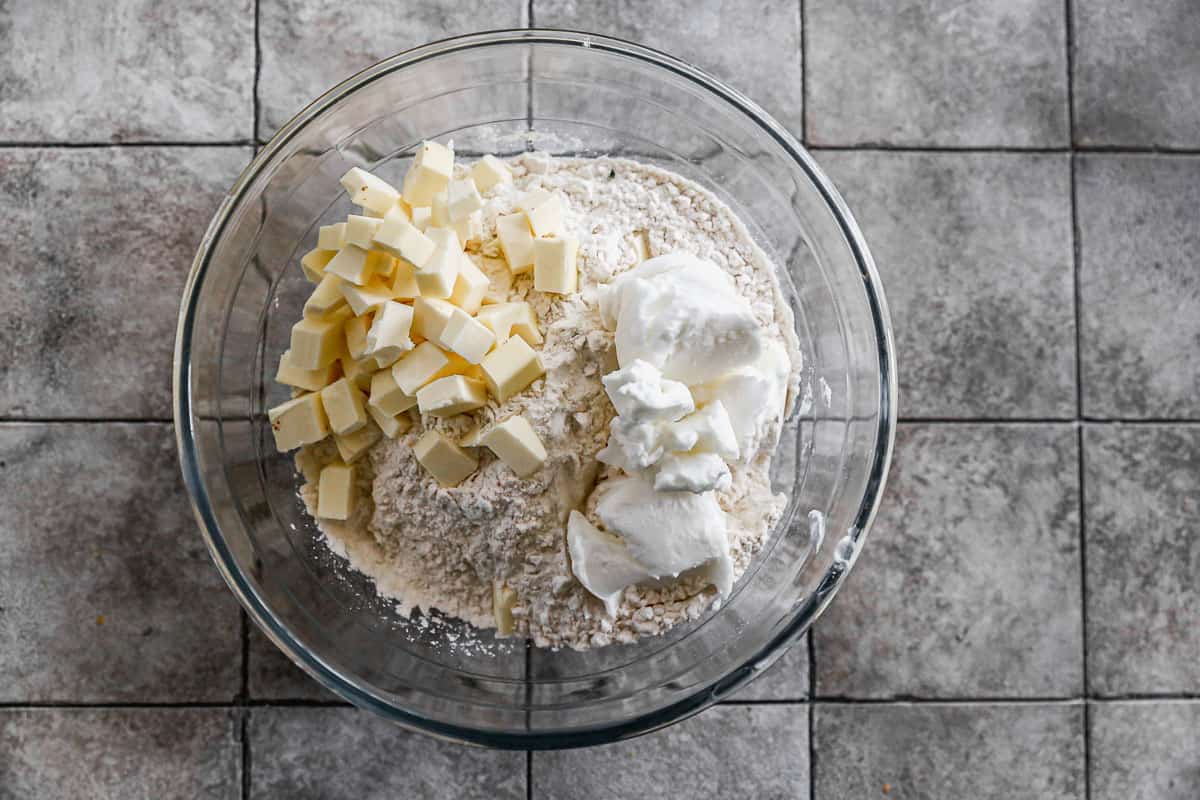
Combine Ingredients: Start by adding the flour and salt to a mixing bowl, then add the cold shortening and butter.
- You want to keep the “fats” in the pie crust cold so that when they begin to melt in the oven they have time to create flakey, tender layers of crust. Cold butter and shortening are so important in helping create that flaky pie crust that everyone loves!
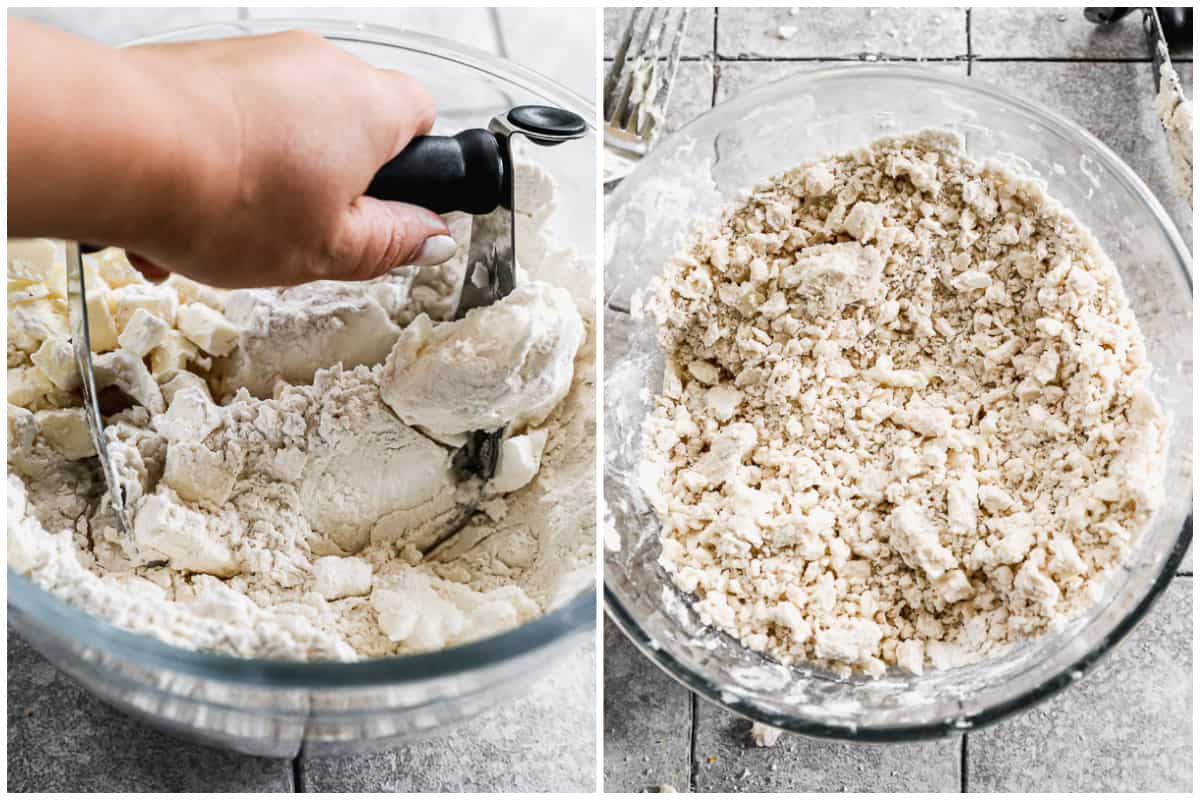
Cut Fats into Flour: Use a pastry blender or forks to cut the fats into the flour until the mixture resembles crumbs.
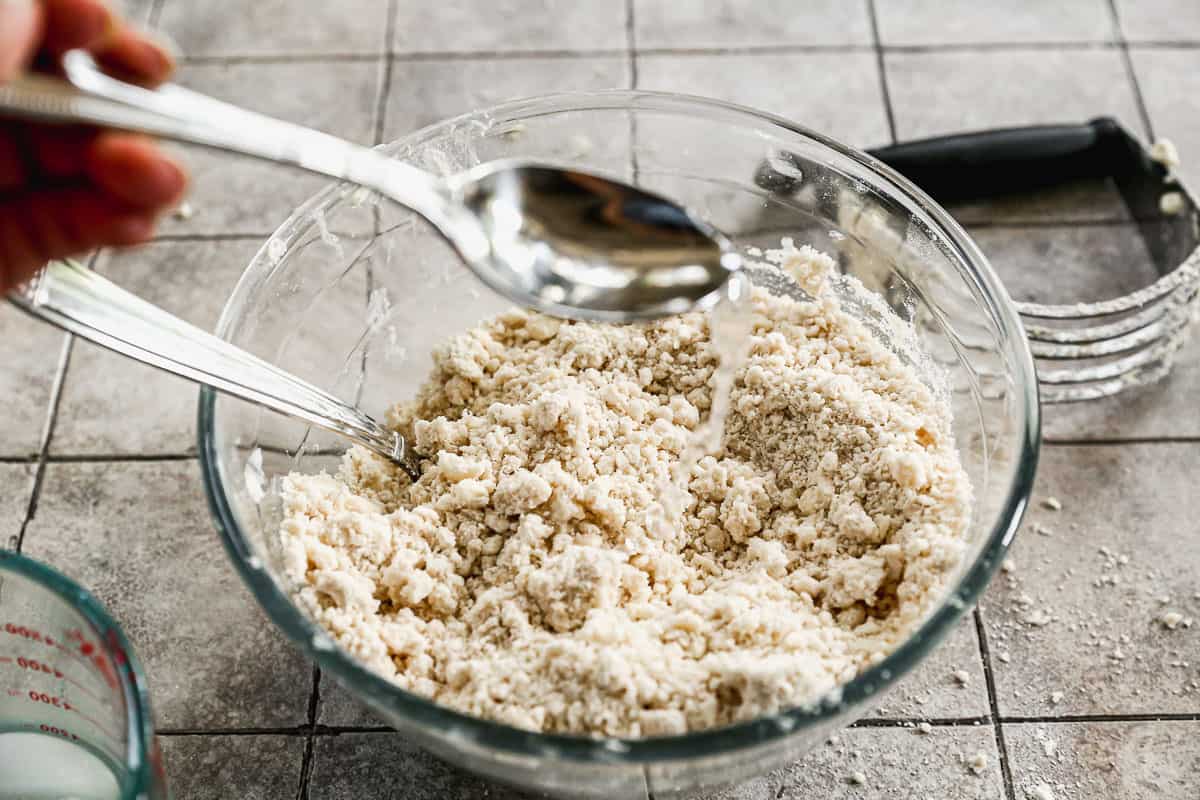
Add Moisture: Add some ice water, just one tablespoon at a time, until the mixture starts to come together into a ball. (You may not need all of the ice water).
Form into Ball: The dough should not be sticky, be careful not to over-work it. Handle the dough just enough to form it into a ball.
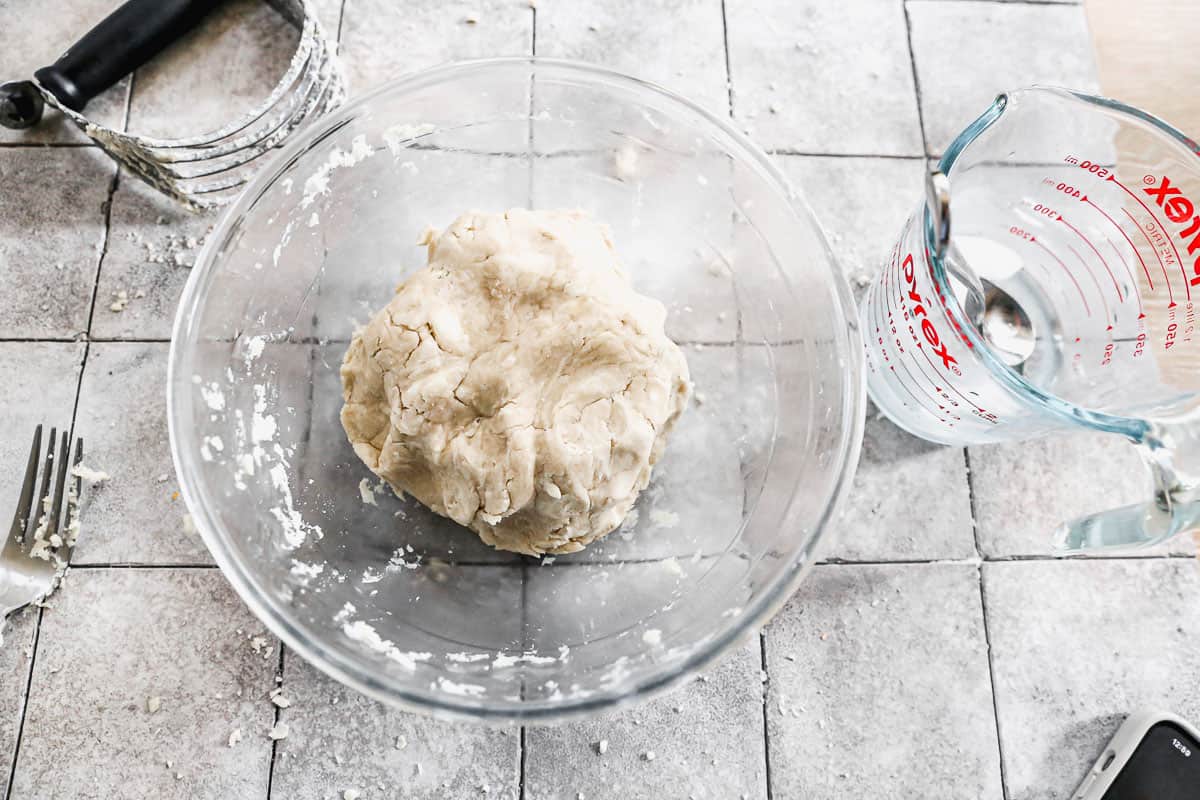
Divide into two equal pieces and flatten each into a disc.
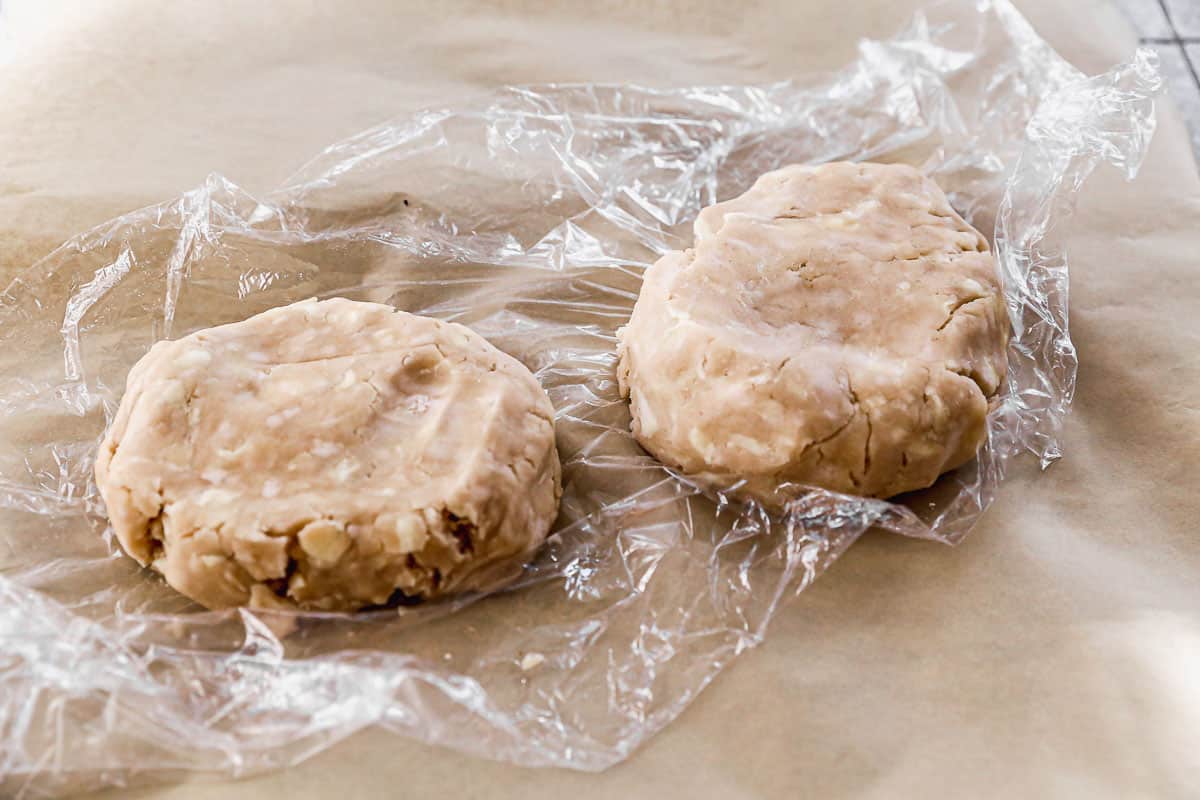
Refrigerate/Freeze: Cover the dough well with plastic wrap and refrigerate for at least 2 hours or up 24 hours. You can also freeze the dough at this point. Place the wrapped disc of dough in a freezer ziplock bag and freeze for up to three months. Thaw overnight in the fridge before using.
How to roll out Pie Crust:
Prepare: Find a large, thin hand towel or cloth and get it barely damp. Lay on countertop and place a large piece of parchment paper over it. (The damp cloth will keep the parchment paper from sliding around as you roll out your pie dough). Remove pie dough from fridge and dust both sides with a little bit of flour. Place on parchment paper.
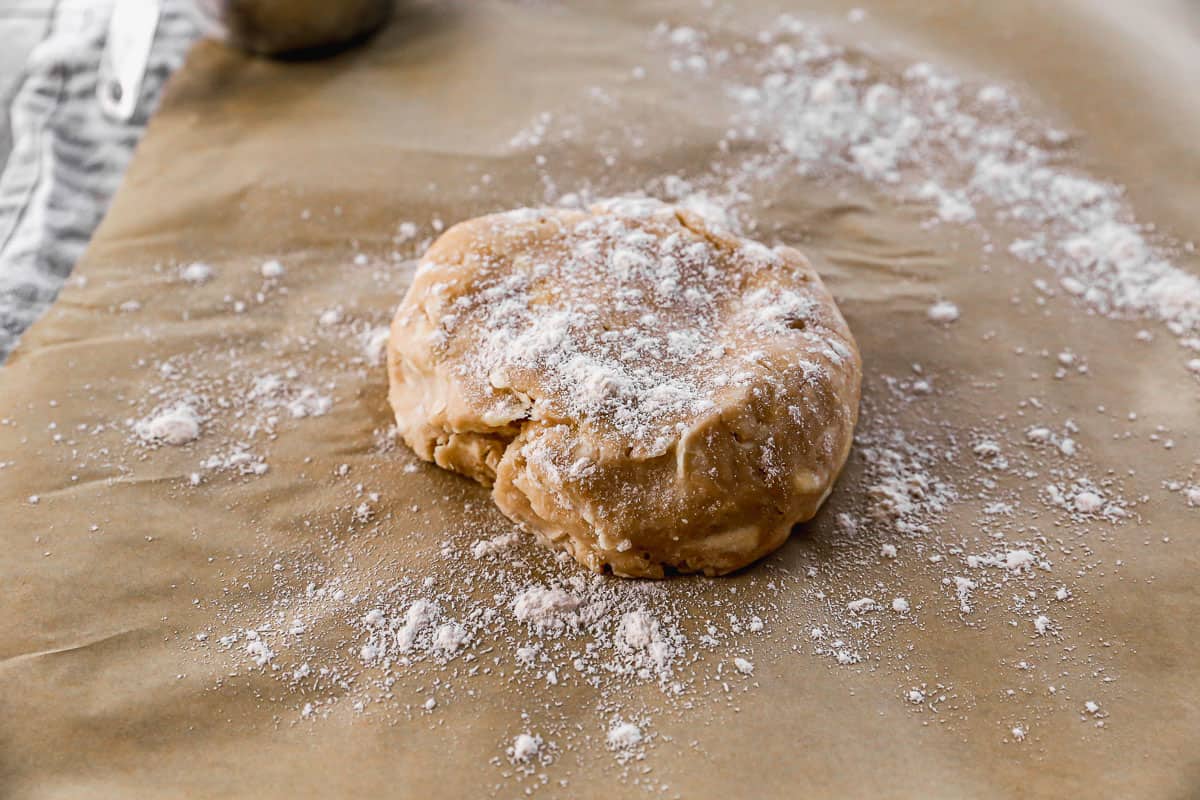
Roll Out: Use your rolling pin to gently press the pie dough out into a large circle. Always start at the center of the crust and work outwards. You want your crust to be thin, and a at least 1or 2 inches larger then the size of your pie tin.
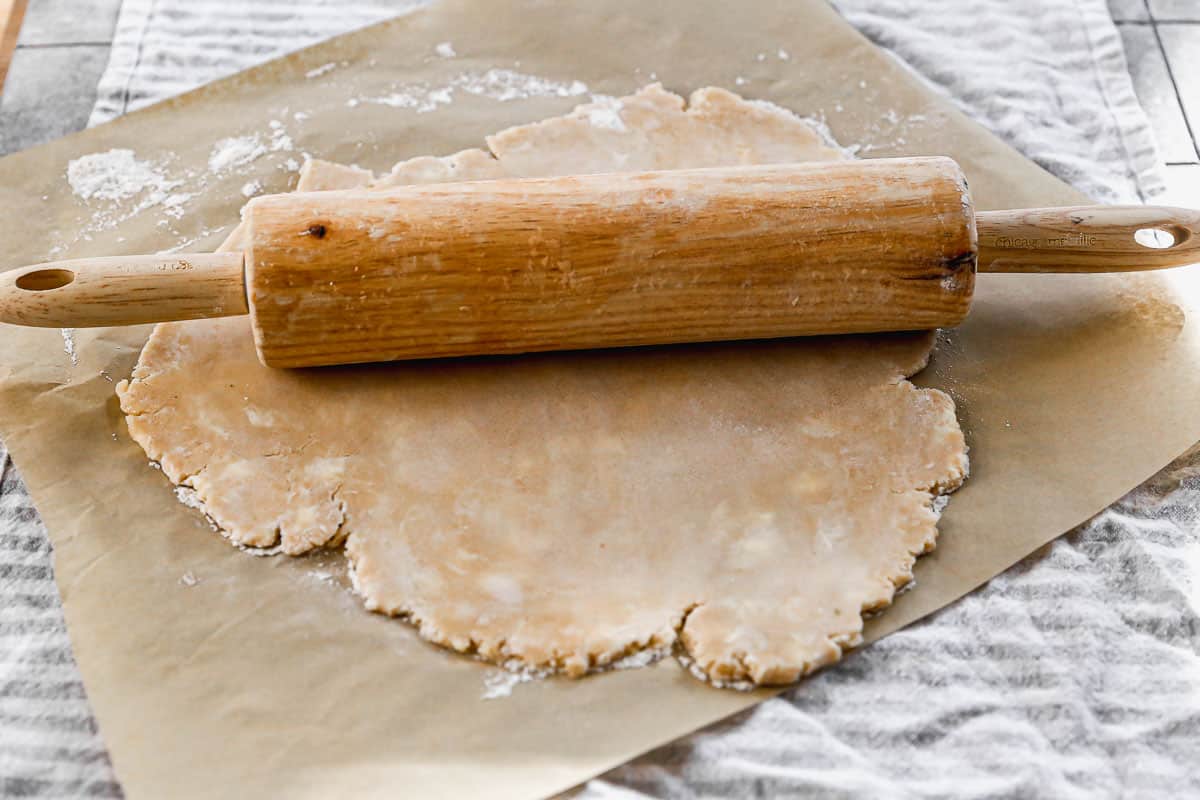
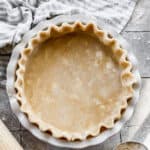
Transfer into Dish: Place pie pan next to the rolled out pie crust. Lift the crust placing a hand underneath the parchment paper and gently flip the crust, guiding it into the pie pan. Settle the crust into the bottom and sides of the pan, then gently peel the parchment paper off.
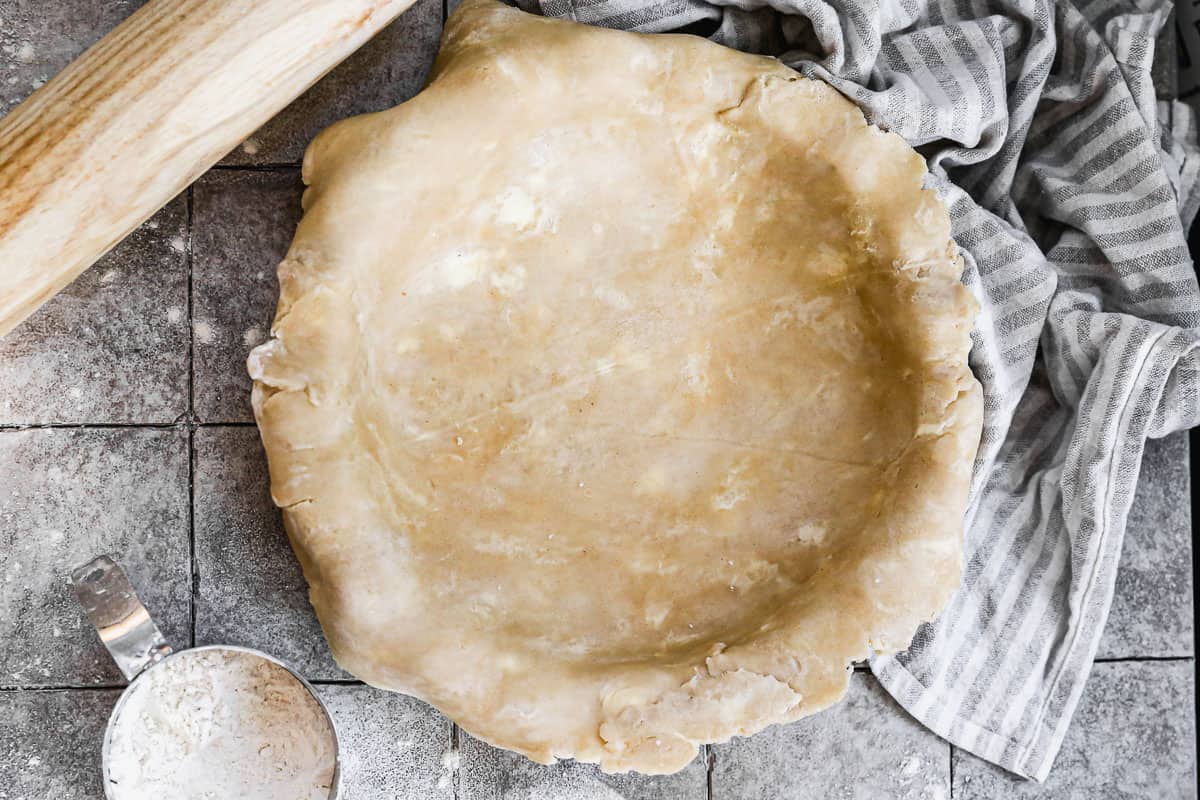
Trim and Crimp Crust: Leave 1 inch overhang of excess crust around the edges, and use a butter-knife or kitchen scissors to trim anything larger. Fold the excess crust behind the outer edges to create a thicker crust border. Crimp or flute the edges, if desired.
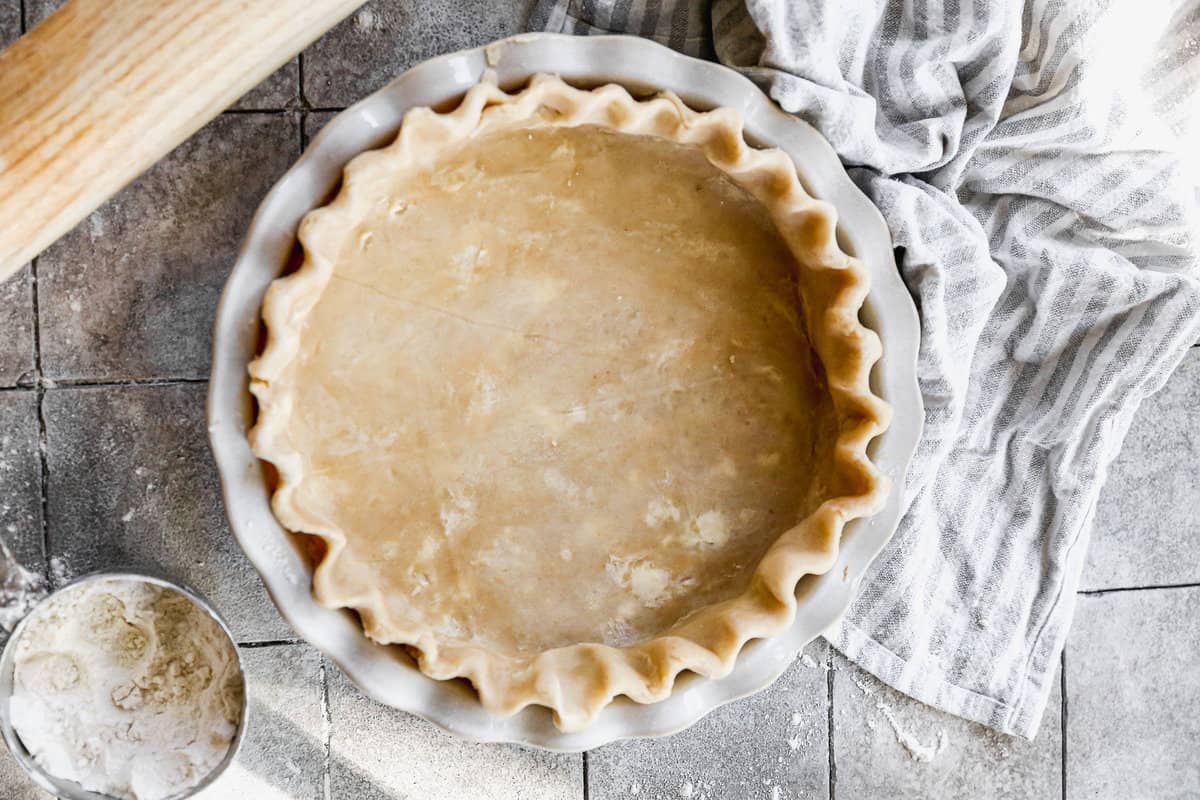
Fill or Bake: At this point you can proceed and pie filling that requires baking (like pumpkin pie) and bake according to recipe instructions. Or, blind bake the pie crust to use in pie recipes that call for a pre-baked pie crust (like a pudding pie or this lemon sour cream pie).
How to blind bake Pie Crust:
Why do I need pie weights? When blind-baking your crust, always use pie weights! You can use dry beans, dry rice, or pie weights. Pie weights help the pie crust to keep its shape. If you bake your crust without pie weights you risk the crust shrinking and shriveling down into the bottom of the pan.
Fill with Pie Weights: Place a large piece of parchment paper inside unbaked pie crust. Pour some dry beans, rice, or pie weights onto the parchment paper and smooth into an even layer.
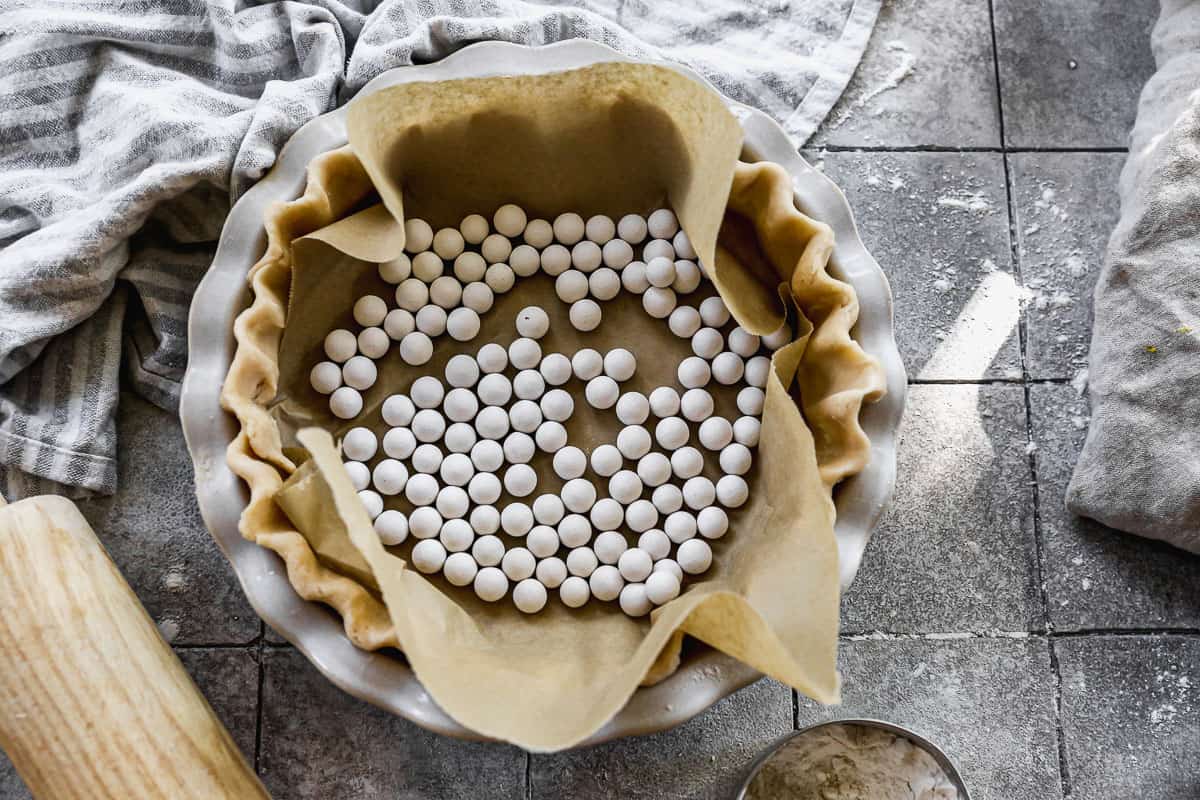
Bake at 375° F for 15-20 minutes. Remove the pie from the oven and lift the parchment paper and weights out of the crust. Prick the the bottom of the crust all over with a fork, then return the pie to the oven to bake until lightly golden, about 10-15 more minutes.
Freezing Instructions:
To freeze pie crust dough: Prepare the pie dough, wrap the dough discs tightly in plastic wrap and place in a freeze ziplock bag. Freeze for up to 3 months. Thaw in refrigerator before rolling out.
To freeze unbaked pie crust: roll out pie crust and place in a freezer safe pie dish. Cover well and freeze for up to 3 months. Thaw in the refrigerator before filling or baking.
To freeze baked pie crust: Allow blind baked pie crust to cool completely. Cover well and freeze for up to 3 months.
Uses this Pie Crust recipe to make:
- Quiche, like Broccoli Cheese Quiche or Quiche Lorraine
- Savory pies like Chicken Pot Pie, Tomato Pie or Garden Vegetable Pie
- Triple Berry Pie
- Lemon Meringue Pie
- Lemon Sour Cream Pie
- Pumpkin Pie with Caramel Pecan Topping
- Pecan Pie
- Cherry Pie
- Apple Pie
- Coconut Cream Pie
- Peach Pie
Follow me for more great recipes
Recipe
Perfect Pie Crust
Ingredients
- 2 1/2 cups all-purpose flour
- 1 teaspoon kosher salt
- 6 Tablespoons cold unsalted butter
- 3/4 cup vegetable shortening chilled
- 1/2 cup ice water
Instructions
- Mix flour and salt in a large mixing bowl. Add ice cubes to a measuring cup and fill with ½ cup cold water. Set aside.
- Add fats: Grate frozen butter into the bowl, or cut it into small pieces. Add chilled shortening and use a pastry blender or fork to cut the fats into the flour until well combined and resembles coarse crumbs.
- Add ice water a spoonful at a time, mixing until the dough begins to come together. Be careful not to over mix, and you may not need all of the water.
- Gently mold the dough into a ball, then divide it into 2 equal pieces. Press each piece gently with your hands into a flat disk.
- Refrigerate: Cover with plastic wrap and refrigerate the dough for 2 hours, or freeze for 30 minutes.
- Roll out Crust: Dampen a large towel or cloth and lay it flat on your countertop. Place a large piece of parchment paper over it. Lightly flour both sides of the pie dough disc and set it on the parchment paper. Use your rolling pin to gently press the pie dough out into a large circle. Always start at the center of the crust, and work outwards. You want your dough to be thin, and about ½ inch larger then the diameter of your pie dish.
- Place in pie pan: Gently turn the dough into your pie dish and remove the parchment paper. Settle it smoothly into the bottom and sides of the pan. Trim and crimp the edges of the crust.
- Fill with desired pie filling, or blind bake the crust for recipes that require a baked pie shell.
To Blind Bake Pie Crust:
- Place a large piece of parchment paper into the bottom of unbaked crust. Pour some dry beans, rice, or pie weights on top and smooth into an even layer.
- Bake at 375° F for 15-20 minutes. Remove the pie from the oven and lift the parchment paper and weights out of the crust. Prick the the bottom of the crust all over with a fork, then return the pie to the oven to bake until lightly golden, about 10-15 more minutes.
Notes
- To freeze pie crust dough: Prepare the pie dough, wrap the dough discs tightly in plastic wrap and place in a freeze ziplock bag. Freeze for up to 3 months. Thaw in refrigerator before rolling out.
- To freeze unbaked pie crust: roll out pie crust and place in a freezer safe pie dish. Cover well and freeze for up to 3 months. Thaw in the refrigerator before filling or baking.
- To freeze baked pie crust: Allow blind baked pie crust to cool completely. Cover well and freeze for up to 3 months.
Nutrition
Did You Make This Recipe?
Tag @TastesBetterFromScratch on Instagram with #TastesBetterFromScratch!
Follow Me
UPDATED November 2016, March 2018 and November 2022.
*This post contains affiliate links. I like to share my favorite products with you!
This post contains affiliate links.

Hi Lauren,
I just made the pie crust and I wanted to know why do we have to keep it in the fridge for 2 hrs before we use it?
Thank You,
Maria
I have never chilled the dough and never used cold water for pie crust. Milk makes it so much more flakier and tender.
Just saying
Hi Lauren, can this recipe be doubled to make 2 double crust pies?
Yes!
I have never chilled the dough and never used cold water for pie crust. Milk makes it so much more flakier and tender.
Just saying
Lauren does this recipe work for 10” pie plates or just 9”?
Hi Liz, the crust makes enough for two 9” pie plates.
I looked for weeks to find the best pie crust recipe for my Thanksgiving pies and found it here! I love the texture you achieve with the mixture of butter and shortening. Absolutely will make again! I used the dough right away this time. Will have to trial it after freezing next time!
I love how easy the instructions are! Great tips. The best part is all the recipes you have for fillings!
Can I just skip the pie weights and insert immediately the cake mix inside the pie crust and then bake straight until both (pie crust and cake mix) are ready?
YUM, YUM, YUMMMM!!!
This recipe is amazing! I hadn’t made pie crust from scratch in 10 years because it was just such a frustrating endeavor. But the damp towel and parchment paper is the trick I had been missing, and the flipping it over literally changed my life.
Taste-wise, I thought it was too salty though. Next time I will cut the salt down and add some sugar. Still giving this recipe 5 stars since lots of people like a little salt to counter sweet pie fillings.
This has become my go-to pie recipe. The dough rolls out easily and is easy to transfer. It bakes perfectly. From frozen works just as well.
I decided to try this pie crust recipe after 5 years of using my go-to recipe and I think I’ve been convinced to switch! I loved working with this dough much more than the one I had been doing before, and it worked so well with my pie.
This was a super easy recipe! I love how there are the instructions on how to freeze it 3 different ways! Thank you!
I’m usually a box mix pie crust girl but decides to try this recipe. I’m so glad I did! It was super easy to follow. I ended up using my food processor instead of doing it by hand and it still worked perfectly! The crust was light and flaky and delicious!
The texture is great – it definitely delivers on light and flaky. But the 2 to 1 ratio of crisco to butter makes it kind of flavorless and it leaves that kind of film in my mouth I always get from hydrogenated oils. Perhaps I could find a more flavorful substitute for the shortening, or even out the ratio next time I try.
Follow up to my 1st review. Pie came out of oven really bad. Bottom crust crumbled. With all the good reviews I figured something had to go wrong. So I went back and went over how we did everything. Turns out that the crisco was measured wrong. Too much was used and that’s why it was so soft and did not set. Will try again. Thanks
Turned out amazing! Delicious and flakey. I made banana cream pie and chocolate silk pie with the crust. The recipe was great
Ok… I’ve made this recipe many times now. It is literally perfect. Lauren has updated the recipe with so many great tips to make pie crust making so easy. The roll out technique – the best!!! Loved the video. I was giddy and so grateful (and wishing I had this recipe years ago) as I was rolling out the crusts for the TBFS pecan pies for our Thanksgiving feast.
I have my usual go to pie crust recipe. But I like to try different ones. I did not like this recipe at all. I followed all directions and the dough was to soft. It kept cracking and I could not pick up the crust with my rolling pin like I usually do. I had to use parchment paper. It did not want to hold its shape on my edges. I popped the dough in the freezer before I filled it while the stove heated to temperature. I put foil around edges to keep from getting to dark. Near the end of baking I went to take off the foil and found that 1/4 of the edging fell off.
So yummy! I was surprised how easy it was to roll out even after resting in the freezer for an hour. Light and delicate with flaky layers. It was perfect for my quiche and apple pie.
See my post @cbear9264 for pictures and November recipe challenge.
Hi there! So glad I found your page. I just made this on Sunday as a trial run for Thursday. I made enough for two. I used one for the trial pie, which was gone in 5 minutes. My friends loved it! But do I need to toss that second disc? It’s already Thursday tomorrow and I’m new to this baking ordeal so I do not know the rules to save or throw out. I am recently finding out some can only be saved for up to two days. Is it too late? It’ll be 4 days tomorrow…. Thank you!
I was excited to try this, as it had some differences from the pie crust recipe I usually use… I’ve never refrigerated crisco, grated butter into it, used ice water, or refrigerated the crust before rolling it.
The instructions were very easy to follow, and it worked out nicely. The parchment paper was extremely helpful because I usually break the crust as I’m putting it in the pie plate.
I used this crust for a pumpkin pie and a cherry pie. Both turned out well and were delicious! I will definitely use this recipe again!
I made these for the November challenge…took pictures, but I don’t see anywhere here to include them.
Wow, it’s so awesome to hear how well the pie crust recipe worked out for you! 😊 Grating butter and using ice water can really make a difference, right? And parchment paper is a game-changer for sure.
I’m super curious to see how your pumpkin and cherry pies turned out. It’s great that you took pictures! Could you please send them over to us at admin@tastesbetterfromscratch.com? We’re really excited to check them out and maybe even feature them! Thanks for diving into the November challenge and sharing your experience. Can’t wait to see your delicious pies!
I had a little bit of difficulty with this recipe. The dough came together very quickly once I started adding water so I did not even use half of the water that the recipe called for, but when I tried to roll the dough out after chilling, it seemed like the dough was quick to crack, especially when I tried to transfer it to the pan. May just be my fault for not adding enough water at the beginning!
I had the exact same problem
Is this recipe big enough for a Deep Dish pie plate, or do I need to adjust the ingredients?
Yes, it is.
I keep coming back to this recipe because I love how flaky it is and the taste. It does tend to crumble when I roll it out. Do I need to add more water?
Yes, you may not have added enough ice water (or that can happen if the fats were worked in to much). I would dab ice water onto the areas that are cracking, to smooth it out, and continue rolling.
Thank you for answering! This is my favorite tasting pie crust and it doesn’t go hard like every other one I’ve tried, so I’m going to get it figured out. 🙂
I made this “Perfect Pie Crust” by watching the video and following the tips. The pie crust had the perfect blend of a buttery-crisp taste that paired greatly with the Brazilian chocolate fudge I made. My husband and I enjoyed it for our anniversary dessert. Thank you for this wonderful addition to a homemade dessert. I have often been intimidated with making a homemade pie crust—not anymore!
Great recipe! The only problem I had, and it was totally my fault, was that I needed to cut the butter a little more. I had some bigger pieces that melted and let the pie filling through so some parts of the pie had crust in the middle. 😂 It was the easiest crust I’ve ever made. I’ve failed at crusts many times. This recipe is a keeper.
This was SO FLAKY and flavorful!! I made a salted apple pie for our staff pie bar and people RAVED. I got to have a little taste and honestly, I will never use another pie crust recipe again. Easy to follow instructions, came out perfect. Winning!!!
I love to bake but have never had success with a pie crust & had decided it’s just not my thing. Then I tried your recipe with these step by step instructions last night and it actually worked! I guess I’m a pie maker after all:) Thanks to you!
I made your crust and used your apple pie recipe and I couldn’t believe how wonderful everything turned out! Great recipe with ease to follow along! Will be my go to from now on!
Thank You
My go to recipe for pie crusts! The shorting and butter are really what make it so delicious and flaky. Sometimes if I want to really bring it up a notch I will use buttermilk instead of ice water
So helpful! I made my first pie last month using a less descriptive pie recipe and it was a total flop. It took hours and even still it looked a mess. I followed this one last night with my mom and it was like magic! It was so easy to follow along and tasted great. Definitely going to keep practicing!
I love your recipes. They’re always so good, well thought-out and so well written, which I really appreciate. Thanks!
This came together so well! My pie on the other hand… 😆
I used this recipe to make the crust for my berry crumble pie and it was just perfect. It was tender and flaky and held up nicely to the juicy berry filling. It came together so easily and I am happy to have the other one for my Thanksgiving pie already made and ready for me in the freezer.
Can this recipe be stored in the fridge overnight for say if I wanted to pre make it and use it the next day? I’m trying to avoid the hassle of having to thaw it out after freezing.
Yes, absolutely. It will stay good in the fridge for 2-3 days.
So if its been in the fridge for about 5-6 days it should be tossed and restarted?
Is it grey/brownish at all? If it looks good and smells good it’s still good!
I tried this crust for a pumpkin pie. I used one crust for the bottom and the other crust to cut out fall leaves for decorations on top. This is so delicious and it turned out great!
We loved the pie crust.
Does the recipe make two pie crust?
Yes! If you only need one, you can freeze the second.
Can I leave the discs in the refrigerator overnight and roll them out the next day?
Yes, for sure.
I have never attempted pie crusts so I was pretty nervous to try this recipe, but the instructions were so easy to follow and the crusts turned out AMAZING. I made a chicken pot pie and now I can’t wait to try out some dessert pies this fall. The best recipe!!!
Omg! Nice to be able to make dough ahead of time. And loved the new way to flip the rolled crusts (parchment paper over slightly damp towel), wish I had thought of it years ago. Putting pie dish on ore-warmed cookie sheet? No soggy crust even into day 3!
Would I be able to use lard instead of shortening?
Yes, that would be fine.
Can I replace vegetable shortening with butter? I try to avoid it.
We’ve had the best results with the combination of shortening and butter but you can use all butter.
This was the first time I have tried to make scratch pie crust, and I have to say, I was truly impressed! This turned our beautifully and the instructions are flawless. Thank you for a recipe I can honestly say will become my ” go to” answer for all my pie crust needs. No .ore store bought crust for me!I have graduated to the big leagues!
We made this, following the recipe somewhat, but more using the ingredients from this recipe and my wife making it according to how she’s accustomed, and it turned out great. definately a winner!
Not sure what I did but my crust fell apart so I patched it in the pie pan it was really tasty tho
Why do you put it on a damp towel to roll out vs just putting Parchment directly on the counter?
You can do that, but the towel keeps the parchment from sliding around while you roll out the crust.
For Blind Baking, you mentioned that after baking to ‘remove the pie from the oven and lift the parchment paper and weights out of the crust. Prick the bottom of the crust all over with a fork, then return the pie to the oven to bake until lightly golden, about 10-15 more minutes.’
Would I prick the bottom of the crust if I’m going to make a Custard Pie? Would the Custard seep under the crust through the holes and make the crust soggy?
Yes–the tiny pricks just allow steam to escape so the crust doesn’t bubble up it wont effect the the pie when the filling is added.
I love this pie crust recipe. My newest trick is to add garlic powder, parsley, and shredded cheddar, and use it for beef pot pie!
Honestly, this was the first pie crust I’ve ever made that hasn’t fallen apart, and that’s pretty rad. A+
You are my CHOCOLATE recipe source!
By far the best pie crust ever! And trust me, I’ve had a lot of flops. My favorite filling so far is the luscious Triple Berry which gets unanimous raves. Thanks for sharing!
WONDERFUL !!!!!!!!!!!!!! Thanks
I’ve used this recipe several times now. I’m young and new to cooking, but this has made my experiments with pies very successful. Will continue to use in the future.
You can use lard or do all butter.
That’s a really cool thing to know. It also makes sense that lard would work since shortening is pretty much just vegetarian lard.
I’ve used this pie crust recipe a few times in the past and it always comes out perfectly! Can’t thank you enough for this game changer.
But, I do have a question. Can I make the crust the night before, put it on the pie plate, cover with plastic wrap, leave the other in disk form and in plastic wrap (it’s for a turkey pot pie. Gotta use up those leftovers!), and just resume the recipe tomorrow late afternoon?
It’s just tough for me to get this all done, baked, and properly rested before 6pm, our preferred dinner time. Thanks!
Yes, that’s fine!
Delicious! Thanks for the recipe!
Turned out great. Flaky and good flavor. Easy to make.
Made my first pie crust with THIS recipe! Followed the recipe to a T. Pie turned out SO yummy. Thank you, thank you!!
I made this and it’s aptly named! I used your pumpkin pie recipe and also made a buttermilk pie. Using the dish towel and parchment is genius, and the crust doesn’t overbrown like the store bought ones do. So flaky!
I am making Buttermilk Pie today. I only have salted butter. Should I reduce salt to 1/2 tsp.?
That sounds so delicious!! yes just decrease the added salt! Enjoy!
I have been making pies my whole life and always used the same crust recipe. I finally decided to try this one and I will never go back!!! It is so flaky and delicious. I have made it for pumpkin, apple, and chicken pie and it works great for all those!
This was so easy! Easy to roll and is now my perfect crust recipe. The parchment paper tip is the bomb! Love your site and your cookbook — it resides on my counter in a place of honor and every recipe I’ve made, my hubs said is a keeper! THANK YOU!
THANK YOU!! We can’t tell you how much it means to all of us!
I am using this for the vegetable pie for Thanksgiving. It calls for a baked crust. How long will it last baked if I don’t want to freeze it? Also I made this for the chicken pot pie. It was delicious. I had never made a pie crust before, and I usually don’t like them.
Baked pie crust is good in the fridge for about 3 days when it’s covered!
What can I use instead of all purpose flour to make this gluten free?
Gluten free flour is not a good substitution for this recipe. Here’s a gluten free pie crust that might turn out better for you. https://glutenfreeonashoestring.com/extra-flaky-gluten-free-sour-cream-pie-crust/
Do you think this could be done with a stand mixer instead of by hand? I have a lot of pies to make this year and trying to save some time and arm strength haha
It can but be careful to not overwork the dough!
I’m saving this recipe for next thanksgiving too! I pre-baked it before baking my pumpkin pie and it turned out perfect. Super crisp and flaky, even after the pie has been sitting in the fridge overnight! No soggy bottoms here!!! I used margarine instead of butter because that’s what I had. I also covered the edges of the pie with foil after the pre-bake and it came out perfectly golden!
You lost me at shortening. Can I use all butter or I will have to look up another recipe? Thanks. I will try the filling.
Yes, you could use all butter.
I have used this recipe for years! It never fails me. Always a great crust and bakes well!
This is my first scratch oie crust. I’ll let you know how it turns out.
Can you use all butter for this recipe? Not a shortening fan and wanted to try the recipe out.
Yes, that’s fine.
This crust came out perfect. It was flaky and delicious. I have tried many times to make a good pie crust and this is the first time I feel like I succeeded. Thank you.
I am the pie maker for my husbands family get togethers. I was wondering if there is an easy way to transport the crust already made. I was hoping I could just freeze it in the pie pan ready to be filled when I get there. I would put it in a cooler to keep cold since it is a 6-7 hour trip. Any suggestions? I would make them there but they lack things I need in their kitchen and usually I have to get up early to bake the pies because they want to cook the turkey.
These bakery boxes are my favorite! https://amzn.to/3QE49Y1 You can completely make your pie, put it in the container and they stack well and fit in a cooler! (I use freezer ice packs, with a dry rag over them, so the boxes don’t get wet.
Thanks for sharing the recipes. I plan to try some soon and kick my recipes up a notch.
On your pie crust, I love how you use the moist towel under the parchment paper to roll out, and then you only roll the dough enough to barely go over the rim of the pie plate. I hate to see the cooks on TV roll out their crust so it is inches over the plate edge, why? Such a waste (of course I would bake that and put jam on it). Then you fold the extra to the inside before you do the fancy edge, fascinating! You know your stuff. I never thought to do that before.
The instructions for your recipe are good, but I modified them based on my taste. My last tomato pie turned out soggy at the bottom. I didn’t know about blind baking, thanks for those tips. I am looking forward to eating tomato pie and using more of your recipes in the future.
Best pie crust ever!
I just left a comment on your Triple Berry Pie recipe, but wow this pie crust came out amazing! Next time I’m going to roll it out thinner so that I can make the crust larger. But it came out beautiful!
If you’re worried about the lattice crust breaking while your working with it, just patch it together as best as you can and pop it in the oven. It ends up looking rustic and stunning.
I was worried about the pie being under-baked so I left it in for an extra 5 minutes. It came out perfect!
love your Pie crust recipe
makin a granny smith apple pie
thanks Lauren Allen
Can I use a food processor for this or should I stick with a pastry blender?
You can if you want!
I’m just about to make this but wondering if I can put this in the fridge over night and use it tomorrow to make a berry pie?
Yes definetly.
Hi Lauren,
I froze a pint of half and half a month ago and wonder if I can use it in my pumpkin pie or mash potatoes. Not sure what freezing would do to it. Thanks for any advice.
I’m looking forward to making some of these recipes.
I followed your pie crust recipe but added one tbl sugar.I wash the crust with a mixture of egg and milk to get a golden color.Made apple pie.I got a large and a small pie out of the recipe.Beautiful looking and great crust.
This pie crust recipe was perfect – flaky, light and delicious. Great recipe and step-by-step instructions. Thank you 🙂
AHHHH! This is sooo good!!! All the other recipes were crumbly and confusing! I decided to use a mixer when mixing, and it made it really easy to mold faster! I Made some pumpkin pie with this wonderful flaky crust! Thank you so much for this recipe!
Delicious and such an easy pastry recipe. I’ve baked for years and never really perfected pie crust until I used this recipe. This is my go to all the time and have recommended it to friends and family. If you are afraid of making pastry, worry no more!
I want to try this soon . My question is do I double this recipe to make enough for a 9 by 13 “ cobbler crust ?
No, one recipe would be plenty!
Very easy and tasty pie crust! Will likely use this recipe again.
I have made it twice and both times it was too crumbly to transfer to the pie plate. What am I doing wrong?
Add more water until it comes together into a dough ball.
I put parchment paper on top, twisted it around, placed it in my pie pan, and then pulled the paper off and molded it! But to me using a mixer is much easier.
I put a another pie plate inside the pie crust to bake and then remove for another 5 to 10 minutes. don’t have to mess with rice and works great!
Kathleen, I saw this idea before for skillets for other foods, good idea for blind baking pie crust. I believe once you use something for blind baking, like beans which I have used they no longer are good for cooking. Not sure about that though.
I have made this recipe a few times, and I love it.
Hi… Pie was the first thing my Mom taught me to make….I’m OVER 80 now. We always used butter AND Crisco. I was known for my pies…always delicious. I think Lemon meringue was the favorite. I used wax paper to roll out my layers, didn’t have parchment back then. In fact I rolled between 2 layers of paper & was able to transfer to the frig easily before baking. Ahh…memories, the best. Nancy
You sound just like me. I could have written your review. Only difference was my Mom taught me to use all Crisco but some years ago I switched to butter and Crisco – much better. How did we get to be so OLD! Don’t feel like it. Yes…memories. Betty
Betty, my mom made the best pie crust, biscuits, and Yorkshire pudding using no recipes, scoop here, slop there (Crisco). She was British if that matters and that is how she learned. Me? I follow recipes to the core, cannot get decent anything. I will try this recipe as soon as I use up the 3 boxes of pie dough in the fridge. Ha, ha… OK, not funny.
Made it two times, both with your triple berry pie and one was delicious 2nd one in the oven right now. First time I didn’t have enough dough for the whole lattice, and the second time I made extra and I had enough. This is my definite go to!
Can this pie crust recipe be used for lattice crust?
Yes! It makes enough dough for two crusts– one for the bottom and one for the lattice top crust.
I should have added more water. Still learning. But the flavor was great and I will definitely use this recipe again
Great crust. First time making pie and recipe was easy to follow. Everyone I have given it to has loved the lemon sour cream pie. Thanks.
Great crust but next time I’ll make 1/2 again recipe.
I never have quite enough.
Maybe most recipes are for an 8” pan?
Mine are 9 1/2”.
So far, I feel that this recipe has failed me… after I rolled the dough, it fell apart when I went to transfer into the pie plate (sob!)… I went ahead & pieced it back together & then I baked it… still looks rather sad… It is the crust for a banana cream pie so I will proceed, but I am not feeling very confident…
This is the best pie crust so far that I have tried. I was pleased!
Thanks for all of this. I’ve been struggling through, along the years, a few pies here and there, and I was at the level of reinventing the two parchment sheets as key of no stick.
However, I did not see the “soft mat”, the towel, underneath of the above is the trick. Believe me, I’ll be trying this “very soon”. The development of the two parchment sheets is key in this progession.
After the notion of no stick with parchment became clear, a search found you. And there it is. The rest of it!
Not sure what happened- I followed this recipe exactly and it was an epic fail. Rolled out okay, but wouldn’t lift from the floured surface without crumbling all over the place. I ended up just pressing the dough into the bottom of the pie pan. For the top crust, I was able to do a lattice top. But the only way I could get any of the strips to stay together was using a butter knife to slide under it and very carefully moving it to the pie, but even that was a mess. After cooking, the crust just crumbled to the touch like powder.
I think I’ll be sticking to my traditional pie crust from now on.
Talia, Go back and note she used a sheet of parchment paper under the dough, it makes a world of difference. There is an old saying, “measure twice, cut once”, always read the instructions over until they feel familiar.
Hopefully me and my daughter will be able to make this, she does her school classes online and takes culinary, her teacher ask them to make something from stratch and record it and send it to her. Thanks and Happy Thanksgiving.
I’m a recent widower who needs/wants to learn to bake and cook. I’m not afraid to try things so this is exciting. After making sure that I have all ingredients necessary I will do this; and I’ll let you know how it turns out. I’ve already made a pumpkin pie using a Kroger crust. It was ok; but I’m not satisfied. Here goes!
This was fantastic pie crust. I did need to add about 2 Tablespoons more water.
The tips about chilling and blind baking were very helpful, Thank you,
Excited to make this. Does the recipe make enough for a lattice top? Or should you make more to have enough?
This recipe makes 2 pie crusts–so if your pie recipe calls for a lattice top, then yes, you can use one for the bottom and one for the top.
Looking to pre-make the crust but not pre-bake it…like, prep the crust the day before I want to bake my pie, so the crust will be ready to go. Can I just stick the dough balls in the fridge, tightly wrapped, and then roll them out next day when I’m ready to bake, or will the ingredients go bad overnight?
Yes, you can do that several days of head of time!
I don’t have any unsalted butter, will regular work or will it be too salty tasting?
Yes, just reduce the salt by about 1/2 teaspoon.
I loved how light and buttery and very easy to make. Also the crust hold together nicely!!
Hey there,
So do you just keep a can of Crisco (or other shortening) in the fridge? Will it make the shortening go rancid more quickly?
Also, do you spray the glass pie pan with cooking spray first? Does the pie crust stick to the sides of the dish?
One of my goals this year is to learn how to make a good homemade pie crust, so I appreciate your step-by-step instructions!
Thank you-
Lauren in NC
Store crisco/shortening at room temperature. No need to spray the pie pan first. 🙂
If the Crisco is stored at room temp, do you refrigerate it before making a crust? Recipe calls for chilled shortening and butter?
Yes, I stick the shortening in the fridge or freezer for a little while until cold.
LOOKS Awesome 👍🏼👍🏼♥️👏🏼Thank You For Sharing! I Found Print Button FOR Recipe 😱🥴 and Pinned To my Desserts 👍🏼G-d♥️Bless😊
Lauren if all possible I’d like the recipe for your sour lemon sour cream hi. I used to buy a mine from Marie Callender’s but a lot of them closed down they’re hard to find. Thank you I would appreciate that Jackie Morgan
Here is the recipe for the lemon sour cream pie!
I just tired this recipe tonight in place of my normal crust recipe for my chicken pot pies and……..
This pie crust recipe was by far the most delicious recipe I’ve ever tried. I bake pies all the time for family and friends and have always used my Aunt Carol’s recipe. Which was pretty good. However, this beats it hands down. Sorry Aunt Carol, but this is going to be our favorite from now on. It is tender, flaky, tastes so good and what’s more so easy to roll.
Thank you so much for sharing this recipe.
Hi Lauren,
Thank you for the recipe. I have tried this pie recipe 3 times now, I really enjoy the flaky texture of it and so does everyone who has eaten the pies I’ve made. The trouble I’m having is that for some reason it always crumbles/breaks on me when I roll it out and when I’m trying to place it over the pie dish:( I find it brakes once I try moving it. I’m not sure if I’m not adding enough water, but I find when I add too much water it becomes sticky.
Any suggestions on what I can do to resolve this issue.
Thank you,
Jess
Hi Jessica, yes I would add more water if it’s crumbling, then be sure to give it adequate time to rest in the fridge. If it’s sticky upon rolling out you can always smooth a tiny bit of flour over it while rolling.
Yes i’m having the same issue to the point that I can’t bake it. So not sure what to do now– add water and back in the fridge– seems like it will be overworked for sure then. : (
I have tenderflake which is lard, can I use instead of vegetable shortening? Or must I use the vegetable shortening?
Yes, that would be fine!
The crust tastes great but it shrunk pretty badly. I did the dry beans. A good layer. Did I not use enough? Would something else cause it to shrivel and lose its shape? It was so good until I baked it 🙁
It sounds like your butter got too warm–next time I would stick the crust in the fridge for 15-20 minutes before baking, and fill the crust full with beans. So sorry this happened!
Hi! I’m making this recipe into tarts for Mother’s Day! Would you have a recommendation for making the crust into 12 tarts? Do you think half the recipe would be enough for 12 tarts and freeze the other half? Should I roll the dough out or just form the shells with my fingers? Thanks!!
Hi Lauren, how big are the tarts? This recipe makes dough for two 9” pie crusts, so you could pull out a pie pan and use whatever size tart dish to help you determine if it will be enough dough. I’m guessing you’ll want to 1.5 or double the recipe. Sound delicious!
Great pie crust recipe and easy to work with. I wish I had taken a pic prior to baking though, never had a crust shrink so much? Too much water?
Hi Lauren,
Nice little website you got here. First time visitor. I’ve always had trouble rolling out pie crust. I will give it a try with your damp towel and parchment trick. I’ve been using boxed crust for so long to avoid the hassle. Thanks for your awesome content! -Ben from Detroit
What vegetable shortening do you recommend? Do you use Crisco, lard or something else?
I use Crisco!
Ok thank you!
For the blind crust can I put an extra pie dish on top of unbaked crust, instead of pie weights to hold the crust down?
Hi if I blind bake my pie crust today, do I refrigerate the baked crust or just leave on counter to finish making my lemon meringue pie tomorrow?
You can just leave it on your counter until tomorrow!
Hi! Does each disc that you regrigerate for 24 hours make one crust? Or do you combine the two discs into one before you roll it out?
Each disk is for it’s own crust! If you only need one, you can freeze the extra for another time.
I have made a lot of pie crusts in my life – this is very similar in process but was so flaky and delicious. I have some in my freezer for when hubby’s next pie craving hits.
Your recipe says the pie crust should be “thin.” I just bought a new rolling pin with measuring discs allowing crusts of thicknesses measuring 1/16”, 1/8”, 1/6”, 1/4”, or 3/8”. What thickness would you recommend?
I never measure it exactly, I just roll it out a bit bigger than the 9inch pie tin I’m using.
No never heard of it.I would love to try. Thanks
This is my go to pie crust. Love it. So flaky and good.
Hello Laura,
I am a teacher in China who works with university students. Surprisingly, pie is not a common dish here, so when I was looking for pie crusts, there were none at the supermarket, and ordering them online was a problem. So, of course, I turned to making my own. Your recipe is the most successful pie crust recipe I’ve used here. The students love the pies that I’ve made using it, and a few have learned how to make them. I am a loyal fan of your work. Thank you for helping me connect with my guys!
Do I have to use parchment paper?
– a last minute Christmas baker
If you don’t have parchment you can use waxed paper or just lightly flour your counter top.
This is a very wonderful video.
You never mention what size pie pan this recipe is for: this is critical.
It will make a double crust for two 8-9″pies.
I plan on making a mince pie that requires a top crust-do I double the recipe??
No, this recipe makes 2 crusts. 🙂
Good to know… so I just pinch it together?
Have you ever made banana meringue pie? My mom used to make it and I never had it anywhere else, just banana cream, which is a huge disappointment compared to banana meringue. If so do you have a recipe for it?
I haven’t! I have recipe for banana cream, and lemon meringue, but I’ve never heard of banana meringue! Is it similar to banana cream, with a meringue baked on top?
Please send me your banana meringue pie. I’m dying to try your recipe. Thanks
This pie crust came together so great and rolled out perfectly! I followed your blind bake instructions and it’s the first time they haven’t shrunk all up into a mess. I thought the first time was a fluke, but nope the second blind bake went perfect too! I used rice for pie weights. Now I need to get me some real pie weights! Thanks for the recipe and clear to follow instructions!
Love this pie crust recipe. Very simple to follow, can make ahead and turns out so flaky and delicious!! Thanksgiving go-to crust!
I’ve been making pie crusts using an old Crisco recipe. Lately hasn’t worked well. Maybe I’ve started to overwork.
Two questions. 1/Is this for a 9″ double pie crust or just a single? 2/What was the total shortening amount before you added the butter? (I’m comparing recipes)
Thank you
This is for two 9” pie crusts. 3/4 cup of shortening.
Perfect pie crust for an apple pie! Taste and texture were perfect. Easy to make!
Made three of these for Thanksgiving
This is THE BEST pie crust recipe I have used! Will keep it around! Thanks!!
This is the second time I’ve made the pie crust. I enjoy making my own crust now. Great recipe, and very simple to make. Also I bought my pie weights from Bed Bath And Beyond.
I still love to cook and I am old. I love your website it is not a mass of adds. So many I have to un-subscribe because they are just a ton of adds.
I love basic good food and that is what you offer so glad to find you. Five stars for sure
I tried out this recipe earlier this month, and really do love the butter/shortening combination! I tripled the recipe, and put some in the freezer; a few already rolled out in pie plates, and some in discs. I have used one of the frozen pie crusts (already rolled out in the pie plate) for pumpkin pie this week … it turned out beautifully, and was so very good. Thanks!!
It seems really good from the reviews, but what exactly do you mean by pie weights?
Pie weights are good to use when blind baking the crust, meaning baking the crust all on it’s own to fill with a pudding filling or no bake-filling. See the blind baking tips below the recipe card. You can buy pie weights online or just use parchment paper with dry beans or rice to weigh the pie down and hold it in place while it cooks so that it doesn’t shrink into the pan while baking.
Ant changes/tips for high altitude (5500 ft), baking?
You may end up baking for 3-5 minutes additional time.
perfect crust! straight to the point instructions and results, SCRUMPTIOUS! one question? do you just double or triple the ingredients to yield pie crust quantity or is there a different calculation? I want to prep 3 pies for Thanksgiving.
Best Regards
George
Thanks for the great feedback! Yes, I just double or triple the recipe 🙂
Have you ever used this crust to make a gallette? Any tips on that if so?
Yes, I have! Here’s the recipe and tips: https://tastesbetterfromscratch.com/peach-blackberry-tart/
How do you keep the sides from shrinking down?
Be sure the pie crust edge is really high, and be sure to refrigerate the blind baked crust before baking.
This pie crust was excellent! Really easy to make and delicious. I used half for a sweet potato pie and then I added rosemary and salt and it was a great base for a savory pie.
I tried this tonight and seemed like I had to much fat in the mixture.
I tried both on the counter and with parchment paper and couldn’t get it to transfer into the pie dish without breaking? Does the dough need to be really chilled. I’ve watched the video and seems like it doesn’t split on you? I’m having a hard time Because it keeps slipping. Any thoughts and tips?
Absolutely needs to be chilled, very cold.
Hi! I’m From Hungary, can you tell me what vegetable shortening is? Is this fat? Can i use coconut fat for shortening? 🙂
Vegetable shortening in US is often Crisco shortening.
I do not think Coconut fat would work, the melting points will be different. Sorry
It turned out great! I did find it rather salty, so next time I’ll only use 1/2tsp salt
I came across this recipe when looking for a meat pie crust, like for pot pie. Would you do anything different for a savory crust?
This is the recipe I always use for pot pie–it works great for savory as well! Enjoy
For your perfect pie crust, does 12 servings make the bottom of one pie or the bottom and top
This recipe makes enough dough for two crusts. (So you could use it for one pie that requires a top and bottom crust, or for two pies that only require a bottom crust.)
Can you replace the flour with an almond or coconut flour to make it gluten free?
A good tip for lining a loose bottom flan case is to roll the pastry out, place on to the bottom fold the sides in before placing it in the tin, no credit to me it came from the lovely Mary Berry here in the UK.
Thanks for sharing!
I am stranded at home with no wax/parchment paper, can I use thin foil instead? And this will be for blind baked crust.
Hi Nikki, foil will likely tear and you don’t want small pieces getting into your crust. I would recommend using your counter top. Just lightly flout the surface before placing the dough on the counter to keep it from sticking!
I like the shortening/butter combo. Makes perfect crust! I roll the chilled dough between two pieces of wax paper without flouring. When completely rolled I peel off the top wax paper layer; lay the bottom layer over the pie pan and gently peel off second layer. I fit the dough in the pan, crimp, trim and bake!
Can I use Lard in place of shortening or Unbleached Organic white all purpose flour? I don’t buy shortening.
Yes. I think it should work.
I have made my first 3 pies ever with this recipe. It’s the bomb. My inlaws think I’m a godamn pastry pie chef. Thanks. I do however wish that you would give me the best temp to bake fresh apple pie at. Thanks
Hahaha, that made my day! Thanks for sharing. For fresh apple pie, I’d suggest baking it at 375 degrees.
Can you half this recipe to make one pie crust? I just want to know that it will still turn out right 🙂
You can half the crust.
I love this recipe! Our results have been a little inconsistent, however… is there any chance you have measurements by weight for the flour? Thanks again for the awesome recipe!!
It’s been a very long time since I have made my own pie crust…been purchasing it from the store. Was pushed to shoved to make a pie today and no pie shell in the fridge…. Decided to go for it, I will never purchase a pie shell again.. It was perfect
That’s what I love to hear! Thanks so much for sharing!
First time making this recipe and it’s perfect!! I love it. My family and I are obsessed
I made this recipe twice and failed both times. I’m really in no position to rate it. I’m brand new to making crust and relatively new at baking in general. While the crust tasted good , both times it came out so that it would make a ball, but I couldn’t roll it out. It behaved almost like sand. I pressed it into the pie plate, but when it was finished baking it still was like sand. I made a coconut cream pie so I blind baked a single crust. I used the other half of the crust to make mini chocolate cream tarts, and while they were delicious, they exploded into crumbs in your hand when you took off the wrapper. The pie was also delicious, but there was work involved trying to get the sandy crust onto the fork. I did not use much water because it seemed to make a ball after just one or two tablespoons. The water and the fats were ice cold. I confess I used the food processor to mix it all. Could I have overworked it? I was very careful to limit the processing on the second batch. Same result. I have not yet made anything with my second batch, but I formed a sample of it into a thin cookie and baked it to see how it would come out. It’s still like sand. Having little to lose at this point except time, should I try adding a little more water to the dough I have yet to use. Or would that definitely be a waste of time and maybe I should just quit and cut my losses, or maybe try it still again. I hate to walk away from s challenge, but this is becoming my white whale. Do you know what I probably did wrong so if I try again I won’t repeat the same mistake? Btw, I tried following another crust recipe that I found on line and it came out great. So there’s nothing mysterious lurking in my kitchen other than an inexperienced baker.?
It sounds like the dough definitely needed more water. Hope you get to try it again 🙂
You need to do the blending by hand. Food processor blend it too much. And yes definitely add more water. The whole thing about the using fork is to keep the ingredients loose that way when u add water it will not form until ready. Good luck!! And never give up, make it into your own. You can change any recipe I to your own.
Hi I am new at making pie crust and had the same result as you. It all seemed ok until I baked the pies and the crust crumbled. It was only for home so no big deal, but I was going to look for another recipe. Next try I will use more water also.
The taste was worth the crumbled mess.
The best!
this has become my favorite pie crust recipe…and I’m known for pies!
What a great compliment! Thanks Linda!
I lost our childhood pie crust recipe and couldn’t recreate eventually giving up and buying the pre-made store bought crusts, those also were not very good. So I made berry crisp and while delicious, it isn’t pie. So I tried this recipe. The crusts from this recipe are better than I ever made as a child! Light and flaky and taste SO good! I had a suggestion that really helped from a pastry chef, who agreed that this recipe and instructions are excellent. He suggested that I use a cheese grater to grate the butter. I didn’t have 2 hours to chill the crust, he suggested putting it in the freezer for 5-10 minutes but insisted not cutting corners by not chilling the crust prior to rolling it out. I also cut up the shorting into small pieces both right out of the freezer. Made the mixing super easy. I am on my 3rd time using this recipe and love it! Thanks for bring pie making back into my life! I used the lemon meringue pie recipe – absolutely fabulous. Next up, Berry pie!
Wonderful Connie–I’m so happy to hear this and thanks for sharing your tips!
Hello! I would love to try your pie crust recipe tomorrow but I have a question before I begin – is vegetable shortening the same as margarine and if so, should I use the same quantities as you stated or a different amount? Thank you for your time!
Hi Tina,
Vegetable shortening and margarine are not the same thing although in general, you can substitute shortening for butter or margarine. It may slightly change the texture and flavor of the crust.
Delicious!
I’m 72 and this is the first pie crust that I’ve been successful with. I changed some of the ingredients out of necessity. I didn’t have shortening and never use it. I also used my 45 year old food processor to mix. I put the flour and salt in the then followed the scratch recipe. I did cut up the butter in small pieces before adding to the flour mix. This crust is delicious , very light and flaky.
So instead I used.
– 1 stick of butter
– 1/2 cup of avocado oil.
After decades of having “pie phobia”, I decided to try again with this crust and with your triple berry pie recipe for my family. WOW!! Okay, I used your ‘technique’ for the lattice pie crust because it was easy and crust rolling is still not a skill I possess: It was a bit ugly (no roll skill here! 🙂 but FANTASTIC!! The flavor of the crust was so incredible as well as the flake on that crust! It even held up to the day after test with the filling. Still delicious, super flaky and no sogginess whatsoever! This is an absolute winner! Thank you for such a fine recipe and directions. Now..if only you could help me with my ugly rolling technique! 🙂
I can’t tell you how much that means to me! I’m so glad you had success–it really is such a great pie crust recipe! Thanks for coming back to comment!
Hi, I am trying your recipe right now. The dough is resting. I have a question. I have to make a blueberry pie. Finding fresh or frozen berries is tough in my part of my country. I have a canned blueberry filling and dried blueberries. What should I do? Can I use canned filling and bake a pie or first bake the tart and then just add the filling?
You will want to add the blueberry pie filling to the unbaked bottom pie crust, then add the top crust and seal the edges of the pie crusts together. Prick it with a fork for some steam to escape. Bake at 375 degrees for around 45 minutes, or until the crust is golden brown.
Can I blind bake using a smaller pie plate?
You can use any size pie plate to blind bake, you just may not need as much crust, and it may not take as long.
VERY EASY TO MAKE, NEXT TIME I WILL USE LESS SALT OR MORE SUGAR, I WILL USE AGAIN AND AGAIN
I’ve been searching for a good crust recipe, since so many busy people these days seem to use the pre-made crusts from the dairy case, or quick drop biscuit or croissants as substitutes. I just don’t think that gives me the results I’m looking for, so when I landed on your site by accident, I bookmarked it and can’t wait to start off with a new batch of real crusts. I haven’t tried it yet, but it’s on my to-do list for this very week. Thanks for sharing, I hope my efforts pay off and do your granny’s crust some kudos.
I only substituted gluten free flour and it was like sand. It never cooked, and I had the pie in the oven for 1 hour & 45 minutes.
Hi Dee,
Gluten free flour is not a good substitution for this recipe. Here’s a gluten free pie crust that might turn out better for you.
I used this pie crust recipe to make my pumpkin pies for Thanksgiving Year and they came out so good!! Thank you for this easy, perfect pie crust recipe!
I’m about to use your recipe now with some alterations for dairy intolerance and fridge-hardened oil in place of shortening–people need to remember that hardened oils that come that way, like Crisco, are hydrogenated oils which can literally kill you, if your body is short on omega oils needed for every cell in the body, which get replaced by hydrogenated oils. This causes cell death by repelling oxygen.
Anyway, off to use your recipe with adaptations.
I have quite a large pie dish (10 inches, 8 on the bottom). Do you think this recipe would work with that size? Or should I make some extra? Thank you so much! Can’t wait to make this! (Making the triple berry pie for thanksgiving tomorrow!) 🙂
If you do a lattice crust on top I do think it will work 🙂 Enjoy!
All I have is salted butter..could I use it instead of unsalted ?
Yes of course, just cut down a little on the amount of extra salt you would add.
Lauren, do you think I could do this in the food processor? I have carpal tunnel and pie crust is hard when I have to use the pastry cutter. It looks easy enough and I may give this a try. Thanks for the video — it always helps and I hate myself but when I see a video, I’m more than likely going to try that recipe because I know I should be able to accomplish the goal of a great pie crust!
Yss, that would work well (just don’t over-mix it)! Hope it turns out great 🙂
Hi Lauren,
This is a first time recipe for me to use. I have never been a great pie baker but want to try and make a home made crust. How long would I bake a cherry pie using this recipe for crust?
Thanks for your help,
MaryAnne
Hi MaryAnne, that really depends on your recipe for cherry pie. Are you using store-bought or canned filling? Is the filling made from scratch? Use this unbaked pie crust for your crust and then follow your cherry pie recipe instructions for baking.
I would like to use this crust for my peach cobbler. Any suggestions. I want to use it as strips, you know the lace look. I need to make three layer of crust. Will this one batch be enough or do I need to double it?
Hi Brudy, I’ve never used a pie crust with my peach cobbler so I couldn’t say for sure, but this recipe should be plenty big enough, depending on what size of pan you use. (My peach cobbler recipe is here and has it’s own type of crust made from a batter: https://tastesbetterfromscratch.com/peach-cobbler/ )
I did your recipe for perfect pie crust, it rolled well but when I tried to put it in the pie dish I couldn’t lift it up it cracked – could it be too much water – I used the 1/2 cup – thanks
wow thanks for all these nice recipe I’ll try them
I’m guessing lard would work as well as shorting? These days the health world is saying lard is actually more healthy than hydrogenated oils such as shortening. Thanks for this wonderful explanation of making pie crusts. I wish I would have been smart enough to stay and learn in the kitchen with my mom and grandmother. They always had perfect pie crusts, now it is too late. But glad you are here to save the day!
This really is the best pie crust. I have tried many of her recipes & they never fail me. The only thing I did differently was I used my hands for everything. I did not use a pastry cutter because I do not get along with them. I have doubled this recipe in the past to make a thicker crust for a thicker pie.
Thanks so much Courtney–I’m so happy you’ve enjoyed some of my recipes 🙂
The pie tasted delicious! I followed the directions but found the dough somewhat difficult to roll out after I took it out of the refrigerator after two hours. It stuck to the rolling pin even though I sprayed the pin. Any suggestions?
Thank you!
Hi Laura, next time just dust it with a little bit of flour 🙂
Thank you for this pie crust recipe. I just retired after teaching for over four decades and am enjoying doing more baking now that I have more time. I make apple pies but have always bought the crusts. I’ve always wanted to make my own crusts, especially since I host Thanksgiving each year. So…..I’m going to practice before the holiday arrives. Yay!
Can I just say, thank you? I do not consider myself much of a baker and have always been intimidated with pie crust. I saw your recipe and was hopeful when I saw the instructions with your photos. I followed the instructions exactly and I was so pleased with how well it turned out! My husband asked where I bought it 🙂 Thank you for giving me a little bit of confidence in the kitchen.
People blow my mind! Do you think I can change 3 ingredients in the recipe and have it turn out like your’s? Blah Blah Blah… Geez!!!
My girlfriend and I were just laughing about the same thing. All recipe site comments are the same. But, maybe it helps with the learning curve for new cooks. It’s humorous to read through.
Hello, I am going to try this recipe soon for your broccoli quiche (it turned out great in store-bought crust, but let‘s try from scratch! It can only be better. My question is silly, but here I go…. can I use the beans after I bake them for the quiche as weights? thank you!
Hi Alex, I’m so glad you liked the quiche (and I know you’ll love it in a homemade crust!) Not a silly question at all. Unfortunately I wouldn’t suggest re-using the beans. But you could keep them to use again as pie weights in the future. I’d love to hear how the crust turns out!
OK< when I took the shell out of the oven after 15 minutes, I think I should have let it cool a bit. I tipped the rice into the garbage and used a brush to get the rest of the rice out of the shell and when I tipped it again to get the rest of the rice out-yep you guessed it, the whole shell fell into the garbage. Luckily I had the other crust in the fridge so I tried again. Worked OK.
Hi Ron, I’m so sorry, but you shouldn’t “tip” the rice out of the pie crust. Next time just lift the parchment paper and beans/rice up and out all at once to remove them 🙂
Love it! I used up some leftover vegetable spread that was lurking in my fridge, together with butter and the shortening as per your recipe and it turned out amazing and flaky.
Hello, In country that I live there, we have not vegetable shortening. So, my question is if can I use something instead of it?
Hi Kateryna, you could substitute lard for the shortening 🙂 Otherwise I would suggest using a different, all butter, pie crust recipe. Good luck!
Thank you for fast answer?
This is my absolute go-to pie crust recipe! It’s so easy and it makes the most delicious flakey, perfect crust ever. I have also freezes it many times (for several months even) and it turns out great every time. I have made it with your lemon sour cream pie, triple berry pie, and I have used it as a crust for homemade broccoli cheese quiche – in a muffin tin. Thanks for a solid recipe!
hi, what size pie dish is recommended for the above amount of pie crust dough.
This recipe works well for a 9 – 91/2 ” pie dish. Enjoy!
This really is a fantastic flakey crust recipe. I divided it for two 8″ crusts and tried
freezing just to see and it was perfect!
Hi, I made this crust for your triple berry pie, but it didn’t seem like enough. Maybe my pie pan was too big. It was a 9.5″ Pyrex pie pan.
Hi, I don’t bake cook and hardly step foot into the kitchen yet my daughter has signed us up to make 6 HOMEMADE pies for thanksgiving!! Yay! Bonding time here we come! Anyways, if you are needing a top for the pie do you use the second pie crust as the top? Thanks!!!
Hi Shelly–Wow!! That’s amazing–good luck! Yes, just use the second pie crust for the top. 🙂 I’d love to hear what kind of pies you make!
What is vegetable shortening?
Hi Beth, most shortening you see at the store is vegetable shortening. (i.e. crisco)
Is it possible to use chilled coconut oil in place of shortening?
Hi Alisa, I’ve not tried baking pie crusts with coconut oil, so I’m not sure how it would hold together–the shortening really helps with the tenderness and elasticity of the dough and the final baked crust. It may be worth a try though! I’d love to hear if you try it 🙂
Lauren, could you send me the original recipe with the egg in it? I would like to try both recipes. thanks!!
Hi Pat, here is the original recipe:
3 cups flour
1 1/4 cups butter flavored shortening
1 teaspoon salt
1 egg, beaten
1 tablespoon vinegar
7-8 tablespoons ice water
(makes about 3 crusts)
Hi Laura, why did you remove the vinegar from the recipe? I alway use vinegar in strudel dough -it
activates the gluten so I can roll it out thinner ( more pliable)and increases the flakiness. Why remove it from pie crust? Looking forward to baking your recipe. Best from Germany:)
Lauren, sorry just thought of one more question. Would it matter consistency wise if I added a tablespoon of sugar to the flour before mixing?
Hi Sandy,
I don’t think the pie crust needs the extra sugar but I also don’t think it would change things too much!
Hi Lauren,
I am have all ingredients for my triple berry pie. I am not very good at mixing the dough by hand, my hands and fingers are getting pretty weak from arthritis, so I have another recipe that I got online to make crusts, but it’s a crust for a scratch chicken pot pie that is amazing. The pie crust is good, but nothing phenomenal, and I couldn’t help but see that you get good reviews on your grandma’s crust and I want to try it. If I take special care to make sure my butter is really cold, and I don’t over pulse my dough in the food processor do you think it will be okay? Also, I never go to see your grandma’s original crust recipe. May I ask you what her original recipe was that was the “winner” and why you tweaked it? I am guessing it may have to do with either a more healthful (lol, like butter is healthful) crust w/o egg, or maybe you’re taking into consideration people with egg allergies. I am making my filling exactly as you’ve written yours and can’t wait. Last time I used a recipe out of the hard cover book “Art of Pie” and it was just awful. Barely sweet and so stiff inside the filling. I learned from my mistakes, but it was a shame to toss out all my hard work and all that beautiful fruit and crust. Looking so forward to hearing your reply. And, thank you so much for sharing all your secrets with all of us ladies.
Hi Sandy. I am glad you found my crust recipe. Cold butter is one of the best tricks for a terrific pie. My grandmother’s recipe is very similar. The biggest difference is that she used butter flavored shortening instead of the butter/shortening combination that I use here. I didn’t like the fake flavor of the butter flavored shortening. She also added a teaspoon of vinegar which I found unnecessary. I hope that your pie crust turned out great!
I got 1,000 compliments on the homemade crust at Thanksgiving. It also helped that the inside was filled with the delicious berry pie recipe on this website as well. Thanks Lauren!
Yay, that makes me so happy! Thanks for sharing Kendal <3
I thought I followed this recipe exactly, but when I put it in the oven to bake it all melted to the bottom of my pie pan in an unusable crusty puddle. (The result was flaky and amazing tasting… but more a floury cookie lump than a crust)
Any tips for troubleshooting where I went wrong?
Hi JJ, I’m sorry that happened–I wonder if the butter got too warm. If it takes you too long to roll out and shape the crust, next time you could put the finished crust (uncooked) in the fridge for 30 minutes or so before putting it directly into the oven.This will help re-solidify the butter. It’s really important that the butter and shortening are very cold.
With using butter and shortening, how do you think ths would this work in a food processor, instead of cutting in by hand, do you think it would work like pulsing with just butter or do you think it’d blend to much with the shortening….?
Hi Jen, I would cut in the shortening by hand. You could do the butter with the food processor.
Hi, I see at the top it says this recipe makes 3 pie crusts, then in the instructions it tells you to split it into two balls and chill, then roll them out. So is this recipe for two or three pie crusts? I’ve never made one from scratch and I don’t want to make it too thick.
Thank you!
Hi Talena, this recipe makes TWO pie crusts 🙂
Two questions, please. Your introduction says that this makes 3 crusts, but the directions indicate 2. Also, someone mentioned adding egg, but I didn’t see any egg in the Ingredients. Can you clarify, please 🙂
This is my grandmother’s pie crust recipe almost exactly! Thanks for the exact measurements – hers never had them.
Hi Lynda, sorry for the confusion, I did some tweaking to the recipe last month and eliminated the egg. It now makes 2 crusts. Enjoy!
Hello to you from Holland! I love this receipe and will use it today to preparere for my birthday tomorrow!
I just wonder what”crimping the edges ” is?
Hi Yolanda, it’s just a decorative wave you make along the outer edge of the pie crust using your forefinger and thumb. It’s just to make it look pretty 🙂 Happy Birthday!
hi, thank you for this wonderful recipe. I love the fact I can store away in the freezer! But I’m just wondering if I need to blind bake it before cooking the filling.? Thank you.
Hi Lina,
It depends on what your filling the pie with. Some pies, like pumpkin, apple, or other pies with a top crust you would fill in a unbaked pie shell. If it’s a cream filling like banana cream etc, you would want to bake it first…So it depends on what kind of pie you’re making…
I’m sorry if I missed something but I read Kami’s comment above and can’t find any butter in your recipe. Could she mean substitute Crisco for butter?
FYI, I’ve never put egg in my crust (anxious to try it though) but I ALWAYS use “Butter Flavored Crisco”. It’s the best of both worlds in my opinion. Good for cookies too!
The recipe calls for 6 Tablespoons of butter AND 3/4 cup of vegetable shortning and no eggs (not sure where you got that from). A post states that the butter flavored Crisco can produce a “fake” butter flavor. I agree. My mother, who was a fantastic pie crust maker, even put the bowl in the frig/freezer to ensure the ingredients stayed cold.
Everything tastes better from scratch! I can’t wait to try this. Do you think it would work if I substitute Crisco for real butter?
I couldn’t find the general place to comment so I just replied to Kami. I am 68 yrs old and been in the kitchen more than any other place, and made yeast bread and many other things, but if you want to hear me curse just come around when I am TRYING to make a pie crust, drives me crazy! I feel bad that I haven’t accomplished this feat, so I am going to hand this over to my husband, he is good with his hands. My problem was always the handling the dough to the pan, always wanted to break apart. This very different than making yeast dough which you can manipulate as much as you want to. When trying to mix with the water it is difficult to get it all mixed together without adding too much water. But, am going to give it another try or let my husband try. This is the basic recipe I used but didn’t add the butter. Wish me luck, and thanks for your recipe and help. You were able to give good instructions and tips.
I use a pastry sheet. Roll out dough to pie pan measurement put hand under plastic sheet flip crust onto pie plate, peel off pastry sheet. Using flour under pastry when rolling out makes it simple. I’ve used a pastry sheet since I bought my first one at a Tupperware party 40 years ago. I’ve been through many, my last one I bought on Ebay.
I use butter flavored crisco for my pie crust.
I love putting them in the freezer until I am ready to use them! I should do that more often! Looks amazing!
It was a little difficult to comment w/o sharing with someone else. You did not mention pie pan size in the instructions. So I scrolled down and read the instruction for an empty pie shell. There it mentioned 9 inch. With all the different pie pans out there I felt it was important to mention this.
Thank you.
This recipe is big enough for 2 crusts for any size of pie pan.
Ah. That answers my question. Thank you Lauren. Making Christmas pies from scratch. Last time was in the 60’s so must be very careful to follow these steps carefully. Huge pie lover.