This post contains affiliate links.
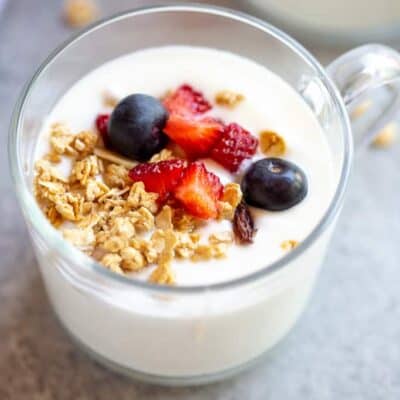
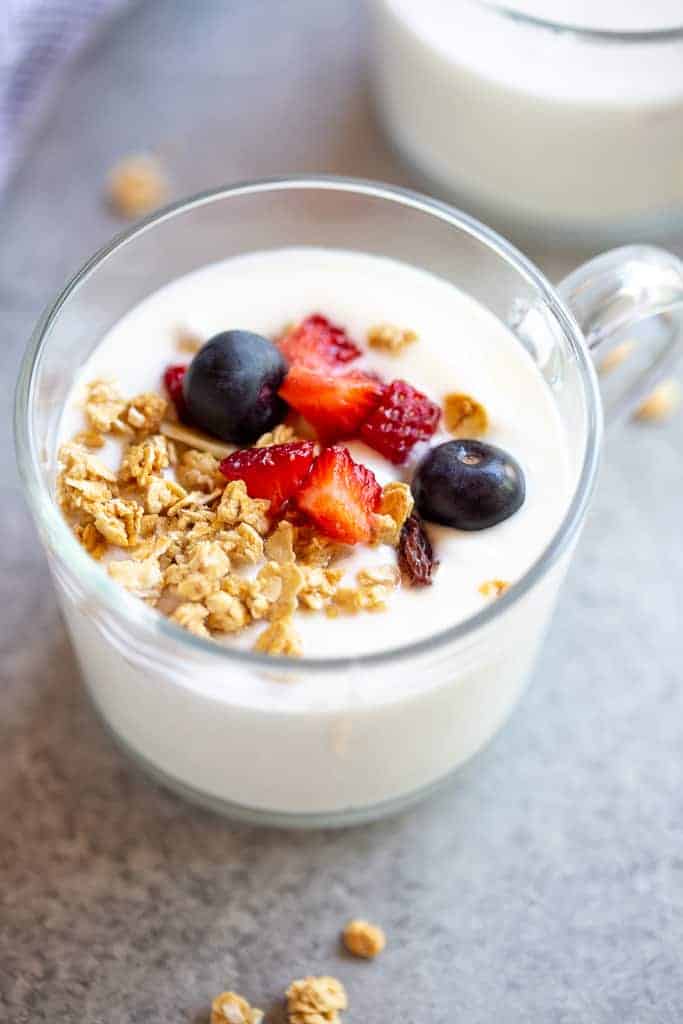
You’ll be amazed at how EASY it is to make perfect Instant Pot Yogurt, with just two ingredients, and at a fraction of the cost of store-bought. Choose non-fat, low-fat yogurt, or whole fat yogurt, and the flavor mix-ins you add at the end.
Don't miss my other simple instant pot recipes, like Instant Pot Corn on the Cob, Instant Pot Meatloaf, and Instant Pot Ribs.
What I love about this recipe:
- Inexpensive: For the quantity of yogurt this recipe makes you'd spend around $15 dollars at the store. The ingredients here cost closer to $5!
- Easy, and healthier than store-bought. I love knowing exactly what is going in our food. This yogurt is creamy and delicious!
This recipe is nearly fool-proof! It requires, patience (the process takes around 10 hours), but is almost entirely hands-off!
One thing that separates an instant pot from a regular pressure cooker is its unique functions like the “yogurt” button, which allows you to make homemade yogurt in it! The instant pot provides a safe method to incubate yogurt—keep it at a constant warm temperature in the target zone of 110 and 115 degrees F– allowing the bacteria in it to multiply properly and thicken to create smooth, creamy yogurt.
What you’ll need:
- Milk: The higher the fat in the yogurt, the creamier and thicker the end result will be. That said, you can use skim, 1%, 2% or whole milk! If using skim milk, see my recipe notes for a necessary adaptation.
- Yogurt with active cultures: Any store-bough plain yogurt will work as long as you check that it has Active Bacteria Cultures in it (most do!). Check the label for the ingredients Lactobacillus bulgaricus or Streptococcus thermophilus.
- Instant-read digital thermometer.
- Optional: cheesecloth to strain the yogurt to make Greek yogurt, or thicker yogurt, if desired. You can buy cheesecloth at most grocery stores in the baking or kitchen gadget section.

How to make Instant Pot Yogurt:
Before starting clean your instant pot really well with soap and water, or steralize it by adding 2 cups of cold water, closing the lid and sealing the vent, and setting it to high pressure for 3 minutes, with a natural release.
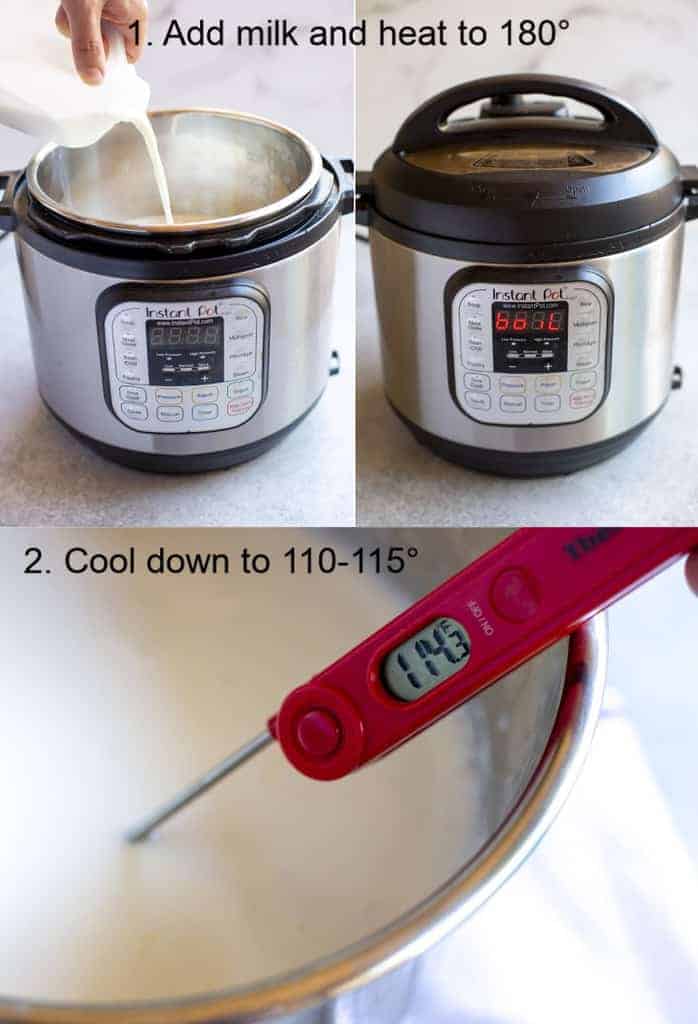
1. Heat milk to 180-200 degrees. Add milk to the instant pot and place the lid on it (it doesn’t matter if the vent is sealed or not). Press the “yogurt” button and then press “adjust” until the screen says “BOIL”.
When the Instant Pot beeps, the milk is hot and ready. Remove the lid and check the temperature with a thermometer to make sure it has reached 180-200 degreed F.
2. Allow milk to cool to down to 110°F -115°F degrees F. This will take 1-2 hours if left alone, or speed up the process by placing the pot into a bowl of ice water for about 10-15 minutes. Check often with a thermometer. Spoon off any milk skin that has formed on top.
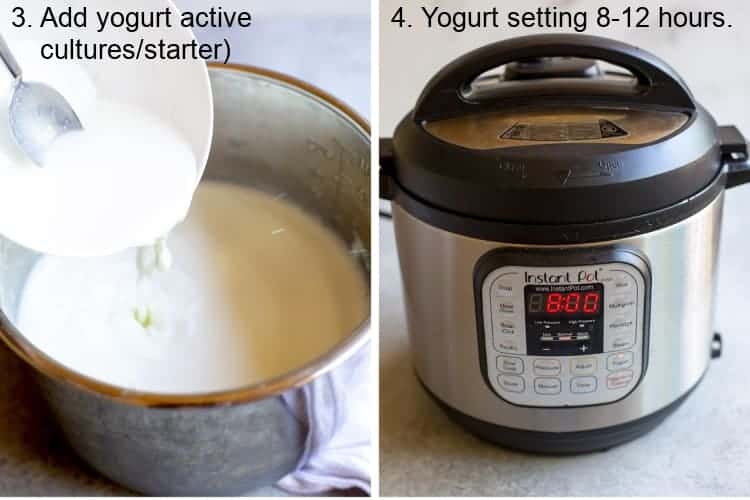
3. Add Yogurt Starter. Remove a ladleful of the warm milk into a bowl and whisk the yogurt starter into it. Then pour the mixture into the pot and whisk to combine.
4. Set Yogurt Timer: Place the inner pot back in the instant pot and secure the lid (again, it doesn’t matter if the vent is sealed or not). Press the “Yogurt” button and adjust until it reads 8:00 to 12:00 hours (less time for looser, milder yogurt and more time for thicker, tangier yogurt).
When the time is up, check the yogurt. You will know it’s ready when it has thickened and jiggles only very slightly, like jello. (After refrigerating for a few hours it will set up even more.)
5. Refrigerate. Remove the yogurt to a container or cover the inner instant pot bowl and refrigerate for at least 4 hours or overnight, before serving. This allows the yogurt to thicken and set up more. Stir well before serving.
Store in containers in the fridge and enjoy within 10 days.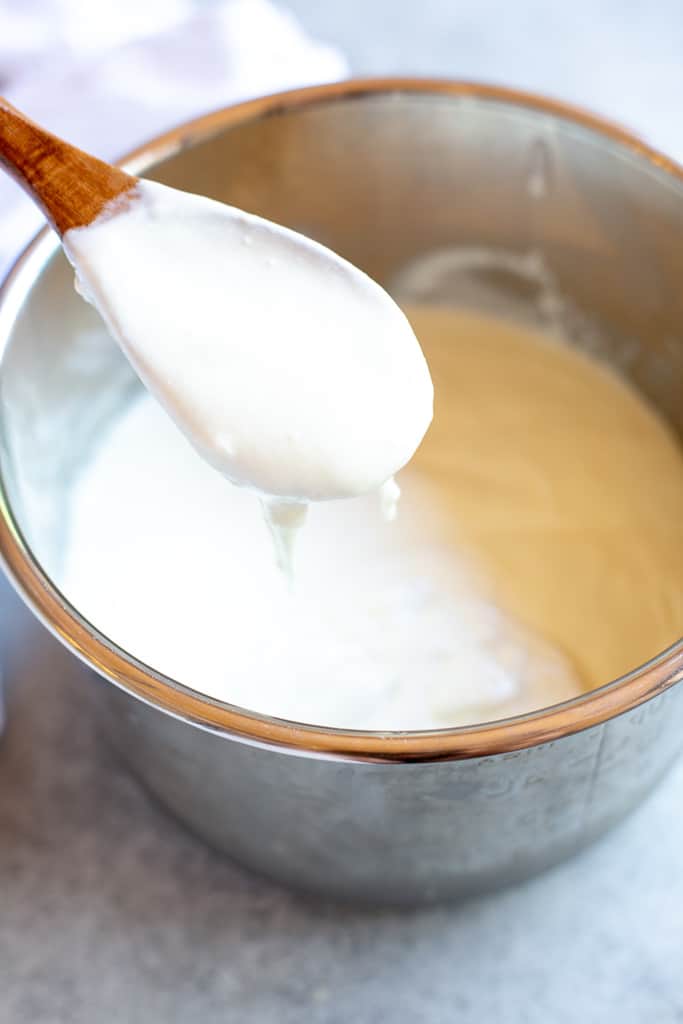
Note: Homemade yogurt will be a little thinner and sometimes slightly lumpier in texture than store bought yogurt that has added stabilizers in it. Give it a good whisk each time before serving.
To make Greek Yogurt:
After the yogurt is made place cheese cloth over a fine mesh strainer and set it on a large bowl. Pour the yogurt into the strainer and allow it to strain for at least 2 hours or up to 6. (If it strains for too long it will become closer to cream cheese, then yogurt). Scoop out the thick Greek yogurt and store in a container in the fridge for 7-10 days.
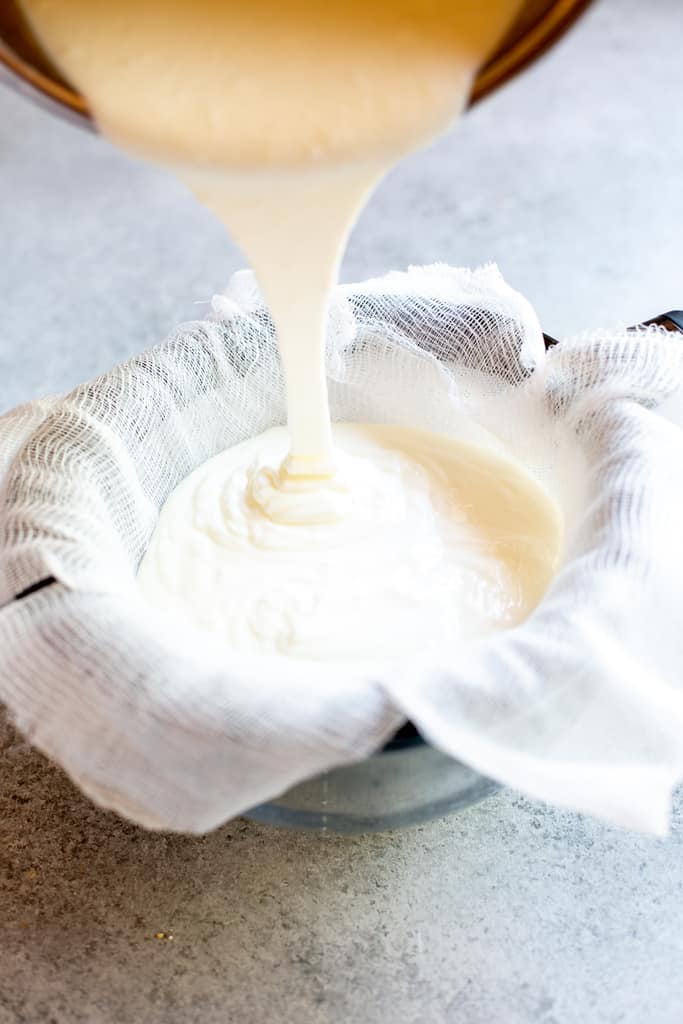
Whey from the yogurt will drain into the bowl and it can be discarded or saved and used for protein smoothies or shakes.
Can I use skim milk?
Yes! You can make non-fat yogurt in the instant pot using skim milk, but because skim milk is missing the fat that helps thicken the yogurt, add an extra tablespoon of yogurt starter for every quart of milk. So, for 1 gallon of skim milk and 6 tablespoons of yogurt starter.
Troubleshooting: Yogurt is runny and didn't set up.
This can happen if too much starter is added, or if the yogurt has not incubated for long enough. Leave it incubating, checking it every hour. It could also be from adding the starter when the milk was too hot, killing the active cultures.
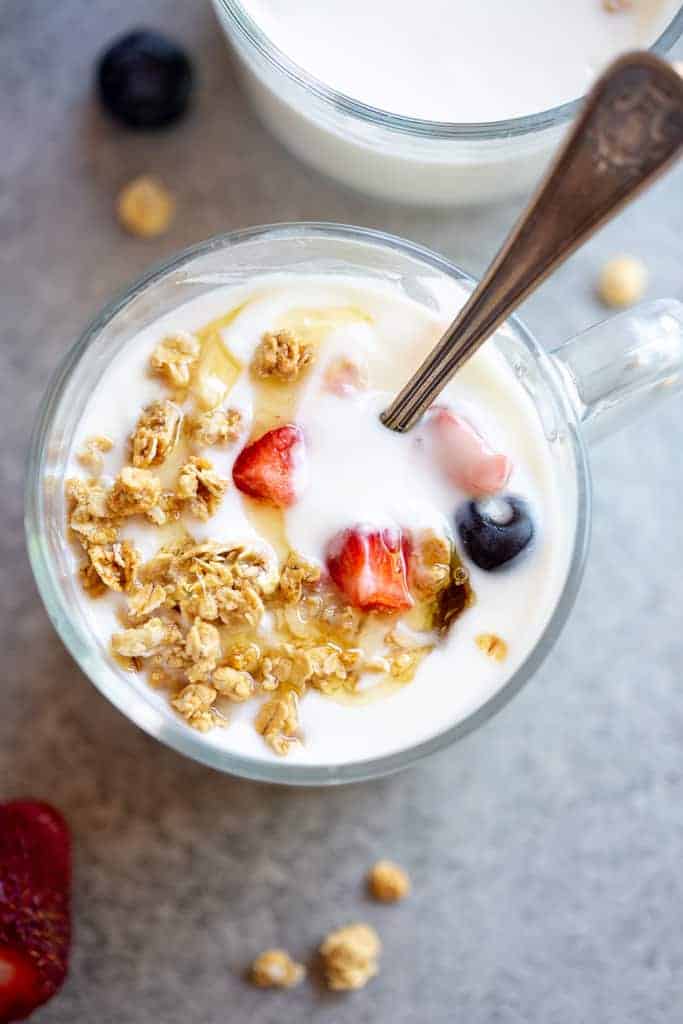
Add flavors and mix-ins:
One your yogurt has chilled, add flavors, sweeteners or toppings, like:
- Vanilla extract
- Honey or maple syrup
- Jam or fruit preserves
- lemon curd
- cranberry sauce
- granola
- fruit
Storing and Freezing Instructions:
Homemade yogurt will last stored in the fridge for 7-10 days, or can be frozen for up to one month. The frozen yogurt can act as a yogurt starter for future batches of yogurt. Thaw overnight in the fridge.
Use yogurt in these recipes:
- Frozen Yogurt
- Green Smoothies
- Chocolate or Carrot Muffins
- Chicken Salad Lettuce Wraps
- Balsamic Bread Dip
- Scones
- Vanilla Pound Cake
- Shrimp Taco Sauce
- As a substitute for sour cream or Mexican crema.

Instant Pot Yogurt
Equipment
- Cheesecloth (Optional): to strain the yogurt for Greek yogurt/thicker yogurt, if desired. You can buy cheesecloth at most grocery stores in the baking or kitchen gadget section.
Ingredients
- 1 gallon milk*
- 1/4 cup yogurt with active cultures (or yogurt starter)*
Instructions
- Before starting, clean your 6 or 8 Quart Instant Pot really well with soap and water, or sterilize it by adding 2 cups of cold water, closing the lid and sealing the vent, and setting it to high pressure for 3 minutes, with a natural release.
- Heat milk to 180-200 degrees. Add milk to the instant pot and place the lid on it (it doesn’t matter if the vent is sealed or not). Press the “yogurt” button and then press “adjust” until the screen says “BOIL”.
- When the Instant Pot beeps, the milk is hot and ready. Remove the lid and check the temperature with a thermometer to make sure it has reached 180-200 degreed F.
- Allow milk to cool to down to 110°F -115°F degrees F. This will take 1-2 hours if left alone, or speed up the process by placing the pot into a bowl of ice water for about 10-15 minutes. Check often with a thermometer. Spoon off any milk skin that has formed on top.
- Add Yogurt Starter. Remove a ladleful of the warm milk into a bowl and whisk the yogurt starter into it. Then pour the mixture into the pot and whisk to combine.
- Set Yogurt Timer: Place the inner pot back in the instant pot and secure the lid (again, it doesn’t matter if the vent is sealed or not). Press the “Yogurt” button and adjust until it reads 8:00 to 12:00 hours (less time for looser, milder yogurt and more time for thicker, tangier yogurt).
- When the time is up, check the yogurt. You will know it’s ready when it has thickened and jiggles only slightly, like jello. (After refrigerating for a few hours it will set up even more.)
- Refrigerate. Remove the yogurt to a container or cover the inner instant pot bowl and refrigerate for at least 4 hours or overnight, before serving. This allows the yogurt to thicken and set up more. Stir well before serving.
- Store in containers in the fridge and enjoy within 10 days.
Notes
- Skim milk (non-fat): If using skim milk, add 6 tablespoons of yogurt starter instead of ¼ cup and incubate for 10 hours. You may notice a layer of liquid on top when it’s finished incubating--just spoon it off and discard it.
- Raw milk: Yes, raw milk may be used in this recipe. After you heat it, it actually pasteurizes it and kills any unwanted bacteria. The cream will naturally separate with the raw milk, so just whisk it before and after the heating step and when you whisk in the yogurt starter. Sheep milk and Goat milk could also be used but the yogurt will take on those respective flavors.
- Dairy-free yogurt: Try these recipes for Soy milk yogurt or coconut milk yogurt.
- Every 1 quart (4 cups) of milk need 1 Tablespoon of yogurt starter. If using more than 1 gallon of milk, you will need an 8 quart instant pot. To halve the recipe, use ½ gallon of milk and 2 tablespoons yogurt starter.
Nutrition
Nutrition information is automatically calculated, so should only be used as an approximation.
Text me new recipe ideas!
Simple, tasty ideas sent once a week. No spam.
Yield: Makes about 16 cups of yogurt. Nutritional information is based on 1 cup servings, using 2% milk.
*This post contains affiliate links. I love sharing my favorite products with you!


If we wanted to sweeten, would you use condensed milk after everything is said and done? I tried honey and fresh fruit – still not sweet enough for my kiddos coming off of store bought yogurt.
Have you tried using maple syrup or agave? My kids also really like sweetening their yogurt with homemade jams as well!
I have been making this for 9 months now without issue and now the last 3 out of 4 times the yogurt has come out completely runny, basically still milk. I use whole milk and follow all directions without fail. I have even tried using different starters. Do you have any idea what this issue is?
That’s so strange! Is your Instant Pot working well with every other recipe? Do you use a thermometer to verify the milk has been heated to the right point?
I wondered about it working correctly but I haven’t had any other issues and I always use my thermometer. This time, after going for 11 hours and it still being liquid, I ended up adding more of the same starter and letting it run for another 5 hours. It was set up after that. It is bizarre…
Are you using “starter” from your previous homemade batches of yogurt? Or from a store bought yogurt? Just wondering if the cultures aren’t as active for some reason?
Thank you for the yogurt recipe. Once I have made a batch and take out my starter for future use, how long does the starter keep in the refrigerator?
Up to 2 weeks.
Id use the starter within 1-2 weeks or you can freeze it in small portions (like ice cube trays) for up to 3 months and thaw it before using.
I only use raw milk and it turns out fantastic everytime. I do skin off the liquid once it is finished prior to putting in fridge so I’m left with a thicker yogurt
I’ve used raw milk in this recipe twice now, and it has worked perfectly both times.
I would like to sweeten my yogurt but how much vanilla should I use? I.used a gallon of milk and set for 12 hours..
Hi Jennifer, usually it’s best to sweeten or flavor your yogurt after it’s completely finished so it doesn’t interfere with the process and outcome. I enjoy mine with fresh berries, granola, and a drizzle of honey. If you wanted to try adding vanilla to the whole batch, I would start with 1-2 teaspoons, but of course it’s to taste. You could also sweeten by stirring in some honey, agave, pure maple syrup, sweetened condensed milk, or blending in some fresh fruit. We hope you enjoy your yogurt!
Hello! About how much sweetened condensed milk should you use for vanilla yogurt?
It’s completely to taste, so stir in a little and add more depending on how sweet you want it to be! We hope you enjoy the yogurt!
If halving the recipe, do you need to adjust anything (time, temp, etc.)? Or literally just change 1/2 gal milk and 2 T yogurt instead of 1 gal and 1/4 C (4T) yogurt?
Nope, the time and temp will be the same. Just cut the ingredients in half. I hope you enjoy the homemade yogurt!
These are the best instructions clear and easy to follow.
I just made my 3 rd batch and I’ve got it down to this: I started with Chobani plain Greek yogurt the first time, this time I used my homemade as starter I cooked the yogurt for 10 1/2 hrs then strained it suspended for 2 hrs. It’s perfect Greek yogurt thick.
I would highly recommend this method it makes great yogurt. Don’t be disappointed if you get a so so batch, my first batch was to thin but I ate it tasted great!
Thanks Lauren for the great recipe! 💞
Is there no way to make this in an instant pot without a yogurt setting? This is the third recipe I’ve seen now that has this step, but an instant pot is just a pressure cooker, so there must be a way to make yogurt in any of them by manually setting the temperature and time, right?
I wish I’d seen your post sooner I would have checked the temp when my yogurt was done. If you scald the milk on the stove cool it then add starter you should be able to set the Instant Pot to the correct temp and time and wahlaw you have yogurt!
I did a little research and it seems Instant Pot hold yogurt at 110-115 degrees so if you bring it to 180 degrees, cool to 110-115 degrees add starter. Put it in IP at somewhere in that range and let it cook.
Hope this helps, homemade is so much better!
I’ve used these guidelines twice for making yogurt with raw milk; first one quart, then a half gallon. I did heat the milk to 180 – 200. I was surprised at how thick it was. 10 hours was too much. 7 hours was too much. Not in terms of taste but texture. Next time I will try 1 gallon and will check it starting at 4 hours. It worked for me! Thanks Lauren!