
This post contains affiliate links.

Homemade Bread Bowls
My goal with this recipe is to instill confidence in even the most amateur bread makers out there. Homemade bread is soo EASY and anyone can do it! I love that I usually always have the pantry ingredients I need to make it, and it tastes way better than anything you could buy at the store. Follow these simple steps and you'll feel like a professional baker!
I adapted this recipe from the Food Nanny, as I knew I wanted a great base for an Italian bread that was crusty on the outside and soft inside, but had a sturdy enough crumb to hold its own when hot soup was added. The end result is absolutely perfect and will take your soup-for-dinner experience to a new level!
6 Pantry Ingredients:
- Active dry Yeast
- Granulated sugar
- Salt
- Butter
- All-purpose flour
- Eggs
8 Simple Steps for Homemade Bread Bowls:
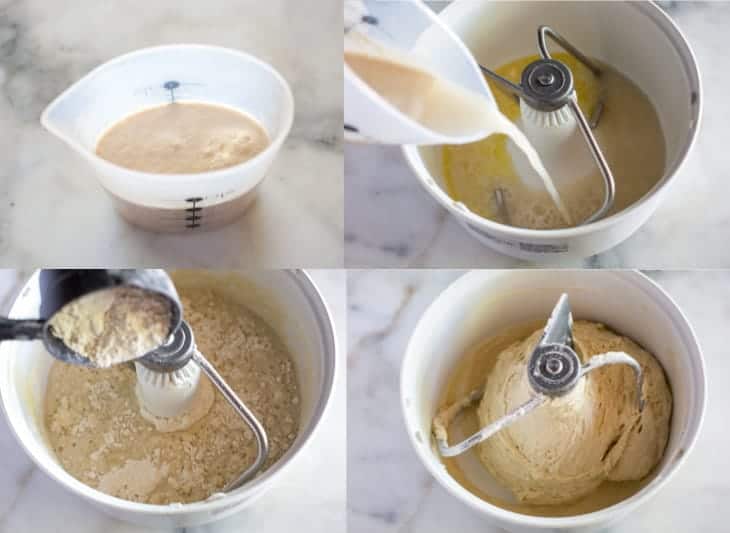
- Proof the yeast – Combine the water, yeast, and ½ teaspoon of the sugar in a small bowl. Stir just until the yeast is dissolved. Cover with a towel and let stand until the mixture is foamy, about 5 minutes.
- Mix the dough ingredients – In a large bowl, add the salt, remaining sugar, butter, yeast mixture, and 3 ½ cups of the flour, and mix.
- Knead the dough – Slowly keep adding more flour (about 1 cup at a time) until the dough starts to pull away from the sides of the bowl. Knead/mix the dough for about 5 minutes. Stop and touch the dough with a clean, dry finger. The dough shouldn't be “sticky”, but may barely stick to your finger. Add a little more flour, as needed, until you reach that consistency. Knead for 2-3 more minutes.
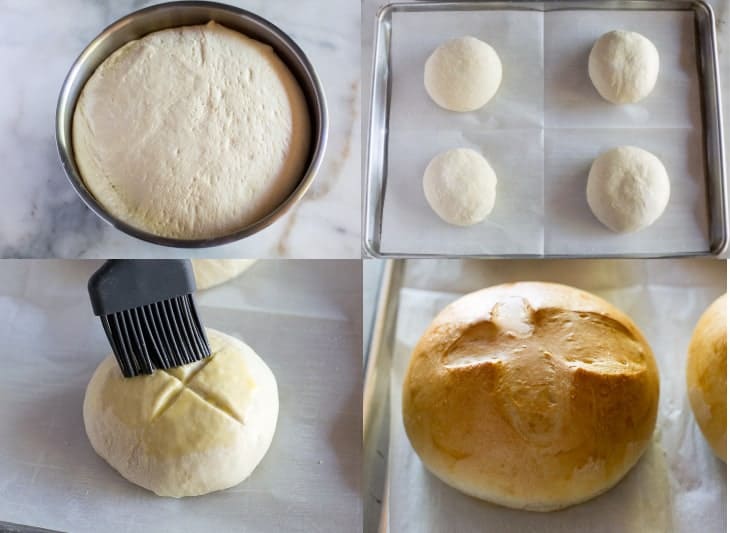
- Allow dough to Rise – Lightly spray another large bowl with nonstick spray and transfer the dough to that bowl. (Flip the dough over once so both sides are coated with spray). Cover the bowl with a dish towel and let it rise until doubled, about 30-45 minutes.
- Divide the dough. Punch down the risen rough, and divide it into 8 equal pieces. Pat them down well to remove any air bubbles and fold them into a tight ball. Make a very small “X” slit on the top of the dough rounds with a serrated knife.
- Brush with egg wash. Beat an egg with 1 tablespoon of milk to make an egg wash. Lightly Brush the tops of each dough ball with a very thin layer of egg wash.
- 2nd Rise – Cover the rolls really lightly with a piece of plastic wrap and allow to rise until doubled, about 30-40 more minutes.
- Bake at 400 degrees for about 30 minutes.
Do I need any Special Equipment?
NO! The bread bowls bake on a regular baking sheet and can be mixed by hand or in a stand mixer. Anyone can make this easy recipe!
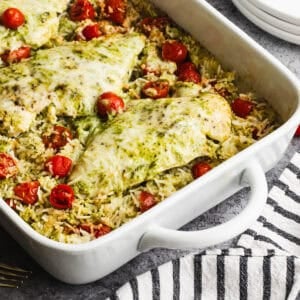
The BEST soups to serve in a bread bowl:
I think bread bowls are especially delicious served with cream based or thicker soups. These soups have a slightly thicker consistency that won't cause the bread to get soggy as quickly.
- Clam Chowder
- Broccoli Cheese Soup
- Classic Homemade Chili
- Creamy Chicken and Wild Rice Soup
- Chicken Enchilada Soup
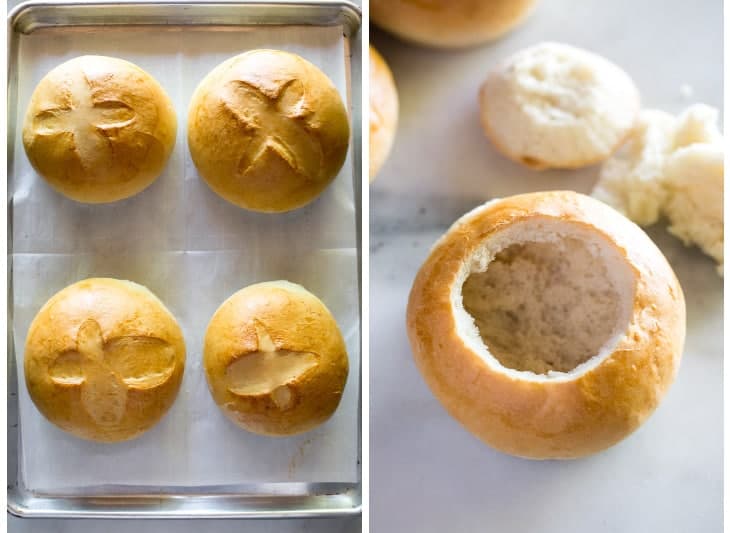
Eat the Bread Bowl!
This bread bowl is more than just edible, it's absolutely delicious! So don't just scoop your soup out of it with a spoon; tear it, dip it and enjoy it!
Storing and Freezing Bread Bowls:
To freeze the dough, punch it down after the first rise and store in an airtight, freezer safe container or bag for up to 2 months. Thaw overnight in the refrigerator and then continue with step 5, dividing the dough.
To freeze the baked bread bowls, store them in an airtight, freezer safe container or bag for up to 3 months. Allow them to thaw on the counter and then warm them in the oven before serving.

You can also FOLLOW ME on FACEBOOK, TWITTER, INSTAGRAM and PINTEREST for more great recipes!

Homemade Bread Bowls
Ingredients
- 3 cups warm water
- 1 1/2 Tablespoons active dry yeast, (2 packets)
- 2 Tablespoons +½ teaspoon granulated sugar, , divided
- 1 Tablespoon salt
- 4 Tablespoons butter, , melted
- 7 to 9 cups all-purpose flour, , divided
- 1 tablespoon milk
- 1 egg white
Instructions
- Combine the water, yeast, and ½ teaspoon of the sugar in a small bowl. Stir just until the yeast is dissolved. Cover with a towel and let stand until the mixture is foamy, about 5 minutes.
- In a large bowl, add the salt, remaining sugar, butter, yeast mixture, and 3 ½ cups of the flour, and mix. Slowly keep adding more flour (about 1 cup at a time) until the dough starts to pull away from the sides of the bowl.
- Knead the dough (with your stand mixer, or using your hands) for about 5 minutes. Stop and touch the dough with a clean, dry finger. The dough shouldn't be "sticky", but may barely stick to your finger. Add a little more flour, as needed, until you reach that consistency. Knead for 2-3 more minutes.
- Lightly spray another large bowl with nonstick spray and transfer the dough to that bowl. (Flip the dough over once so both sides are coated with spray). Cover the bowl with a dish towel and let it rise until doubled, about 30-45 minutes.
- Divide the dough into 6 or 8 equal pieces (for large or small bowls). I like to use a scale to make sure they're all the same size. Pick up one section of the dough and pat it down with your hands to remove any air. Use your hands to gently fold the dough into a tight ball. Place the dough ball on a baking sheet lined with parchment paper. Make a very small "X" slit on the top of the dough rounds with a serrated knife.
- Beat an egg with 1 tablespoon of milk to make an egg wash. Lightly Brush the tops of each dough ball with a very thin layer of egg wash.
- Cover the rolls really lightly with a piece of plastic wrap and allow to rise until doubled, about 30-40 more minutes.
- Bake at 400 degrees for about 25-30 minutes. Allow to cool for at least 15 minutes before cutting for bread bowls.
Notes
Nutrition
Nutrition information is automatically calculated, so should only be used as an approximation.
Text me new recipe ideas!
Simple, tasty ideas sent once a week. No spam.
Have you tried this recipe?!
RATE and COMMENT below! I would love to hear your experience.
I originally shared this recipe December 2013, Updated August 2019.

These came out better than any I’ve ever bought
How many does this recipe make?
I made 6 bowls and 2 large rolls today, with this recipe.
I will just add that these take much longer than 2 hours stay to finish. Cook time is ~half hour, rise times (twice) are each 30-40 minutes, waking the yeast is 5-10 minutes, took at least 30 minutes to mix everything, 15 minutes to shape the balls and apply the egg wash, and then about 10 minutes to cool after taking it off the oven. This took about 3 hours start to finish, so I think an honest time estimation would be closer to 2.5-3 hours.
This recipe is solid. I only needed two big bread bowls, so I cut the recipe into a third. Everything came out perfectly. They were soft, but they had enough structure–you definitely do not want a leaky bowl. I eyeballed the flour, obviously, as a cold and dry climate can mess with measurements on flour. They cooked up beautifully. I definitely recommend toasting your bowls after hallowing them out.