This post contains affiliate links.
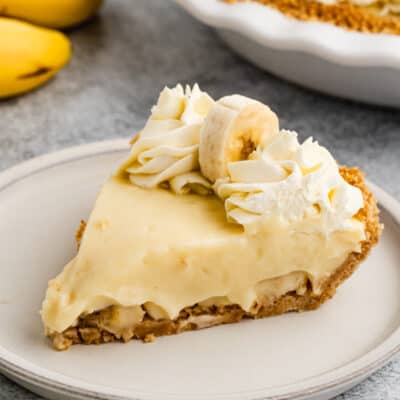
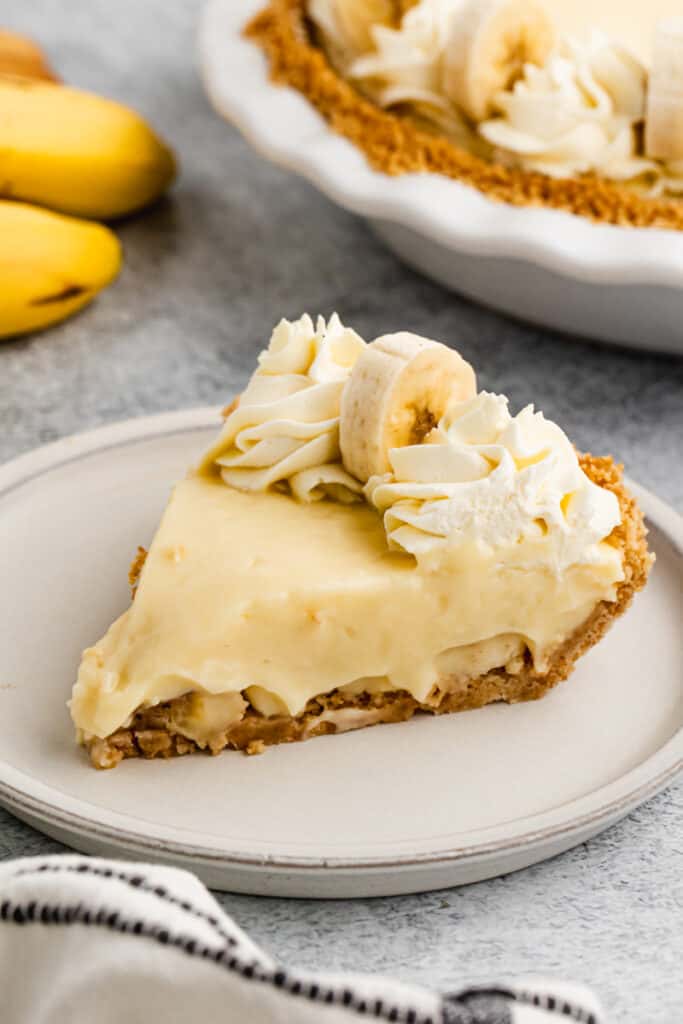
The most incredible (and easy) Banana Cream Pie recipe with homemade custard filling that holds together perfectly, layered inside a Nilla wafer crust. You'll never use a box pudding mix again!
You can browse all of my delicious pie recipes, and be sure to try the Key Lime Pie, Apple Pie, Pecan Pie, or a Lemon Sour Cream Pie.

What I love about this pie:
- The Filling: To make a truly excellent Banana Cream Pie, the pudding NEEDS to be made from scratch! This recipe if flavorful, holds together, and so velvety smooth.
- Nilla Wafer Crust really shines in this pie, and reminds me of banana pudding. If you prefer something else, you can use a graham cracker or traditional pie crust.
- Make Ahead: you can make this beautiful pie 1-2 days in advance, but I recommend reserving the bananas for topping on individual pie slices while serving, rather than inside the pie.
How to make Banana Cream Pie:
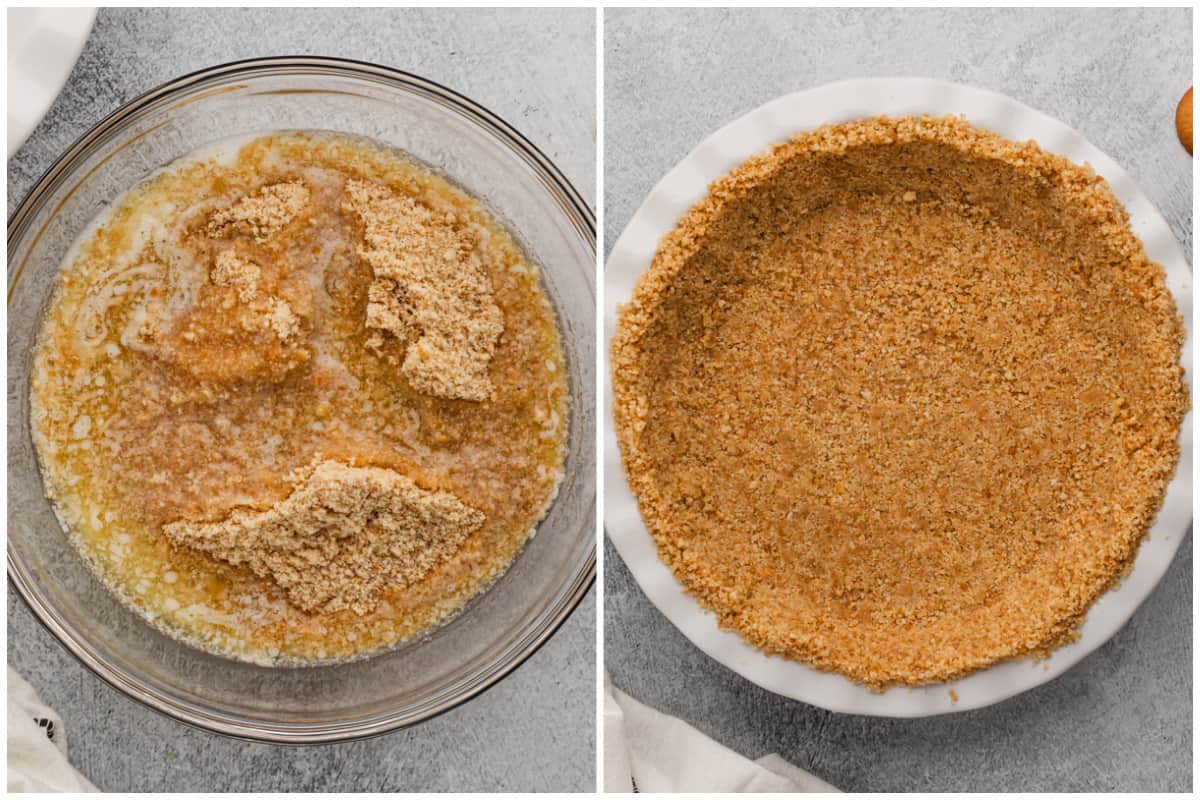
Prepare Crust: Add Nilla wafers to a food processor and pulse until fine crumbs (or crush them in a resealable bag, using a rolling pin). Add cookie crumbs to a bowl and stir in melted butter. Press mixture firmly into the bottom and up the sides of a 9” pie plate. Bake crust for 10 minutes, and then allow to cool completely.
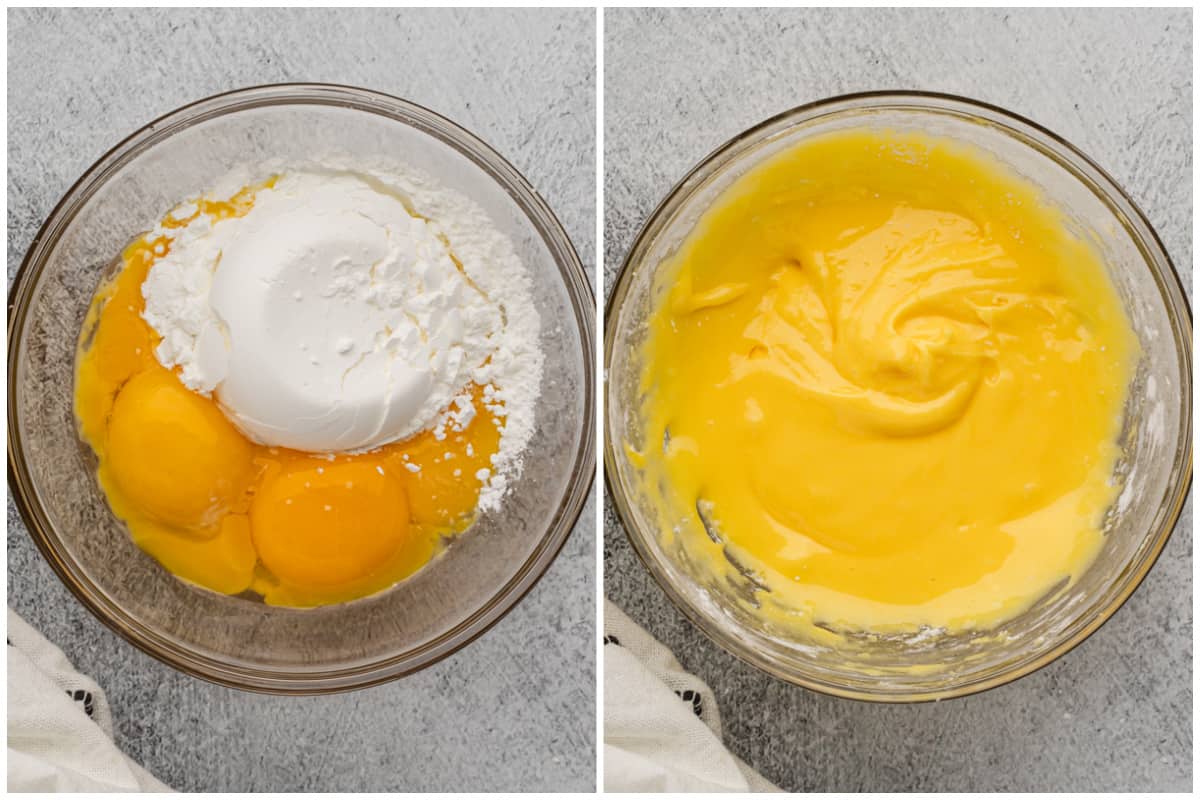
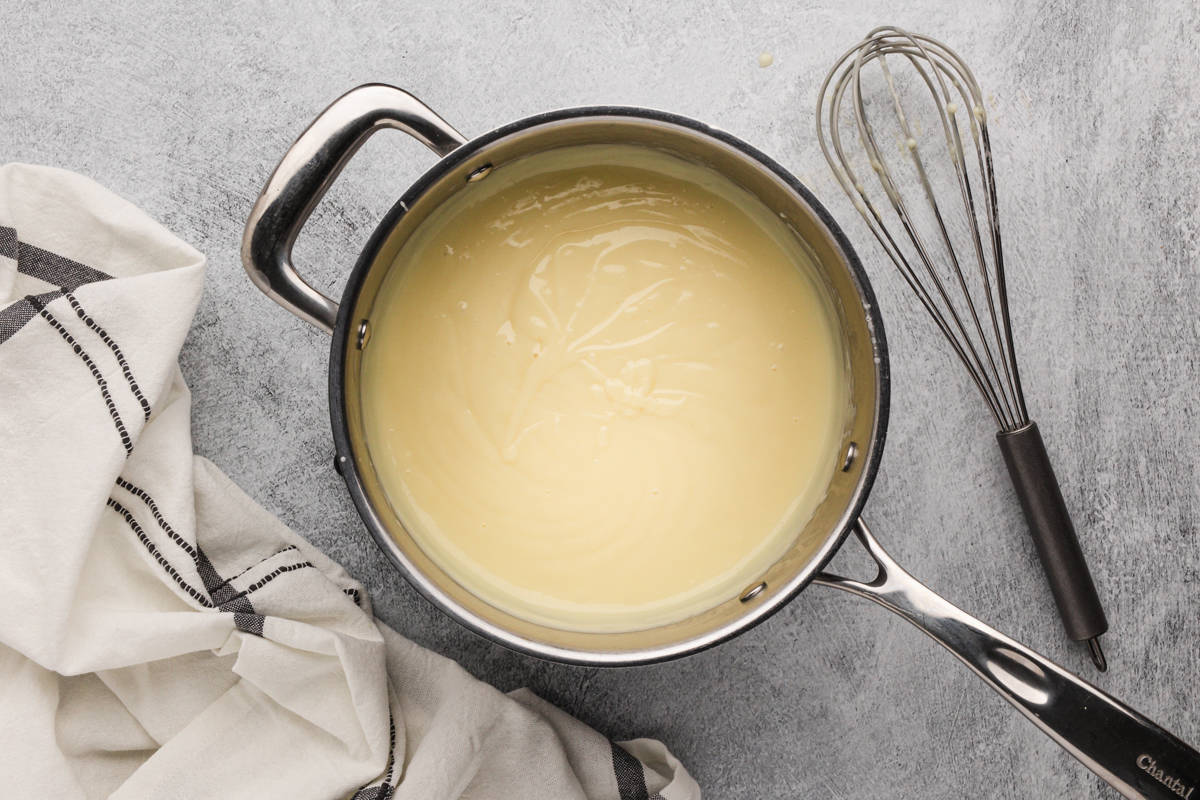
Make Filling: Mix egg yolks and cornstarch in a bowl until smooth. Set aside. Whisk in sugar, salt, and milk in a large, heavy saucepan. Cook over medium heat, stirring often, until it comes to a simmer.
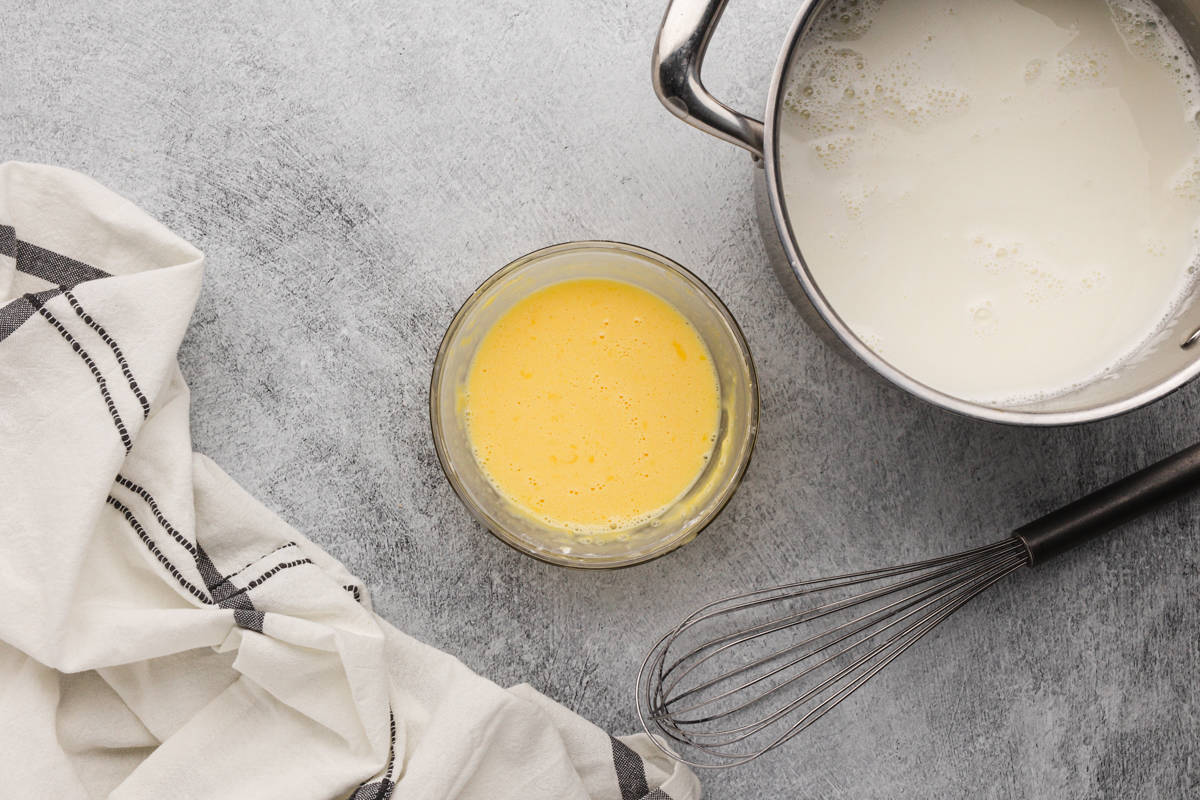
Temper Eggs: Spoon a big ladleful of simmering milk out of the pot, then very slowly whisk the milk into the egg yolk mixture, whisking constantly as you pour a slow steady stream, to temper the eggs (warm them up slowly, without scrambling them).
Cook Pudding: Pour the tempered egg mixture into the saucepan, whisking to incorporate. Cook, stirring constantly over medium heat, until the mixture has thickened (thick enough to coat the back of a spoon).
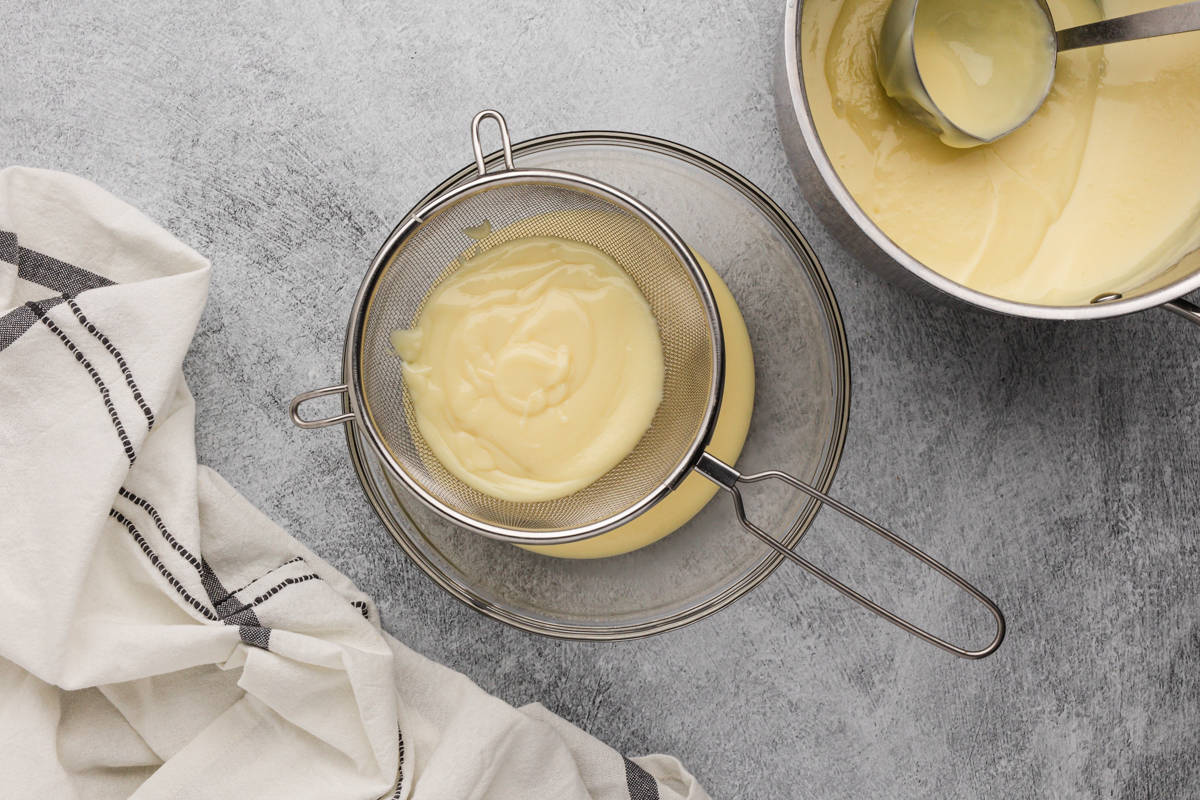
Strain: Remove from heat and stir in butter and vanilla extract. Strain pudding through a fine mesh sieve into a storage container. Lay a piece of plastic wrap directly over the pudding to prevent a skin from forming then cool for 30 minutes.
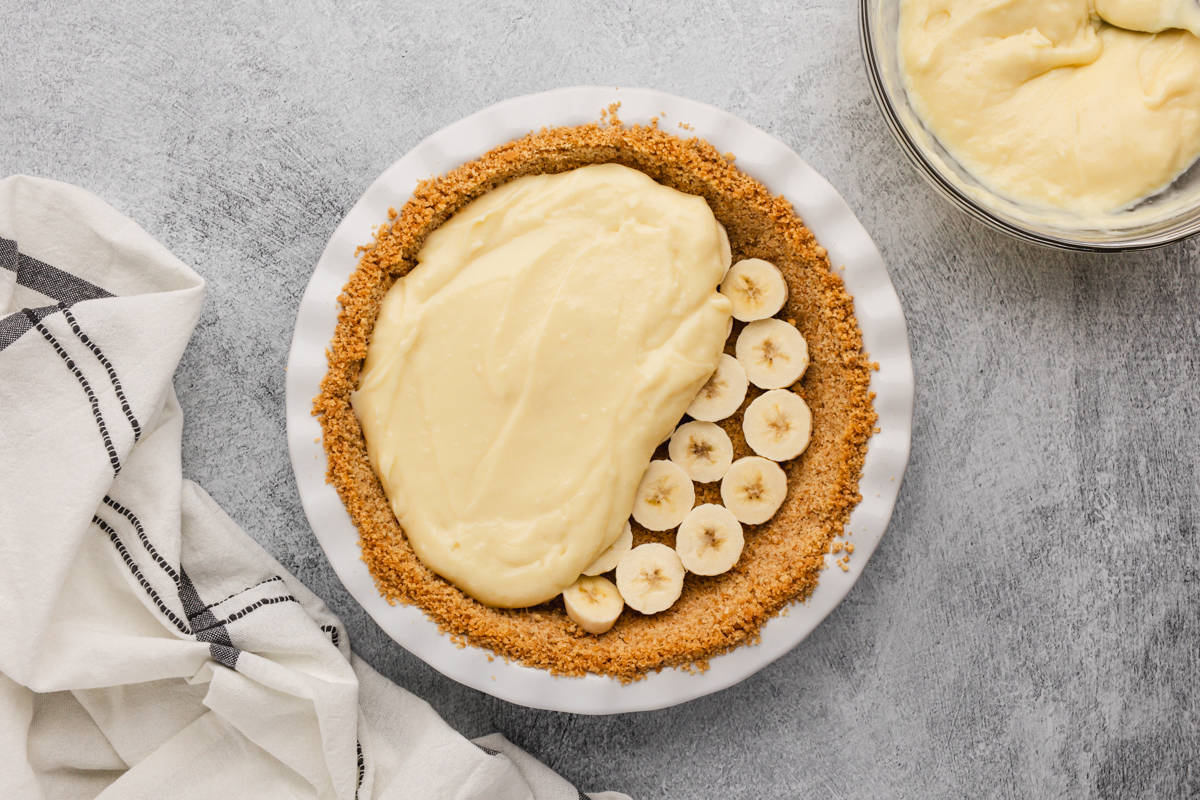
Layer Pie: Slice bananas into the bottom of the Nilla wafer crust, into an even layer then pour pudding over the top. Cover with plastic wrap again, so a skin doesn’t form, and refrigerate for at least 4-6 hours.
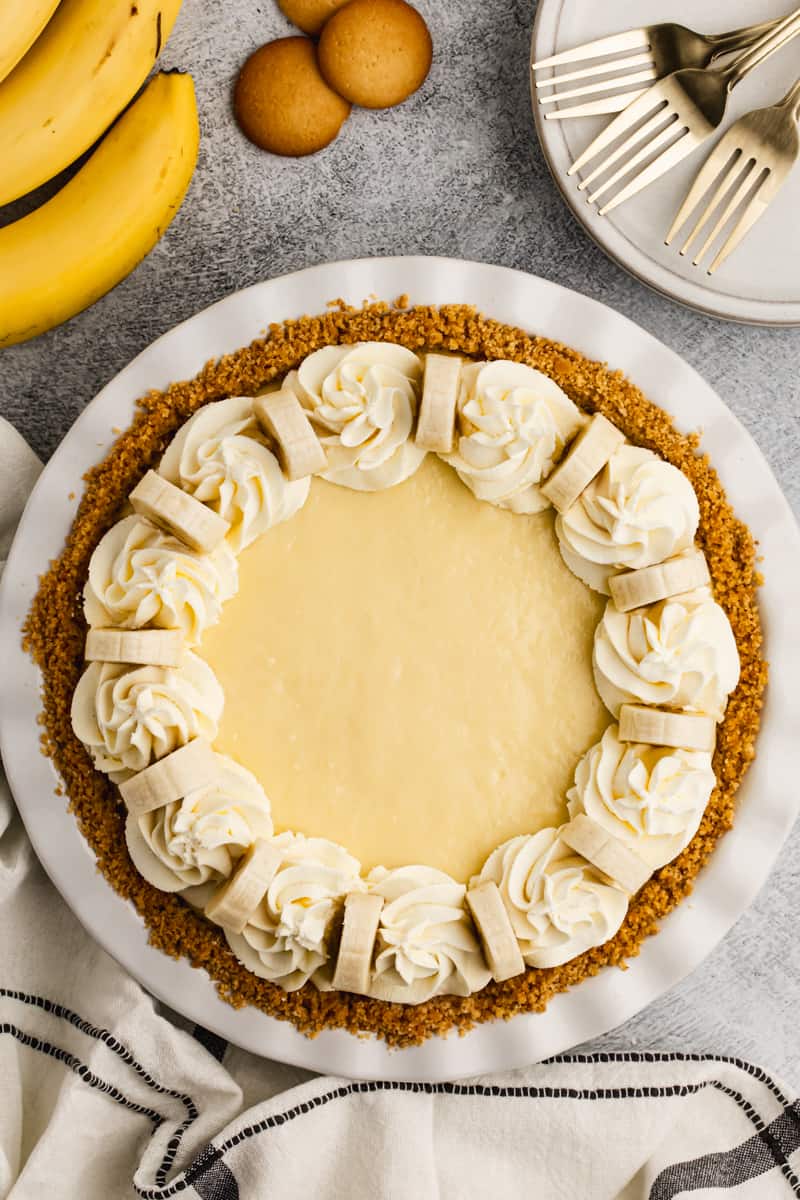
Whip Cream: Add heavy cream and powdered sugar to a mixing bowl and whip until peaks form. Smooth whipped cream over the top of the old fashioned banana cream pie, or pipe around the edge. Refrigerate, uncovered, for at least 4-6 hours before serving.
Make Ahead and Freezing Instructions:
To Make Ahead: Nilla wafer crust can be made several days in advance, stored at room temperature or in the freezer. Banana Cream Pie can be made 2-3 days ahead, but I recommend adding the bananas while serving the pie, and not placing them inside, so they don't get brown.
To Freeze: Don't add bananas, but otherwise make as instructed. Allow the pie to cool completely then wrap in plastic wrap and a layer of aluminum foil and freeze for up to 2 months. Thaw in the refrigerator overnight.
More Homemade Pies:
- Cherry Pie
- Lemon Sour Cream Pie
- Pumpkin Pie
- Oreo Cheesecake Pie
- Lemon Chiffon Pie
- Coconut Cream Pie
- Triple Berry Pie
- Peanut Butter Pie
Banana Cream Pie
Equipment
Ingredients
Nilla Wafer Crust:*
- 2 cups Nilla wafers, , crushed, (about 60 cookies)
- ⅓ cup butter, , melted
Filling:
- 4 large egg yolks
- 1/4 cup cornstarch
- 2 1/2 cups whole milk
- 2/3 cups granulated sugar
- 1/4 teaspoon salt
- 2 Tablespoons butter, , cut into pieces
- 2 teaspoons vanilla extract
- 3 large firm bananas, , sliced
Whipped Cream Topping:
- 1 1/2 cups heavy whipping cream
- 3 Tablespoons powdered sugar
Instructions
- Prepare the Crust: Preheat oven to 350 degrees F. Add Nilla wafers to a food processor and pulse until crumbs (or crush them in a resealable bag, with a rolling pin). Add cookie crumbs to a bowl and stir in melted butter. Use the back of a measuring cup to press mixture firmly into the bottom and up the sides of a 9'' pie plate. Bake for 10 minutes. Allow to cool completely before adding the custard filling.
- Banana Pudding: Mix egg yolks and cornstarch in a bowl until smooth. Set aside. To a large saucepan, add sugar, salt and milk to a large, heavy saucepan and whisk to combine. Cook over medium heat, stirring often, until it comes to a simmer.
- Spoon a big ladleful of simmering milk out of the pot, and very slowly whisk the milk into the egg yolk mixture, whisking constantly as you pour a slow steady stream, to temper the eggs (warm them up slowly, without scrambling them).
- Pour the tempered egg mixture into the saucepan, whisking to incorporate. Cook, stirring constantly over medium heat, until the mixture has thickened (thick enough to coat the back of a spoon).
- Remove from heat and stir in butter and vanilla extract. Strain pudding through a fine mesh sieve, into a storage container. Lay a piece of plastic wrap directly over the pudding to prevent a skin from forming. Allow to cool for 30 minutes.
- Slice bananas into the bottom of the nilla wafer crust. Pour pudding over the top. Place a small piece of plastic wrap directly on the surface of the pudding, so a skin doesn’t form. Refrigerate for at least 4-6 hours.
- Whip Cream: Add heavy cream and powdered sugar to a mixing bowl and whip until peaks form. Smooth whipped cream over the top of the pie.
- Refrigerate for at least 4-6 hours before serving.
Notes
Nutrition
Nutrition information is automatically calculated, so should only be used as an approximation.
Text me new recipe ideas!
Simple, tasty ideas sent once a week. No spam.
Follow Me
I originally shared this recipe November 2017. Updated November 2019 and November 2023.
Do I use unsalted butter or salted butter?
You can use either. If you use salted just reduce the salt in the recipe a little bit 🙂
If you are preparing the pie 1 day before it is being served should u still not put the bananas in the middle?
I’m sure that would be fine. Just toss them in a little bit of lemon juice before adding them 🙂
I’m curious as to the banana flavor if this pie, is it strong? My husband is used to pies that used banana pudding mix but I don’t want to make mine that way. Is this too far of a stretch?
Hi Katelin, one of the things I appreciate from this from-scratch version is that it doesn’t have that strong “artificial” banana flavoring like the store pudding mix, (I think it’s WAY better) and it holds together better to. If you think you’d miss that stronger banana flavor you could always add a tiny bit of banana extract 🙂 Hope you get a chance to try it!
I’ve made this recipe twice now and I feel like I have to come back to comment and tell you how great it is. I’ve never had such great success with homemade banana cream pie before! It’s my husband’s favorite but I really don’t like the flavor of the box pudding. This recipe is really amazing!
I tried this recipe twice and both times were spectacular failures! I used the exact amounts of ingredients both times and cooked it per instructions. It thickened when cooking, but returned to liquid state after chilling!
My first thought was that maybe the corn starch had gone bad. Nope! Corn starch has an indefinite shelf life, as long as it is kept in dry, a sealed container. I thought the only other possibility might have been the quantity of vanilla extract called for in the recipe. At the time, I thought one tablespoon was way too much, but I added it as called for. Perhaps the greater quantity of alcohol in the extract interfered with thickening chemistry.
Has anyone made this recipe successfully using one table spoon of vanilla extract? I wonder if the correct quantity should have been one teaspoon rather one tablespoon?
I had the exact same experience where it was thickened when cooking on the stove, then turned into a watery gravy after cooling in the refrigerator. I have no idea why the recipe didn’t work for me either.
Can I make this with 2 percent milk ?
Hi Susanna, 2 percent milk would work, you will just loose a tiny bit of the creaminess factor. 🙂 Enjoy!
I am allergic to corn derived products such as corn starch. Can you recommend a substitute?
Honestly I couldn’t say for this particular recipe since cornstarch is such an important ingredient. I would just search for a vanilla custard recipe that doesn’t use cornstarch, such as this one http://www.vlhamlin.com/blog/homemade-vanilla-pudding-without-cornstarch/ good luck!
I attempted this and my custard isn’t very custardy. I have let it cool, but it still won’t sit right. I followed the recipe the the letter and don’t know what I did wrong. I am still in the process of making it, so is there anyway I can save the custard?
I made the same mistakes, I’ll try your tips for my next attempt. And I also think I’ll cut in half the sugar, way too sweet.
Can you use 2% milk or evaporated or half-and-half? I don’t have whole milk! Argh!
Hi Tracey, any of those would be great as a substitution 🙂 I’d love to hear how you like it!
I made the banana pie that came out perfect.
However the whipped topping for some odd reason turned into butter.
I don’t know what went wrong.
This is my first time for making this.
Hi Don, the whipped cream will do that if it’s beaten for too long. Next time stop beating it when it’s stiff enough to “hold a peak” when you pull the beaters up, but still very light and fluffy.