
This post contains affiliate links.
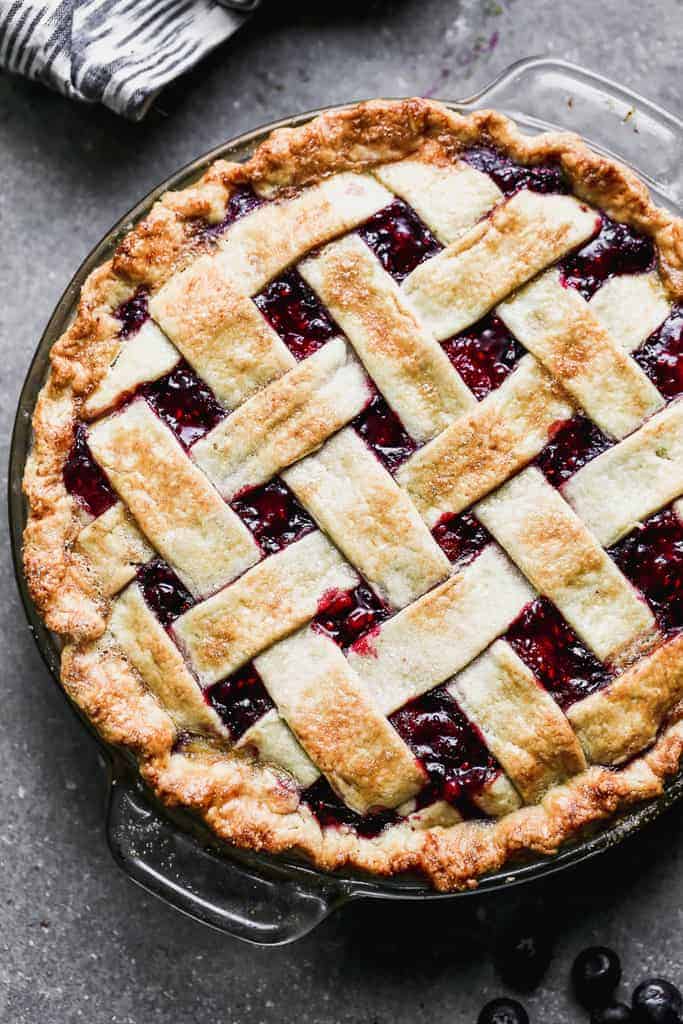
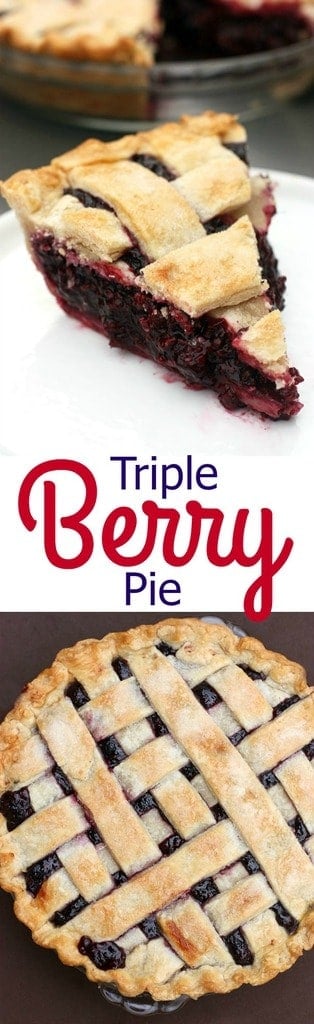
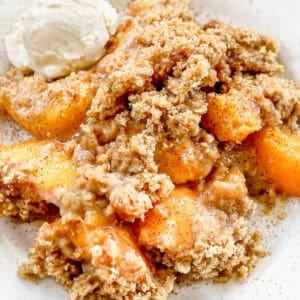
You just can't beat this easy and delicious homemade Triple Berry Pie! It holds together perfectly every single time, and you can use fresh or frozen blueberries, raspberries and blackberries.
If you've tried any of my other favorite pie recipes, you may have learned that I'm a Pie fanatic! It's the most important part of my Thanksgiving. Don't miss my classic Pumpkin Pie, Apple Pie, and Lemon Meringue pies.
On Thanksgiving, I take great care not to over-stuff myself during dinner so that I have plenty of room for pie. And no, I don't just pick one favorite and enjoy a slice. I request slivers of nearly every single kind of pie (which, growing up, meant like 15-20 different kinds!).
My Mom mastered this Triple Berry Pie years ago. It's always the first gone at Thanksgiving–even for my husband who usually detests berries with seeds in them.
This pie is restaurant quality! Scratch that. It's BETTER than restaurant quality, because it's made from scratch! The crust is my Grandma's “Prize Winning” pie crust recipe, which couldn't be easier to make.
For the filling, I use the big beautiful frozen berries from Costco. They come in a 3-berry pack in the frozen section and the price is unbeatable. They are the biggest, nicest frozen berries I've ever seen. Don't you just love Costco?!
How to Make Perfect Berry Pie:
Cook berries: Simmer berries, sugar and lemon juice in a large saucepan over medium heat until warm and juicy, about 5-10 minutes, gently stirring occasionally.
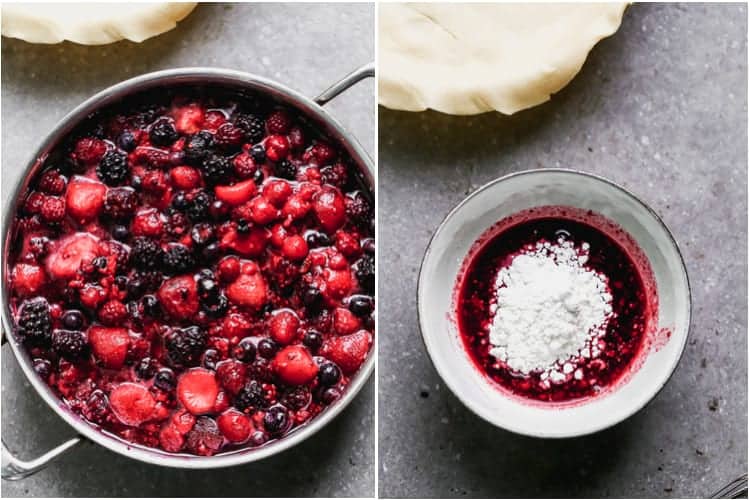
Thicken filling: Spoon out about ½ cup of the juice from the pan into a bowl. Stir cornstarch into the juice until smooth. Bring pot of berries back to a simmer and slowly pour in the cornstarch. Gently stir mixture (being careful not to mash the berries), until thickened, about 2-5 minutes.
Cool. Remove from heat and stir in the butter. Allow to cool for 15 minutes.

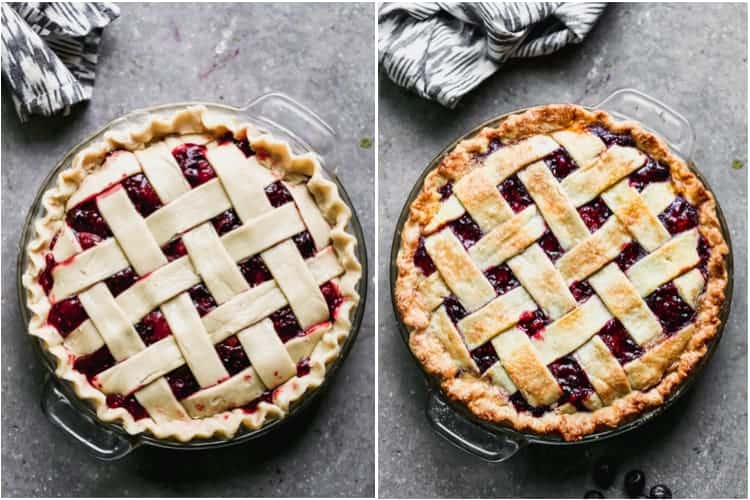
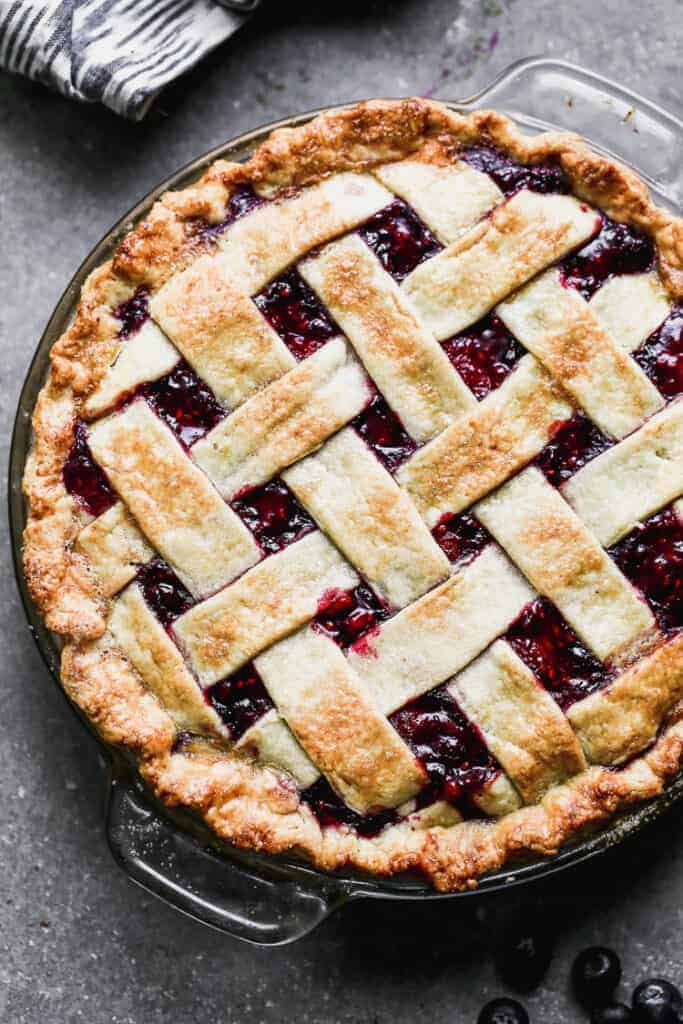
Add to pie shell: Pour mixture into unbaked pie shell (in a 9 in deep dish pan). Add lattice top or a whole top with holes pricked on top for steam to escape. Pinch the edges of the top and bottom pie crusts together and crimp the edge, if you like.
Brush with egg wash: Brush a thin layer of beaten egg white over the top of the pie and sprinkle lightly with sugar.
Bake at 400 degrees F for 40-45 minutes. Check it after about 25 minutes and place a piece of tinfoil over it if the top crust is getting too browned.
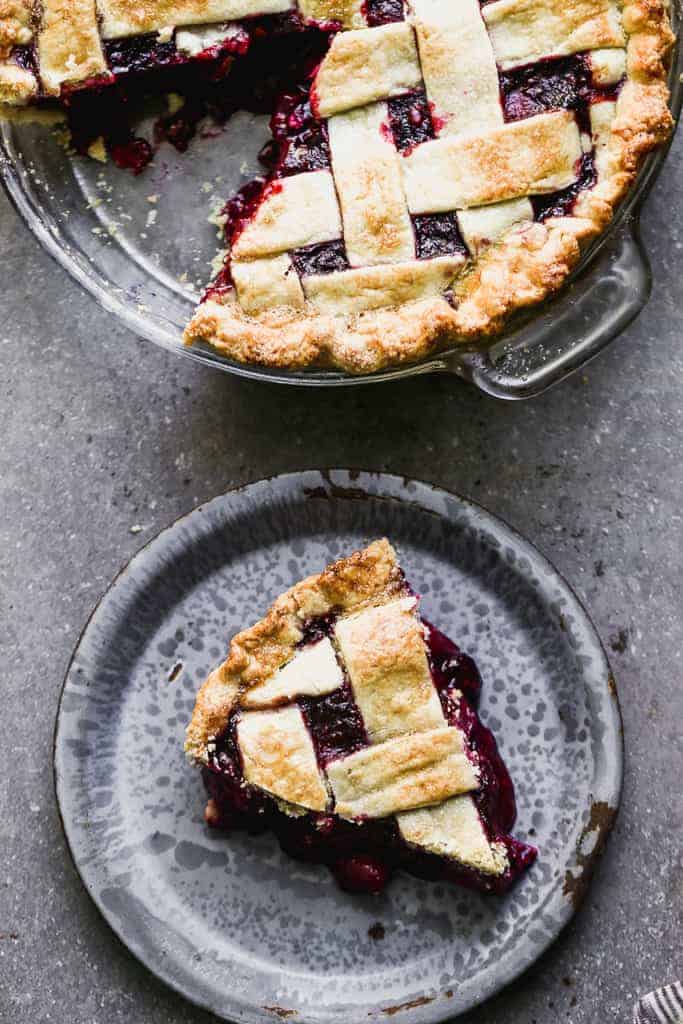
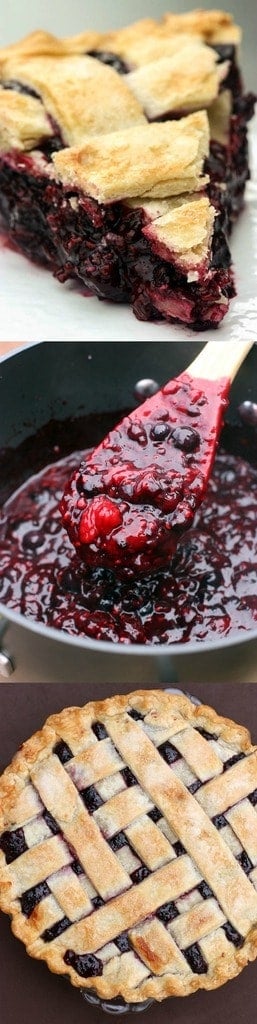
Serve or refrigerate. Remove to a wire cooling rack and allow to cool for several hours. Once cooled completely, you can cut into it or cover it and refrigerate it overnight to serve the next day.
What sets this Berry Pie apart?
- Less sugar. It has way less sugar than most berry pies. It's still amazingly sweet, but it's not overly sweet, like some berry pies tend to be.
- Holds it's shape. It has the perfect amount of liquid to yield a pie slice that holds its shape. Some berry pies are so juicy that they completely fall apart when you cut into them. This one will turn out beautifully, as long as you let it cool for several hours before cutting into it.
So there you have it. Our family's favorite Triple Berry Pie. Perfect for Thanksgiving or Christmas or any time you're craving some pie…which, for me, is ALWAYS.
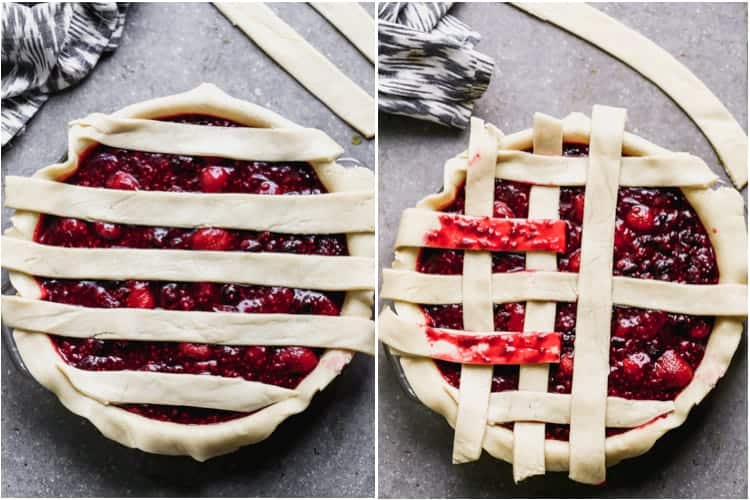
How to Make a Lattice Crust:
Don't let this beautiful pie crust intimidate you! It's so easy, especially if you know the tricks!
- Roll out crust. Roll our your homemade crust on a lightly floured counter or on a piece of parchment paper. (I like to place a piece of parchment paper on top of a damp kitchen towel to keep it from moving around). Roll the pie crust into a large circle that's about 1-2 inches larger than then top edge of your pie dish.
- Cut strips. Use a pizza cutter to strips. cut them as wide as you'd like them to be (there's really no right or wrong way).
- Lay first layer of strips. Lay your longest strip across the middle of the pie then lay a few shorter strips on either side, parallel to each other and spaced evenly.
- Fold pack even numbered strips. Fold back the second and 4th strip and lay a shorter strip of dough perpendicular to other dough strips. Unfold those dough strips over the new strip.
- Fold back odd numbered strips: Fold back the first, third and fifth strips in the same direction and lay another dough strip across the pie. Unfold the first, third and fifth strips over the new strip.
- Repeat steps 4 and 5 until pie is covered with a lattice crust.
- Trim dough strips.
- Pinch crusts together. Pinch the lattice top with the bottom crust to form one unified outer edge.
- Crimp edges.
Make Ahead and Freezing Berry Pie:
To make ahead: This pie can be prepared completely 1 day a head of time. You can also prepare the filling up to 3 months ahead of time and store it in the freezer. Thaw it overnight in the refrigerator before pouring in unbaked pie crust.
To freeze: You can freeze the baked pie for up to 3 months. Thaw overnight in the refrigerator and allow to come to room temperature before serving.
Consider trying my other HOMEMADE PIES, like:
- Apple Pie
- Cherry pie
- Lemon Sour Cream Pie
- Pumpkin Pie
- Chocolate Mousse Cheesecake Pie
- Key Lime Pie
- Chocolate Cream Pie
- Oreo Cheesecake Pie
- Lemon Chiffon Pie
- Banana Cream Pie
- Coconut Cream Pie
You can also FOLLOW ME on FACEBOOK, TWITTER, INSTAGRAM and PINTEREST for more great recipes!
Triple Berry Pie
Equipment
Ingredients
- homemade pie crust, for a 9'' deep dish pan. This recipe makes 2 crusts: one for the bottom and one for the to
- 7 cups fresh or frozen raspberries, blueberries and blackberries, about 2 ⅓ cups of each type of berry*
- 1 cup granulated sugar, (plus a little extra to sprinkle on top of the pie)
- 1 Tablespoon lemon juice
- 4 Tablespoons cornstarch
- 2 Tablespoons butter
- 1 large egg white, beaten with a fork
Instructions
- Cook berries: Add berries, sugar and lemon juice to a large saucepan over medium heat.
- Simmer, until warm and juicy, about 5-10 minutes, gently stirring occasionally. (You can taste it at this point and see if it's sweet enough for your liking. I don't like to make mine too sweet, but if you want it sweeter you can add ¼ cup more sugar.)
- Thicken filling: Spoon out about ½ cup of the juice from the pan into a bowl. Stir cornstarch into the juice until smooth.
- Bring pot of berries back to a simmer and slowly pour in the cornstarch. Gently stir mixture (being careful not to mash the berries), until thickened, about 2-5 minutes.
- Cool and add to pie shell. Remove from heat and stir in the butter. Allow to cool for 15 minutes. Pour mixture into unbaked pie shell (in a 9 in deep dish pan).
- Add lattice top or a whole top with holes pricked on top for steam to escape. (See directions for lattice crust below).
- Pinch the edges of the top and bottom pie crusts together and crimp the edge, if you like. Brush a thin layer of beaten egg white over the top of the pie and sprinkle lightly with sugar.
- Bake at 400 degrees F for 40-45 minutes. Check it after about 25 minutes and place a piece of tinfoil over it if the top crust is getting too brown.
- Remove to a wire cooling rack and allow to cool for several hours. Once cooled completely, you can cut into it or cover it and refrigerate it overnight to serve the next day.
For the lattice crust:
- Roll out crust. Roll our your crust on a lightly floured counter or on a piece of parchment paper. (I like to place a piece of parchment paper on top of a damp kitchen towel to keep it from moving around). Roll the pie crust into a large circle that's about 1-2 inches larger than then top edge of your pie dish.
- Cut strips. Use a pizza cutter to strips. cut them as wide as you'd like them to be (there's really no right or wrong way).
- Lay first layer of strips. Lay your longest strip across the middle of the pie then lay a few shorter strips on either side, parallel to each other and spaced evenly.
- Fold pack even numbered strips. Fold back the second and 4th strip and lay a shorter strip of dough perpendicular to other dough strips. Unfold those dough strips over the new strip.
- Fold back odd numbered strips: Fold back the first, third and fifth strips in the same direction and lay another dough strip across the pie. Unfold the first, third and fifth strips over the new strip.
- Repeat steps 4 and 5 until pie is covered with a lattice crust.
- Trim dough strips. If you dough strips hang over the edge of the pie, trim them to the edge.
- Pinch crusts together. Pinch the lattice top with the bottom crust to form one unified outer edge. Crimp edges.
Notes
Nutrition
Nutrition information is automatically calculated, so should only be used as an approximation.
Text me new recipe ideas!
Simple, tasty ideas sent once a week. No spam.
Have you tried this recipe?!
RATE and COMMENT below! I would love to hear your experience
I originally shared this recipe November 2015. Updated November 2019 with new photos and additional instructions.


Five stars all day long! All winter I’ve been staring at a shelf full of frozen berries, and I chose this one to try. No reason to look elsewhere, this one is my keeper! I used strawberries, blackberries, huckleberries, raspberries, blueberries and cranberries! OH MY! It set up beautifully and tastes amazing. Not cloyingly sweet; just right for us! All wrapped up in your Perfect Pie Crust recipe, this goes into my Best of the Best File. I’ll be putting the Granddaughters to work picking berries again this summer! Thank you for sharing this lovely recipe!
When do you add the butter?
Hi, Kya. I saw your question scrolling down — I missed the butter directions, too. I am accoustomed to recipes that say to dot the filling with cut-up butter before putting on the top crust. But I didn’t see that in the directions here and I thought it was an oversight. So I just dotted it with butter the way I usually would, on top of the filling but under the top crust. But, re-reading the recipe, I see the butter is to be stirred into the hot, thickened filling (#5 in the filling directions) before cooling. I am sure this mixes in the butter with much greater uniformity, so I will denitely do this when I make it again.
All I can say is WOW!!! This recipe is so easy and the pie is perfect and utterly delicious. I’m so happy I found this recipe…this will be the only Triple Berry pie I make from now on.
I made this pie 2x. I used Costco’s frozen mix of 4 organic berries. The first time I made it I served it the same day and it was very wet, but the taste was there. Next time I made it I baked it the day before and let it rest uncovered for 24 hours before serving. It stayed together much better. I definitely still prefer peach or apple pies, taste-wise, but this recipe will go into my files anyway because I know berry pies will be requested. This recipe seems pretty versatile I bet it’ll probably work with any mix of berries.
Would it be a disaster to leave off the lattice top crust? I don’t have enough pie dough but am craving berry pie!
Will not be a disaster, it just won’t have a top crust. Enjoy
I tried it with blackberries, raspberries, quartered strawberries and blueberries. It was amazing, and only lasted about 24 hours in my house. Great recipe!
Do you serve this pie cold from the refrigerator where it was stored overnight, or better to bring it back to room temp the day of serving it?
I usually take it out of the fridge about 30 minutes before serving, but either way is fine!
Hello… I can’t wait to make this pie today… but I would REALLY like to have a crumb topping. Do you think the topping would be too heavy for the berries and will sink…since they are cooked first?
Thanks
No I don’t think the topping would sink–sounds delicious!
I just made one of these pies but didn’t have quite enough triple berries, so added the differencecwith strawberries. I’m sure it will be yummy.
Has become another holiday tradition recipe! My husband requests this pie every year. Not too sweet and not too tart. So easy and delicious!
If you love berry pie, this is the one for you! Great instructions, easy to make, and so delicious!
This is an outstanding pie! Easy to make delicious and nothing goes to waste, because you can freeze the leftovers 😊
This is my 3rd time making it and it comes out perfect every time!
Just finished making this for Thanksgiving tomorrow. It’s going to be delicious, I’m sure. I loved your tips about rolling out the crust. Worked like a charm.