This post contains affiliate links.
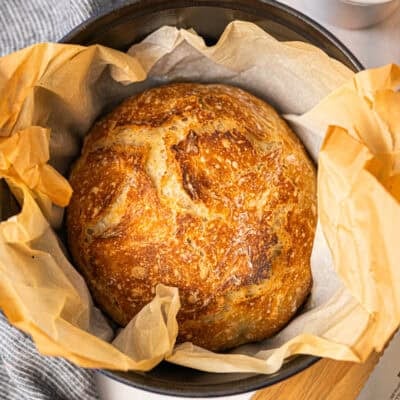
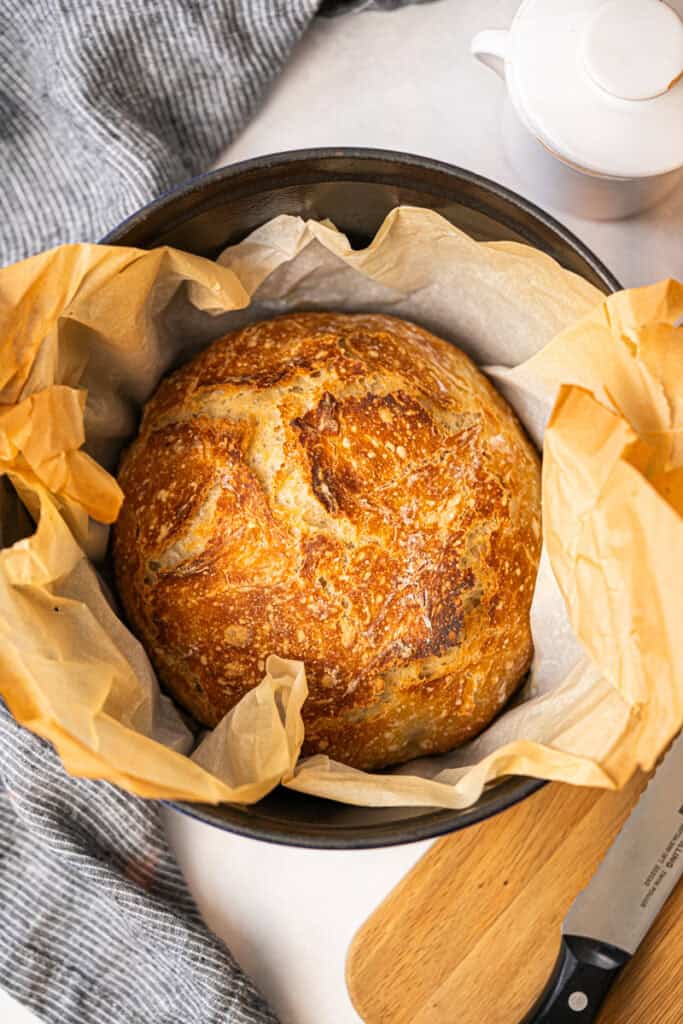
Our easy No Knead Artisan Bread recipe just uses 4 simple ingredients and creates a bakery-style artisan loaf with a crispy, golden crust and a soft, tender interior. This is the easiest bread that just requires 5 minutes of prep, anyone can make it!

I'm telling you, ANYONE can make this Artisan Bread.

This is hands-down the easiest bread recipe you'll ever make, and it looks like it came straight from a fancy bakery! You only need 4 basic ingredients–flour, yeast, salt, water–and 5 minutes of time. If you're too intimadated for sour dough (or frankly just don't have the time for sourdough) this will be your favorite artisan bread recipe.
Artisan bread bakes best in a cast iron pot (this one is a great price) but you can also make it on a basic cookie sheet, with a pan of boiling water at the bottom of your oven to create steam. I love to serve it alongside soup, salads, or really any main dish!
If you want more easy bread recipes, try my Homemade Baguettes, English Muffins, Homemade Sandwich Bread, Pita Bread, or Focaccia!
How to make No Knead Bread:
Combine and Rise: In a large mixing bowl, mix flour, salt, and yeast. Pour in the warm water and stir with a dough hook or wooden spoon until combined (the dough will be sticky). Cover the bowl and let it rise for 3-4 hours or in the refrigerator for up to 15 hours.
Shape and Preheat Pot: On a floured surface, shape the dough into a bowl then place on a piece of parchment paper. Cover with a dry kitchen towel allow it to rise for 30 minutes. Place your empty dutch oven (or baking sheet, and a pan of hot water) in the oven and let it preheat to 450°F.
Bake: Uncover dough and carefully lift the parchment paper with the bread dough on it, into the hot dutch oven. Place the lid back on the pot and bake for 30 minutes. Remove the lid and bake uncovered for 15 more minutes. Remove the bread from the pot and let it cool on a wire cooling rack.

No Knead Bread
Equipment
- Dutch Oven , or
- Dough Hook , or wooden spoon
Ingredients
- 3 cups all-purpose flour
- 2 teaspoons coarse sea salt
- 1/2 teaspoon active dry yeast, (or instant yeast)
- 1 ½ cups warm water, (about 110 degrees F)
Instructions
- In a large mixing bowl, combine flour, salt and yeast. Pour in warm water and stir with a wooden spoon until well combined. The dough will be sticky. Cover the bowl and allow it to rise at room temperature for 3-4 hours, or in the refrigerator for up to 15 hours.3 cups all-purpose flour, 2 teaspoons coarse sea salt, ½ teaspoon active dry yeast, 1 ½ cups warm water
- Scoop dough onto a floured work surface and shape into a ball. Sprinkle a tiny bit of flour on top of the dough ball and place it on a piece of parchment paper. Cover the dough with a dry kitchen towel. Allow to rise for 30 minutes. At this point you can score the bread with a bread lame, if you want, but it's not required.
- Meanwhile, place an empty dutch oven/cast iron pot*, with the lid on, into the oven and preheat oven to 450 degrees F.
- Uncover dough and lift the parchment paper, with the dough on it, into your hot pan that’s been preheating in the oven. Cover with lid and return to oven to bake for 30 minutes.
- After 30 minutes, remove lid and bake, uncovered for about 15 more minutes, until golden on top. Remove from oven and allow bread to cool on a wire cooling rack.
- Store bread in an open paper bag on the counter for up to 1 week.
Notes
- 3 large cloves minced garlic plus 2 Tablespoons fresh chopped rosemary,
- 1 cup favorite kind of shredded cheese (try adding a chopped jalapeño!)
- ¾ cup dried cranberries and/or chopped nuts.
Nutrition
Nutrition information is automatically calculated, so should only be used as an approximation.
Text me new recipe ideas!
Simple, tasty ideas sent once a week. No spam.
I originally shared this recipe March 2019. Updated January 2026.


I love making bread and have several go-to recipes, but I wanted to try yours out today! Unfortunately the dough was just too sticky to work with. I had to add so much flour after a 5 hour rise, and even then it was just a wet blob. It seems like other people had this issue as well, so maybe this recipe could benefit from some tweaks!
Made this and it was very tasty. It did take a bit longer to rise than expected, but still turned out great! I’ll be coming back to this for sure!
Thank you for this amazing bread recipe!y family loves it and I’m now making 3 loaves a week to keep up! Also making a jalapeno cheddar version this week…can’t wait to see how it turns out
I also had issues with the dough being super wet/sticky and turning into a spreading mass instead of a nice round ball. Weighing out my flour did NOT help. Instead, I adjusted for the coldness of my kitchen and all of the moisture here in the air (PNW climate). I reduced the water to 1 1/4 cup and I threw in an extra 1/2 cup of flour and it turned out perfectly. If you go online, you’ll see the exact same recipe as this one on a million sites. Sometimes you have to adjust for the environment. Bread making is an art form. Find the art in your home. 🙂
This recipe was shared with me a few weeks ago and I’ve made half a dozen loaves now – SO DELICIOUS, and easy!!! My whole family devours the bread that I’ve started making 2 loaves at a time and freezing the second in 2 halves for a quick thaw. I’m curious to know if I could use this recipe and divide the dough in standard muffin tin or mini muffin tin – has anyone tried this?? And if so how did you adjust your cook times?
Ahh I love hearing that!! Yes, you can absolutely bake the dough in a muffin tin for little rolls. Grease the tin well, fill each cup about 1/2–2/3 full, and let them rise until puffy. Bake at 450°F and start checking around 12–15 minutes for standard muffins (mini muffins more like 8–10). They’re done when they’re golden and sound hollow when tapped.
Suddenly, I’m a bread maker! This is such an easy, delicious recipe. My family was very impressed and ate the whole loaf immediately. Doubled the recipe the next time, and still no bread leftovers! Awesome, simple recipe!
I wanted to share that this has become my go to recipe for dutch oven white bread. It’s very easy and comes out perfect every time. If I want a “fluffier” bread, I just bloom the yeast first with a teaspoon of sugar. Otherwise, or really can’t be any simpler – i love it. I’ll always have this recipe Pinned!
I am in the middle of making this recipe and it is shaping up to be a complete and utter disaster. I too just triec to remove it from the bowl after the first rise and it looked good, but when I poured it on the paper, what I got was an enormous puddle. I know my way around the kitchen and I just cannot believe how badly this is going.
I’m so sorry, that’s frustrating. This dough is meant to be very wet, but if it’s spreading too much it may just need a bit more flour or could have over-proofed, so try sprinkling in a little extra flour as you shape it and get it into that hot dutch oven quickly.
I did this TWO times–disaster both times!!! Didn’t rise much, very sticky, and VERY disappointing, not to mention wasteful. I had new yeast, new flour, and followed the directions to the letter. I am a retired home economics teacher, so I am very comfortable snd successful in the kitchen. I don’t know if i want to risk trying this a THIRD time!😩
For this recipe, the dough is supposed to be sticky, but it shouldn’t be pourable or runny, and a weak rise usually comes down to flour-to-water balance or a cool environment. If you try again, the most foolproof fix is to weigh the flour (about 360g for 3 cups) and keep the water just warm (around 105°F, not hotter). Also, a cool kitchen can really slow the rise—an overnight fridge rise (12–15 hours) plus a longer rest at room temp before baking often gives the best lift. If your dough was truly very wet both times, it almost always needs a little more flour to reach a shaggy “mounds in the bowl” consistency.