This post contains affiliate links.
A Simple step-by-step recipe and instructions for making authentic Tamales! Fill them with pork, chicken or beans and cheese and cooked on the stovetop or in the instant pot.
If you've been following TBFS then you know that I fell in love with authentic Mexican food while living in Mexico with my husband several years ago. If you love it too, be sure to check out my Authentic Mexican Rice, Cheese Enchiladas, Horchata, and Tres Leches Cake!

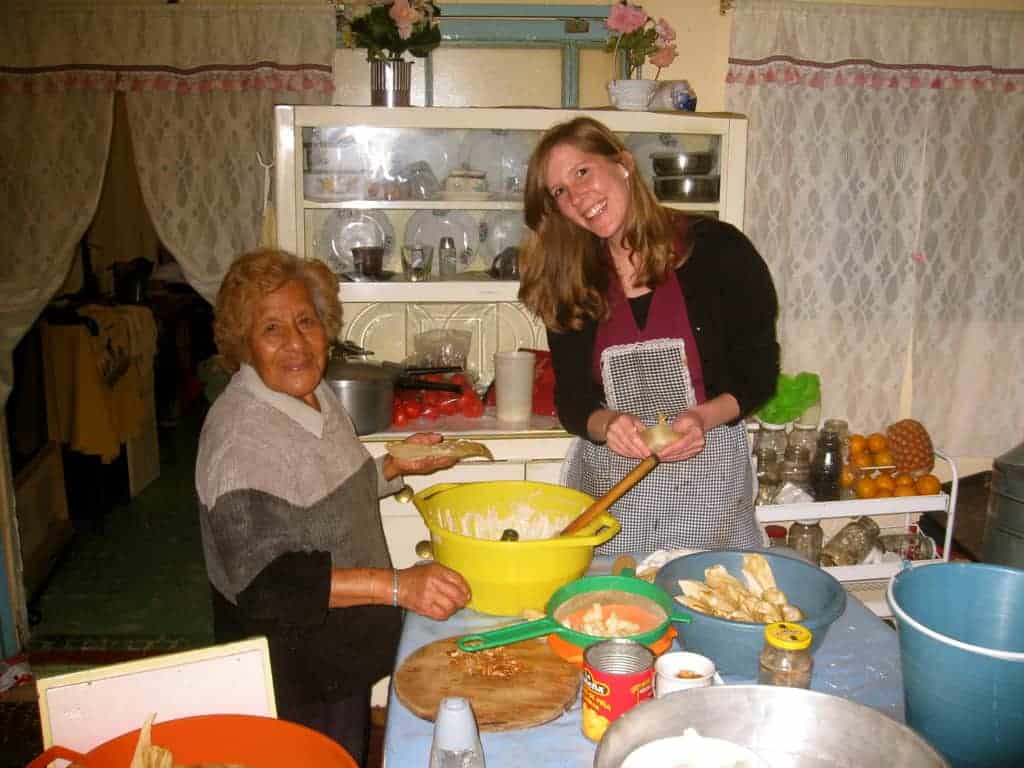
I learned to make homemade tamales many years ago from a sweet elderly woman in Puebla, Mexico. My husband and I were living in Puebla for a few months and became friends with this woman and her family. Her daughter was the secretary at the office building where we worked.
This sweet grandmother made incredible tamales! I expressed my desire to learn the ins and outs of authentic Mexican cooking, so the Grandma invited me over for a “tamalada” or Tamale making party. She made her masa dough completely from scratch, using dried white corn kernels and “cal” , which has been difficult for me to find in the U.S..
What is a tamale?
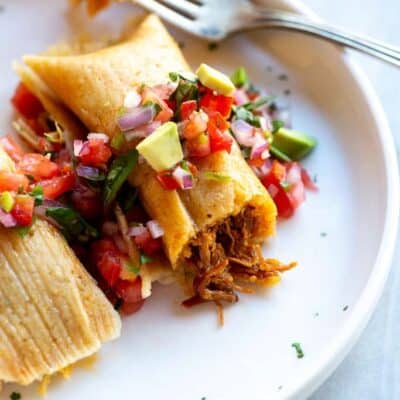
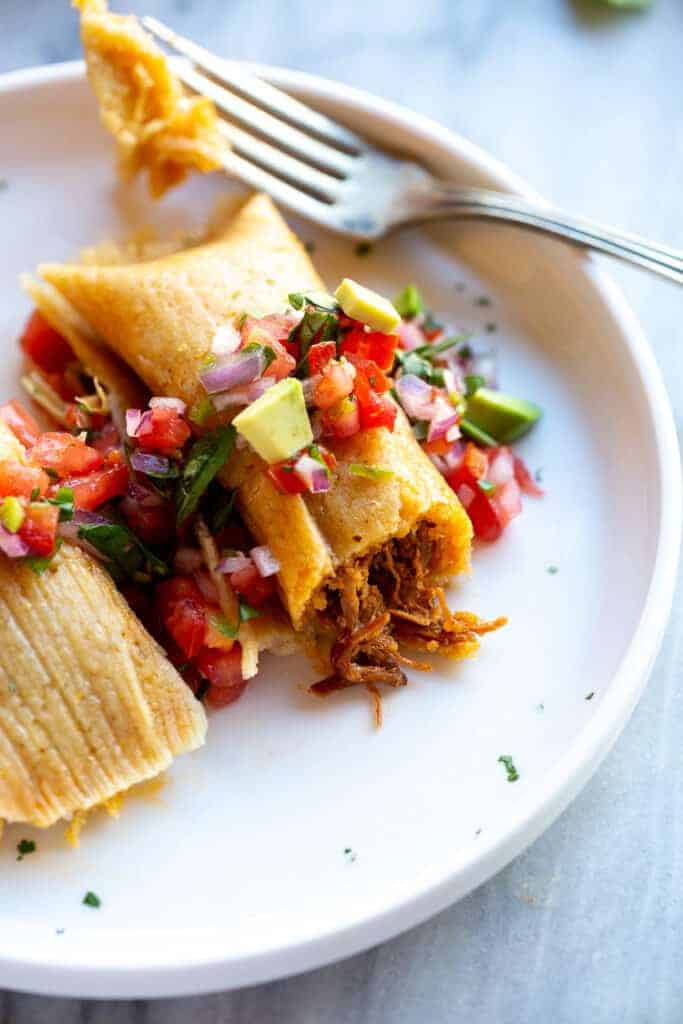
Tamales are a traditional Mexican dish made with a corn based dough mixture that is filled with various meats or beans and cheese. Tamales are wrapped and cooked in corn husks or banana leaves, but they are removed from the husks before eating. Try them served with pico de gallo on top and a side of guacamole and rice.
While making tamales is a process (made very fun with multiple people to help stuff and wrap them!), it's really simple, so don't be intimidated! There are just two main elements; the dough, and the filling.
- The dough, called “masa” is spread on the corn husk. The corn husks do not get eaten, they are just used to envelope the dough and filling of the tamale which gets cooked inside.
- The filling. You can fill the tamales with meat or beans and cheese. Find my favorite filling options below!
Ingredients:
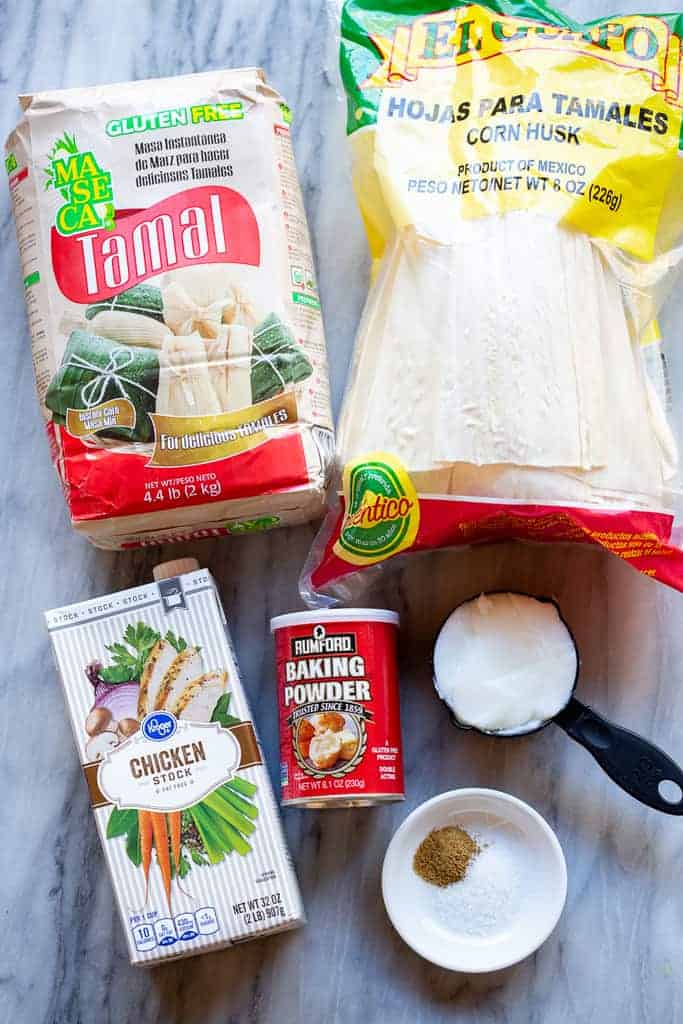
Masa harina: I like the Maseca brand which is a common brand found in the Mexican aisle at the grocery store.
Broth: Beef, chicken or vegetable will work. If using my red chili pork tamale filling, use the leftover broth from the cooked pork.
Baking powder
Salt
Cumin
Lard: lard is used in truly authentic Mexican tamales (and it has less saturated fat then butter)! You can find it in the Mexican aisle at the grocery store, or online. Shortening would work as a substitute.
Dried corn husks: 8 ounce package
How to Make Tamales, Step-by-step:
1. Soak the corn husks. Place corn husks in a bowl of very hot water for 30 minutes or until softened.
2. Prepare desired filling. You’ll need about 3 ½-4 cups of filling for one batch of tamale dough. Some filling options include:
- Salsa verde chicken: 3 ½ cups cooked, shredded chicken mixed with 16 ounce can salsa verde (I like herdez brand)
- Bean and cheese: 15 oz can refried beans and 1 ½ cups shredded mozzarella cheese
- Red chili pork: 1 recipe red chili pork
3. Make the masa dough: In a large bowl, use an electric mixer to beat the lard and 2 tablespoons of broth until fluffy, about 3-5 minutes. Combine the masa flour, baking powder, salt, and cumin in a medium bowl; stir into the lard mixture and beat well with an electric mixer. Add the broth, little by little to form a very soft dough. Beat on high speed for several minutes. The dough should spread like creamy peanut butter and be slightly sticky. Cover the mixing bowl with a damp paper towel, to keep the dough from drying out.
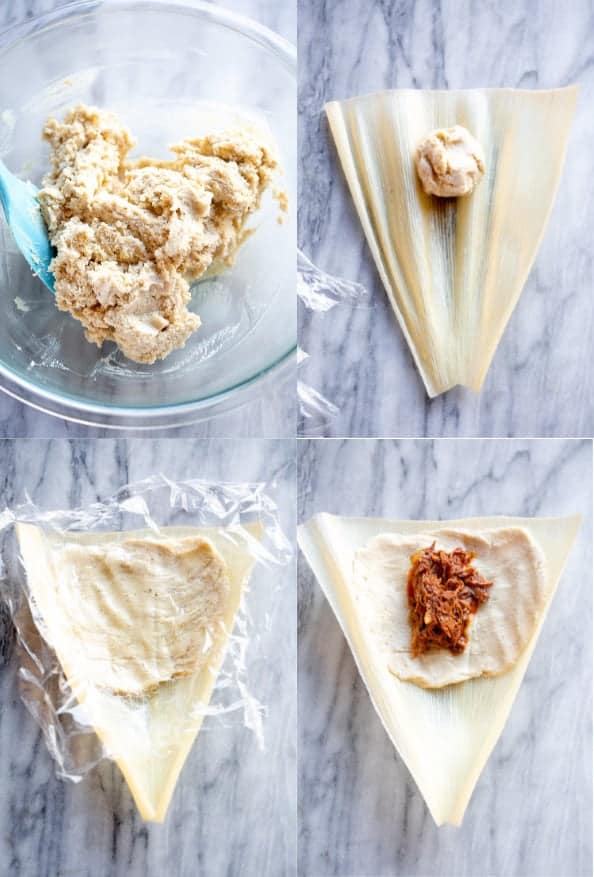
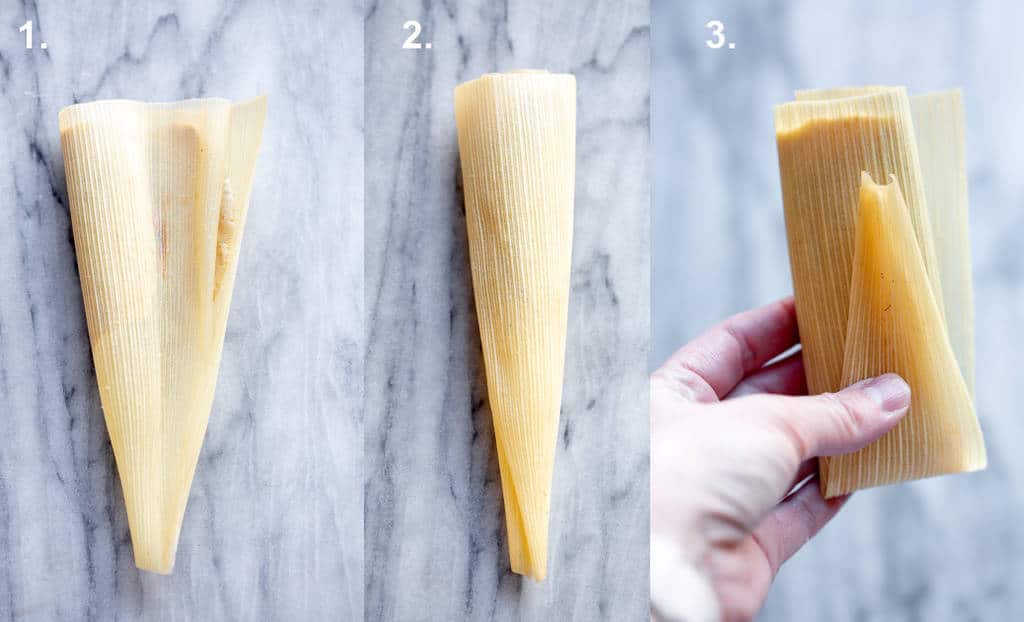
4. Assemble the tamales: Lay a corn husk, glossy side up, on the counter with the wide end at the top. Scoop about ¼ cup of dough onto the top, center of the corn husk. Lay a piece of plastic wrap over the dough and use your hands to press and spread the masa into a thin layer, about ¼ inch thick. Keep the dough spread along the top half of the corn husk to allow plenty of room to fold the bottom husk up, when it’s time.
Place 1-2 tablespoons of desired filling in a line down the center of the dough. (You don’t want too much filling).
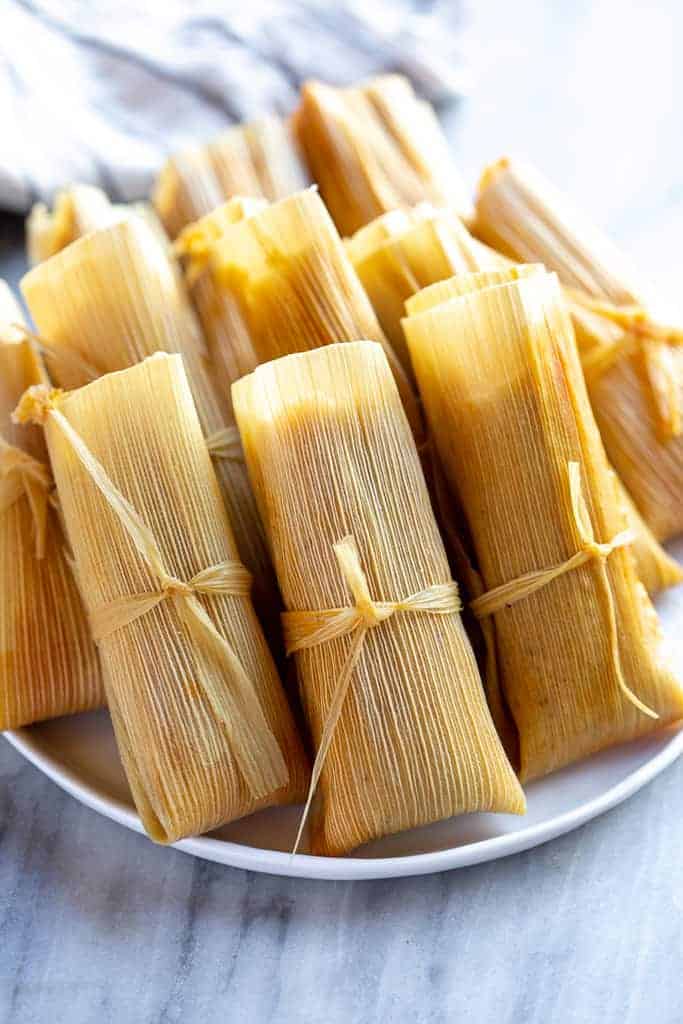
Fold-in one long side of the husk over the filling. Fold in the other long side, overlapping the first (like folding a brochure). Fold the bottom of the husk up. Optional: Tear a long strip from an edge of one of the soaked corn husks and use it to tie the tamale, to hold it together.
5. Tie the tamales (optional): Tying the tamales can help you differentiate them if making more than one filling. However, you don’t have to tie a corn husk string around them to secure them, as they will hold together without it, stacked upright, side-by-side in the pot.
6. Cook on the stove-top or Instant Pot:
Add water to the bottom of your stove-top steamer or Instant Pot pressure cooker. (About 1 cup for IP and a few cups for a steamer pot—don’t fill above the steamer rack.) Lay a few extra corn husks on the bottom rack to keep the tamales from falling through and any boiling water from directly touching them.
Place tamales standing upright, with the open end up, just tightly enough to keep them standing. If using a steamer, lay a few soaked corn husks or a wet towel over the top of the tamales before closing the lid.
Steamer: Bring water to a boil and once boiling, reduce to a simmer and steam for 1 to 2 hours (or even longer, depending on how many you're making). Check them after 1 hour. (In Mexico they would often place a coin at the bottom of the steamer and when the coin started to tap in the pot you know the water was low and you needed to add more.)
Instant Pot: Cook on Manual/High Pressure for 25 minutes. Allow pressure to naturally release for 10 minutes, and then quick release.

Freezing and Reheating Instructions:
To freeze tamales: I love making a big batch of tamales to keep in the freezer for busy nights. To freeze them, allow the cooked tamales to cool completely, then stick them in a freezer ziplock bag and freeze for up to 3 months.
To reheat tamales: Wrap leftover or frozen tamales in a few dampened paper towels and microwave until warmed through. The wet paper towels will help them “steam” as they are reheated. Be careful when unfolding them–they will be hot!

Serve tamales with:
- Toppings: salsa, avocado, sour cream, pico de gallo.
- Authentic Mexican Rice – you'll be in heaven!
- Homemade Refried Beans
- Easy Homemade Horchata
- or check out all my Mexican recipes!
You can also FOLLOW ME on FACEBOOK, TWITTER, INSTAGRAM and PINTEREST for more great recipes!
Mexican Tamales
Ingredients
For the Dough:
- 4 cups Masa Harina
- 3 cups broth, (beef, chicken, or vegetable broth)
- 2 teaspoons baking powder
- 1 teaspoon salt
- 1 teaspoon cumin
- 1 1/3 cups lard
- 8 ounce package dried corn husks
Filling ideas:
- Red chili pork
- Salsa verde chicken, See notes for recipe
- bean and cheese, See notes for recipe
- Authentic Mexican Rice, , for serving, optional
Instructions
- Soak the corn husks in a bowl of very hot water for 30 minutes or until softened.
- Prepare desired fillings*.
- Make the tamal dough: In a large bowl, use an electric mixer to beat the lard and 2 tablespoons of broth until fluffy, about 3-5 minutes. Combine the masa flour, baking powder, salt, and cumin in a separate bowl; stir into the lard mixture and beat well with an electric mixer.
- Add the broth, little by little to form a very soft dough. Beat on high speed for several minutes. The dough should spread like creamy peanut butter and be slightly sticky.* Cover the mixing bowl with a damp paper towel, to keep the dough from drying out.
- Assemble the tamales: Lay a corn husk, glossy side up, on the counter with the wide end at the top. Scoop about ¼ cup of dough onto the top, center of the corn husk. Lay a piece of plastic wrap over the dough and use your hands to press and spread the masa into a thin layer, about ¼ inch thick. Keep the dough spread along the top half of the corn husk to allow plenty of room to fold the bottom husk up, when it’s time. Remove plastic wrap.
- Place 1-2 tablespoons of desired filling in a line down the center of the dough. (You
don’t want too much filling). - Fold in one long side of the husk over the filling. Fold in the other long side, overlapping the first (like folding a brochure). Fold the bottom of the husk up.
- Tying tamales (optional): You don’t have to tie a corn husk string around the tamales--it does take more time and they will hold together without it. However, if you’re making multiple fillings, tying ones of a certain kind can help to identify them.
- Cook on the stove-top or Instant Pot: Add water to the bottom of your steamer or instant pot. (About 1 cup for IP and a few cups for a steamer pot—don’t fill above the steamer rack.) Lay a few extra corn husks on the bottom rack to keep the tamales from falling through and any boiling water from directly touching them.
- Place tamales standing upright, with their open end up, just tightly enough to keep them standing. If using a steamer pot, lay a few soaked corn husks or a wet towel over the top of the tamales before closing the lid.
- Steamer: Bring water to a boil (in Mexico they would often place a coin at the bottom of thesteamer and when the coin started to tap in the pot you know the water was boiling.) Once boiling, reduce to a simmer and steam for 45 minutes to 1 hour, or longer. Check them after 45 minutes.Instant Pot: Cook on Manual/High Pressure for 25 minutes. Allow pressure to naturallyrelease for 10 minutes, and then quick release.
- To test if the tamales are done: Remove one and try to pull the husk off. If the husk pulls away cleanly from the tamale they're done. If the dough is still sticky or wet looking, cook them for 5-10 minutes longer and try again.
- Store leftover tamales in the refrigerator for 5-7 days depending on the freshness of your ingredients.
Notes
- Salsa verde chicken: 3 ½ cups cooked, shredded chicken mixed with 16 ounce can salsa verde (I like Herdez brand)
- Bean and cheese: 15 oz can refried beans and 1 ½ cups Oaxaca or shredded mozzarella cheese
- Red chili pork: 1 recipe red chili pork
Nutrition
Nutrition information is automatically calculated, so should only be used as an approximation.
Text me new recipe ideas!
Simple, tasty ideas sent once a week. No spam.
I originally shared this recipe October 2017. Updated February 2020 with new process photos and clearer instructions.
Have you tried this recipe?!
RATE and COMMENT below! I would love to hear your experience.


I just made tamales today for the first time. Your recipe was easy to follow and they turned out so tender and delicious!
These are a lot of work, but SO worth it! I’ve made them at least 5 times now. They are delicious and moist (dry tamales are the worst). Thank you for sharing such a great recipe.
Tried these for the first time. My masa would not come together and I have no idea what went wrong. Did it step for step and ended up using nearly 5 cups of liquid for the masa instead of the 3 before it actually started floating. Do you have any idea why?
It seemed really thin at that point as well.
Assembled and they are in the instant pot now. We shall see.
Not sure if altitude has something to do with not working properly to mold together while cooking however; the filling was excellent
I would guess you did not whip the initial lard and stock enough. This would have caused your dough to be heavy.
How big of a steamer does it need to be? Do they need to be upright in steamer or can they lay flat?
Any steamer pot is fine–you may just need to cook in batches. Stand them up.
When you steam it you can use a pot big enough ,
for how ever many tamales you need .
They are good been trying to get someone to show me how to make them no one would so i looked on the internet and this recipe popped up . They cane out so good .even better then the peoples tamales I was asking to help me make them
First attempt and they turned out great!
WOW! They taste amazing! I cooked mine for about 1h-1h15 ans they turned out perfect. Thank you for sharing that recipe with us.
Awesome taste and made a lot of tamales – I had enough barbacoa to freeze for my second batch which are steaming now! The family loved them. I had never made tamales, but loved them from trips to Mexico and Texas. The instructions were clear, but there were a few learning curves.
Things I learned:
1) All corn husks are not the same – I bought 2 packages, just grabbed them off the shelf. The first package was really dry, took a long time to soften up enough to fold, and they broke a lot, very frustrating. The second package (same brand bought on the same day) had bigger husks and they were much easier to use. I will feel up the packages in the future to get the more pliable ones😉.
2) Mixing up the masa takes longer than I thought, the first batch I was worried about getting the little ball to float, took forever adding all the broth in little bits. This time I was bolder and mixed the lard while getting the dry stuff ready, once the stock was incorporated I turned the mixer up and let it rip! Fluffy lard in no time. Stir mode for adding the dry stuff, add about half the water (still in stir mode or you’ll have a mess!) mixed that in then added most of the rest of the water (I kept out maybe 1/4 cup) stirred it in then turned the mixer up to 5 and let it go for a couple minutes. checked consistency – didn’t float so stirred in a bit more liquid, then turned it up for a couple of minutes again. Floated perfectly! Masa is ready! P.S. My mixer goes to 10 on speed, adjust accordingly.
3) Use wet fingers to spread the masa and don’t bee too concerned that the masa is perfect before filling.
4) My first batch steamed for about 90 minutes before they were done – I assume the ones I made today will have to steam for about 2 hours, they are a little bit larger.
They are great with some salsa verde! I used barbacoa beef and sautéed onions and peppers as my filling. I look forward to other flavors now that I feel like I know what I am doing.
First off I think you can get great results with half the lard.
Second off, rather than that lard-mixing trick I just melt the lard in the microwave. We save lard from cooking (bacon, guanciale, etc.) so that gives extra flavor depth.
Third off, you can just follow the recipe and you’ll be fine. You don’t need to bother with that floating ball trick.
Fourth off, I’ve mentioned elsewhere but I don’t even think the floating ball thing really works right. broth is the same density as water, so adding broth to something that sinks won’t make it float. The only thing that makes it float is whether your little ball happens to have more lard (oil floats on water) rather than less. So I see this as a test for something you don’t even need to test.
The purpose for testing it this way would be to make sure you have enough air incorporated into your batter. Even though you are adding baking powder it would not add enough leavening to keep the batter from being dense when cooking. If the batter does not float it would still taste the same you would just have a denser tamale.
You’re forgetting about what gets it to emulsify? What are we incorporating. Air. The right moisture and fat are important.
You’re exactly right!
Just terrific! This was my first attempt ever in making tamales and probably one of the recipes that I did not change a thing in. I made the first batch using Crisco, since that’s what I had on hand and the second using lard. I preferred using Crisco since fresh lard was not available. I steamed mine in my slow cooker and they were great.
I did follow the pork recipe and they were delicious. That will be my go to recipe from now on. Yum yum!
Thank you so much for sharing this recipe and the history on how you came to acquire it. It has now become a family favorite and once a month we declare Tamale Tuesday.
Wonderful recipe! Just the right amounts… I always like to make my own…haven’t tasted a comm one yet that was ok. Fill with anything you like as long as it’s not too wet. Love the parchment using parchment, works for me! Easier!
Really good! And so tasty. Will definitely add this dish to our regular meal plan.
I made the tamales because I can’t find the ingredients for the Chilean version of tamales (humitas) as I live abroad. Was very happy with results and surpassed my expectations.
I too live in Santiago, Chile, part-time. As a vegan, there are many delicious vegan choices. Humitas don’t require anything from an animal to taste delicious!
Good job! This is about spot on with how I learned to make them in Mexico. I thought I’d give a few tips; sometimes all that lard can upset one’s stomach a bit, so you can use half lard half Criscu (any short.) and it works just as well. (Keep it half lard though because that’s flavor.) And really spice up your broth mixture for your dough. The spices, especially the salt, will dissipate during the steaming process. Using MSG (yes, it IS safe-look it up) helps a lot as it can cut back your salt by up to 40% and help keep all that flavor you worked hard to get, in there. I never tie, that would take ages, since if you make 1 tamale you may as well make 100. If you can’t get them to hold just stick a toothpick in during cooking. You won’t cook your chicken with your pork (or whatever) anyway so you should know which are which. This is a good, solid recipe posted here and it really walks you through very well!
Thanks! We’re making these right now, and your extra tips are really helpful. Also, just the confirmation that this recipe is on point. Can’t wait to taste the final results!
MSG is NOT safe. It has so many side-affects
Headache · Flushing · Sweating · Face pressure or tightness · Lack of feeling (numbness), tingling or burning in the face, neck and other areas
Good luck if you are putting MSG on everything cause you are likely sick all the time and wondering why