
This post contains affiliate links.
Learn how to make a homemade Gingerbread House from scratch with this complete step-by-step recipe, including gingerbread dough, royal icing, a free printable gingerbread house pattern.
 Making Gingerbread Houses is my Favorite Christmas Tradition
 Making Gingerbread Houses is my Favorite Christmas Tradition
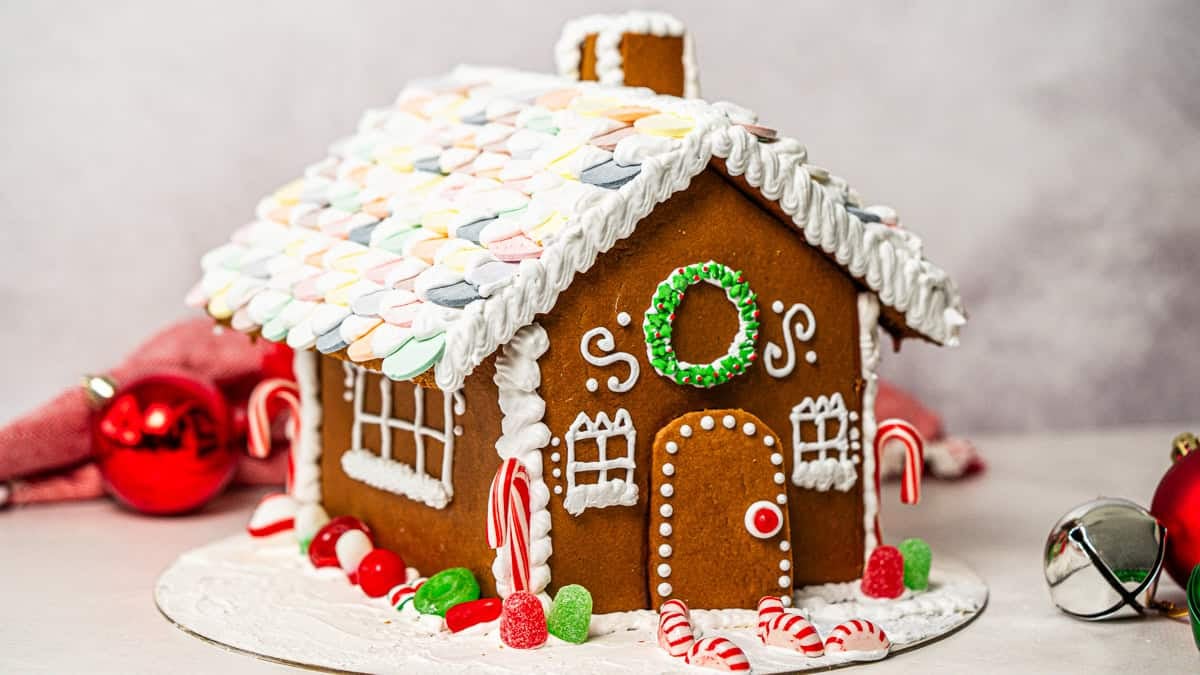
Thanks to my Mom for this Gingerbread house recipe and free template, that she's been using since before I was born! We think of these gingerbread houses less as something to eat and more as a Christmas decoration you'll want to display year after year. It's such a special family tradition and after we made ours, every year we would choose a friend, neighbor, or teacher to make one for.
What I love most about this recipe is that there's absolutely no rush. You can make the dough up to a week ahead, bake and cut your pieces (with my free pattern!) ahead as well, and save the decorating (the most fun part!) for last when the kids are excited to help. And, our easy royal icing recipe is a must for decorating! It's basically frosting glue!
Check out all of my Christmas recipes, like Chocolate Fudge, Chocolate Turtles, Pretzel Bark, Gingerbread Cake, or Homemade Caramel!

How to make a Gingerbread House:
Make Gingerbread: The homemade gingerbread only takes about 5 minutes to mix together with a stand mixer then can be stored in a gallon Ziploc for up to a week. We use pantry staples like molasses, sugar, eggs, vanilla, flour, and spices.

Bake Gingerbread: Separate gingerbread dough into four pieces then roll each one into a 12×12 rectangle. Bake on parchment paper on top of a baking sheet.
Cut Gingerbread Pieces: As soon as the gingerbread is hot from the oven, lay the pieces from our free pattern printable on top to trace and cut out each piece. Let the pieces cool completely, ideally for several hours or overnight, before assembling. (Unlike other gingerbread house recipes, we don't cut the gingerbread pieces out before putting the dough in the oven, because the edges of the pieces will bake rounded a little, making it harder to assemble the house!)

Decorate Gingerbread House: My biggest pro tip is to decorate the sides of your house BEFORE you assemble it! Whip up my royal frosting recipe before assembling, and cover the bowl with a wet towel so it doesn't dry out as you decorate.
Use the small tip to pipe the windows and smaller details, and the star tip to add any “snow” on the bottom of the windows, and for piping the wreath. I love to layer the green star shaped sprinkles for the wreath and little round ball sprinkles for around the wreath. I love using a red hot candy for the doorknob.
If you make a design mistake, no worries! Just gently wipe the royal frosting off your gingerbread house with a damp cloth–it's very forgiving! (And although I prefer to use the melted sugar to “glue” my house together in the next step, my royal frosting icing recipe is strong enough to hold it together, if you want to use it instead).

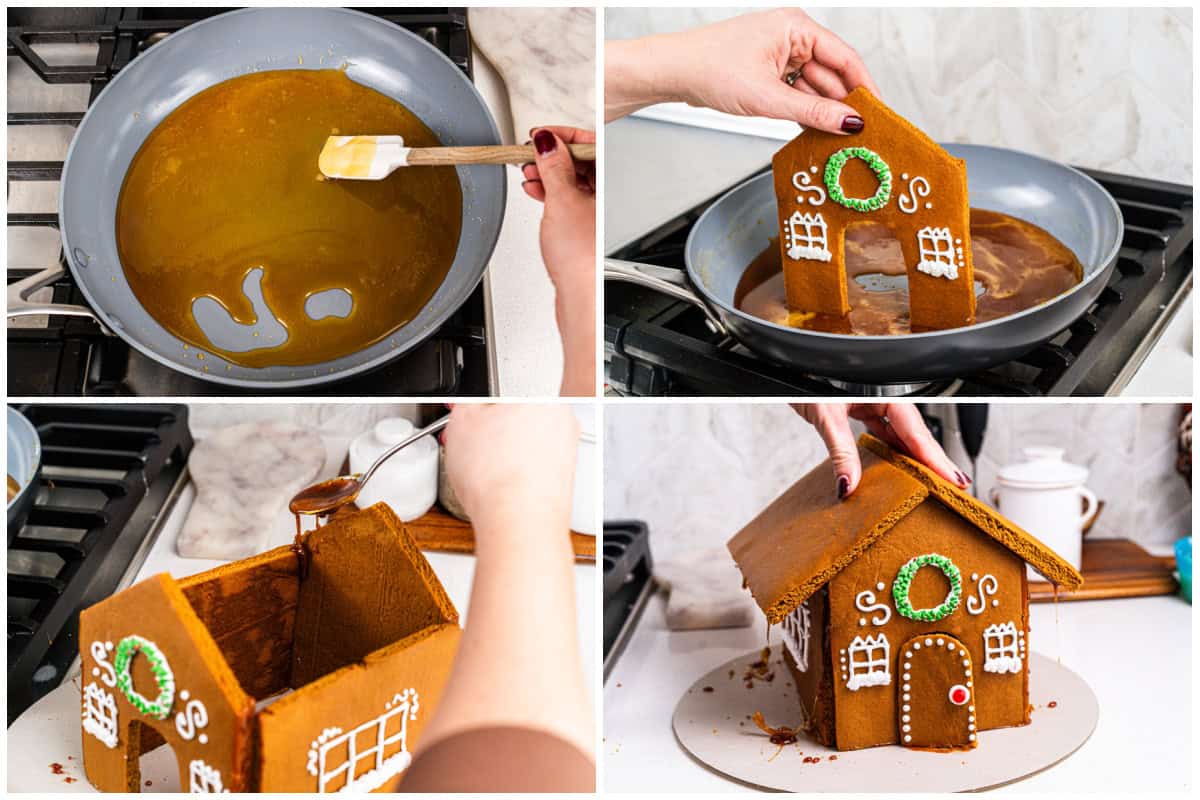
Assemble Gingerbread House: Prep a cardboard cake round and have it by the stove and ready. Melt 2 cups of granulated sugar in a large pan on the stove over medium heat, stirring until it is golden and melted (5-10 minutes). Be careful not to burn yourself while assembling! Start with the back of the house and carefully and quickly dip the bottom of each side on the house in the sugar then place it towards the back of your board. Hold it in place for a few seconds and you'll be amazed at how fast it dries! After you place the back, dip the bottom and back edge side of each side house piece before connecting with the back piece. Finish the frame with the front of the house, dipping the bottom edge and both sides. Before adding on the roof, carefully tilt the gingerbread house towards each corner, dripping some melted sugar down the inside corners of the house (have another person help!)
Lastly, carefully spoon on some sugar on the back of the roof, where it connects to the house and place it on the house, holding it in place until it dries. Finally, carefully dip the bottom edge and sides of the chimney and place it on top of your house. Your gingerbread house is now assembled!
Finish Decorating: Now that the sides of the houses are decorated and it's assembled, it's time to do the roof and candy decorations! I love to use necco candies for the roof shingles, but there are so many fun ways, like mini pretzel twists, shredded wheat cereal squares, or even just with a royal icing decoration.
Feel free to pipe trim, decorate the cardboard round “yard”, and add any candies you want on your DIY gingerbread house! If you are planning on storing this house, just avoid chocolate.

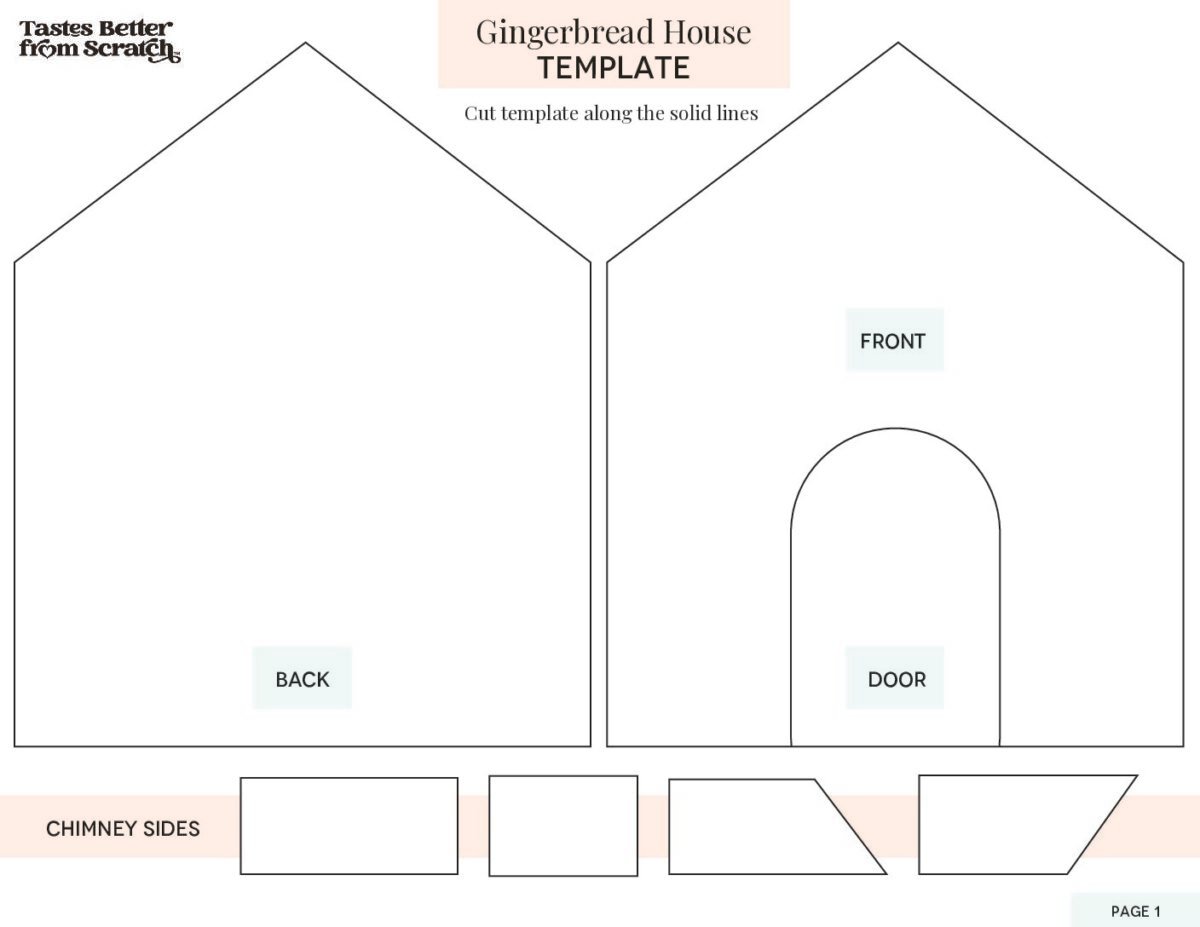
Gingerbread House Template:
Don't forget to print the template for free and cut out all the pieces before baking your gingerbread.

Gingerbread House Recipe
Equipment
- Pastry Bags , you will need 2
- One small round decorating tip , we use a Wilton 2, but many will work.
- One small star decorating tip , we use a Ateco 27, but there are many that will work
Ingredients
Homemade Gingerbread for house:
- 1 cup molasses
- 1 cup vegetable shortening
- 2 teaspoons baking soda
- ½ cup water
- 1 cup granulated sugar
- 2 eggs
- 1 teaspoon vanilla extract
- 7 cups all-purpose flour
- ½ teaspoon ground cloves
- 1 teaspoon ground cinnamon
- 1 teaspoon salt
- 1 teaspoon ground ginger
Royal Icing:
- 4 large
egg whites
- 4 1/2 cups
powdered sugar
, - 2 teaspoon
cream of tartar
For Assembly:
- 2 cups granulated sugar
Instructions
- Gingerbread House Template: Before you begin, you can cut download and print our free pattern, use your own! Find our free template download link above in the post.
Gingerbread Dough:
- In a small bowl, combine baking soda and water and stir to dissolve, set aside.1 cup molasses, 1 cup vegetable shortening , 2 teaspoons baking soda, ½ cup water
- In a large saucepan combine molasses and shortening. Bring the molasses and shortening to a boil, stirring frequently. Once boiling, remove from heat and stir in the soda/water mixture, mixing well to combine.
- In a large mixing bowl use an electric mixer or stand mixture to combine the sugar, eggs and vanilla. Add the molasses mixture to the sugar/egg mixture and mix well to combine. Add flour, salt, and spices and mix to combine.1 cup granulated sugar, 2 eggs, 1 teaspoon vanilla extract
- Chill Dough: Place dough in a large ziplock bag and press into a flat disk. Chill the gingerbread for several hours, or make up to 1 week in advance.7 cups all-purpose flour, ½ teaspoon ground cloves, 1 teaspoon ground cinnamon, 1 teaspoon salt, 1 teaspoon ground ginger
- Preheat oven to 375 degrees F. Remove the gingerbread dough from the fridge and allow it to sit at room temperature for 15 minutes.
- Roll out Gingerbread: Cut dough into four equal pieces. Place a piece of parchment paper on a countertop (I like to spray it lightly with cooking spray, so it stays in place. Dust with flour and use a rolling pin to roll each gingerbread piece into a large rectangle (12 in x 12 in), no more than ¼ inch thick.
- Bake: Before you bake the gingerbread, make sure the pattern pieces you will cut from that piece of gingerbread fit on top of the dough you’ve rolled out. Watch the corners particularly. Place the gingerbread (still on the parchment paper) onto a large baking sheet or jelly-roll pan and bake at 375 degrees F for 11-12 minutes. Remove from oven.
- Cut gingerbread house template pieces while the gingerbread is still warm from the oven. As each batch comes out of the oven, place pattern pieces on top and use a sharp serrated knife to cut the pattern out, pulling the scraps away from the pieces you cut. Allow gingerbread to cool completely before removing from the parchment paper. If possible, let the pieces dry out uncovered on a cooling rack overnight or at least for a few hours.
Royal Icing for Gingerbread Houses:
- Place egg whites in a metal mixing bowl and whip them for 1 minute. Add powdered sugar and cream of tartar and beat until smooth and standing peaks (about 4-6 minutes). Keep bowl covered with a damp cloth as you use the frosting (this will help keep the frosting from drying out).4 large
egg whites
, 4 ½ cupspowdered sugar
, 2 teaspooncream of tartar
- Decorate Gingerbread House Sides: Lay the side and front pieces down on a baking sheet. Use the small point frosting tip to pipe and decorate the windows, details, and the wreath. (I do this before assembling, because it's easy to do than after the house is assembled).
Assemble Gingerbread House:
- Melt Sugar: Place a cardboard cake round (or whatever you're using as the base to your house) on the counter next to the stove. Pour 2 cups of granulated sugar in a large skillet over medium heat. When the sugar begins to soften, stir it constantly so that it doesn’t burn. Stir until the sugar is melted (5-10 minutes).2 cups granulated sugar
- Start with Back Piece: I recommend having 2 people for assembly, both being very careful to not burn yourself with the hot sugar! It’s best to have one person dip the pieces in melted sugar and place them on the board, and another person hold them steady together on the board while the sugar quickly dries.• Begin with the BACK PIECE of the house. Dip the bottom and one of the sides in the melted sugar. Place it on the board, positioning it towards the back, center of the board.
- Add Side Pieces: Now pick up a SIDE PIECE of the house and dip the bottom and one side and stick it to the back piece of the house. Repeat with the other SIDE PIECE.
- Add Front Piece and Roof: Now dip the sides and bottom of the FRONT PIECE and put it in place. Hold one of the ROOF PIECES over the melted sugar, inside edge facing up. Carefully spoon sugar onto the piece in the shape of a wide “U” (you want the sugar to stick where the house pieces will touch it.) Repeat with remaining roof piece.
Finish Decorating Gingerbread House:
- Pipe Trim: CONGRATULATIONS! Your house is assembled, and now the best part begins! Cover every standing edge of the house with frosting. That includes up and down the sides, across the bottom, under the roof, around the edges of the chimney, around the front door, etc.)• As you frost, decorate with small, bright candies of different shapes and textures.(Don’t use chocolate, if you plan on storing your gingerbread house).
- Necco Roof: I love the look of the singles the necco roof provides, and it is such a fun way to decorate the roof! If you want to do this, start with a horizontal line of frosting ½’’ up from the bottom edge of the roof.• Press Necco’s into the frosting, ½’’ apart. (You should be able to fit about 6 Necco’s, in a line across the roof). Alternate colors and have the “Necco” symbol face down.• In between each Necco, make a thick, vertical line of frosting. Place Necco’s gently at the top of each line of frosting and press down gently. Repeat with another thick, vertical line of frosting between each Necco. And again, place a Necco on top. Repeat until your roof is done.
- Finish Decorating: Have fun with as much decorating and candy as you want. You can decorate the "yard" as well. I always like to spread some royal icing on it to look like snow and add a simple path. I have included other decorating ideas you can choose from in the notes below. To store for future years, just carefully cover it with a garbage bag and keep in the top of a closet or somewhere it will be undisturbed. Take it out and display it as a fun decoration each year!
Notes
- Christmas hard candies
- Candy Canes
- Peppermint Hard Candies
- Spice Drops
- Dots
- Red Hots
- Gumballs or Gobstoppers
- Good n’ Plenty
- Sprinkles
- For the Roof: Necco’s, Pretzels or Shredded Wheat Cereal
- Tootsie Rolls (for a wood pile on the side of the house)
- Marshmallows (for snowmen in the yard)
- Consider adding Pretzel or Shredded Wheat to the roof
- Make a woodpile out of tootsie rolls and a lake out of blue construction paper with plastic wrap over it.
- Make snowmen out of marshmallows
- Make a fence out of pretzels and gumdrops, or out of candy.
- Cover the base of the board with frosting, like “snow”.
Nutrition
Nutrition information is automatically calculated, so should only be used as an approximation.
Text me new recipe ideas!
Simple, tasty ideas sent once a week. No spam.
Follow Me
I originally shared this recipe in 2015. Updated 2019 and November 2025.


The recipe works but the gingerbread is so boring and bland.
Unfortunately this recipe did not turn out. The gingerbread is puffy and soft. I even baked it a bit longer to help it firm up but it doesn’t look good. Will have to throw out and try a different recipe.
The recipe did not detail whether or not I let molasses and shortening mixture cool first before adding to the sugar and egg mixture, so I’m hoping it’s not completely ruined because of this key detail being omitted. Because it did not say, I followed directions as is and did not let it cool. Also, this is a lot of dough to fit into 1 freezer bag, I had to improvise again here b/c this much dough will not fit into one freezer bag. I was left confused and hoping I did not let all these ingredients and my time go to waste.
Totally get your frustration. The recipe should mention that the molasses/shortening mix needs to cool a bit first bc hot liquid can mess with the eggs. That said, if everything mixed together okay, you’re probably still good! And yes, that dough is no joke I always end up using two freezer bags too. You’re not alone!
This is so detailed! Thank you! I’m just wondering how far in advance the baked dough (the cookies) can be made? Can you freeze them until you’re ready to decorate? I’m excited to make these for my kids to decorate! So cute!!
Yes, you can absolutely bake the gingerbread pieces ahead of time! Once they’re completely cool, store them in an airtight container at room temperature for up to a week, or freeze them for up to 3 months. Just make sure they’re fully thawed before you start decorating. The kids are going to love this project!
this is the best demonstration of the house.
it has been 40-50 since i mad a house
thanks for helping. charlotte j
ps i made our house with just suger.
After bringing the molasses mixture to a boil, do you cool it before adding it to the suger/egg mixture? If so, how long to cool it for? Thank you.
Hello!!
I am looking for the link to the pattern. I’m not sure I’m seeing it in the post.
Thanks
The link is just above the recipe card in the post.
Thanks for the amazing resource!
Is this recipe good for making gingerbread men/cookies too? Is this yummy to eat after the gingerbread house is decorated or is this recipe more just for fun/looks and not very Edible
This recipe is definitely edible gingerbread and it will smell amazing, but it bakes harder than I for cookies. This is my preferred recipe for gingerbread men cookies: https://tastesbetterfromscratch.com/gingerbread-cookies/