This post contains affiliate links.
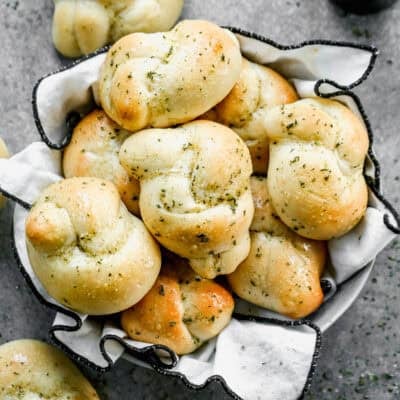
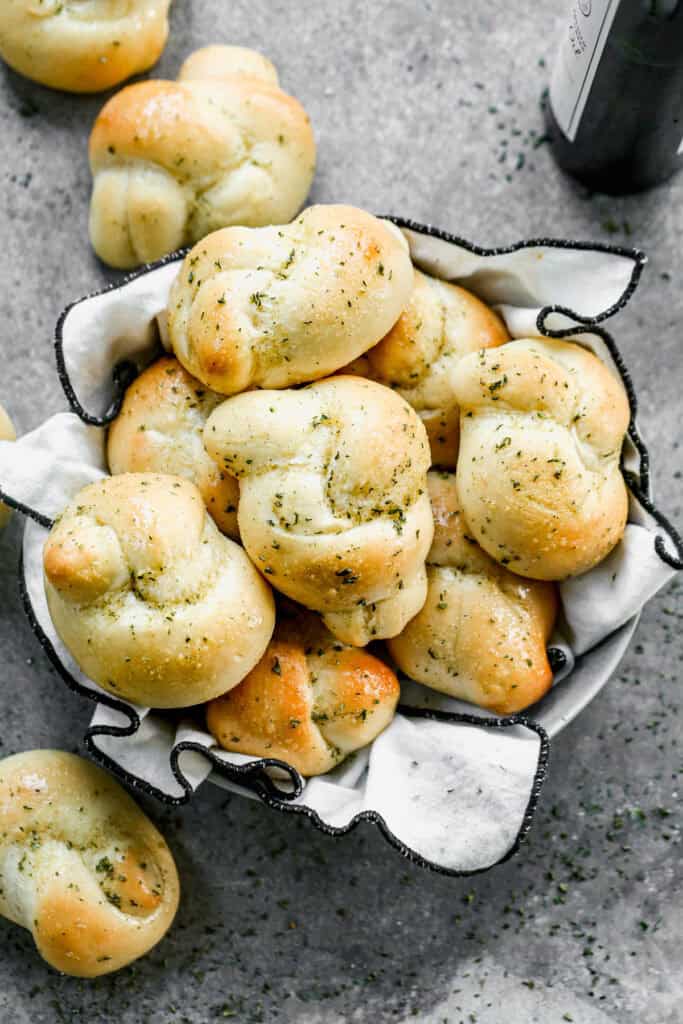
These homemade Garlic Knots use the most basic ingredients for the ultimate crowd-pleasing side dish! They are pillowy soft, golden, and brushed with a rich buttery garlic sauce that will have everyone reaching for seconds.

My favorite way to elevate rolls is these Garlic Knots

My family goes absolutely crazy for Garlic Knots every single time, and honestly, so do I. Whether I'm serving them alongside a big bowl of pasta, homemade pizza, or just snacking on them straight off the pan and dunking them in marinara sauce, these garlic knots never last more than a few minutes at out house!
Do you love making homemade bread? Try my Homemade Baguettes, Multigrain Bread, Focaccia, Cheesy Breadsticks, or the easiest No Knead Artisan Bread!
How to make Garlic Knots:
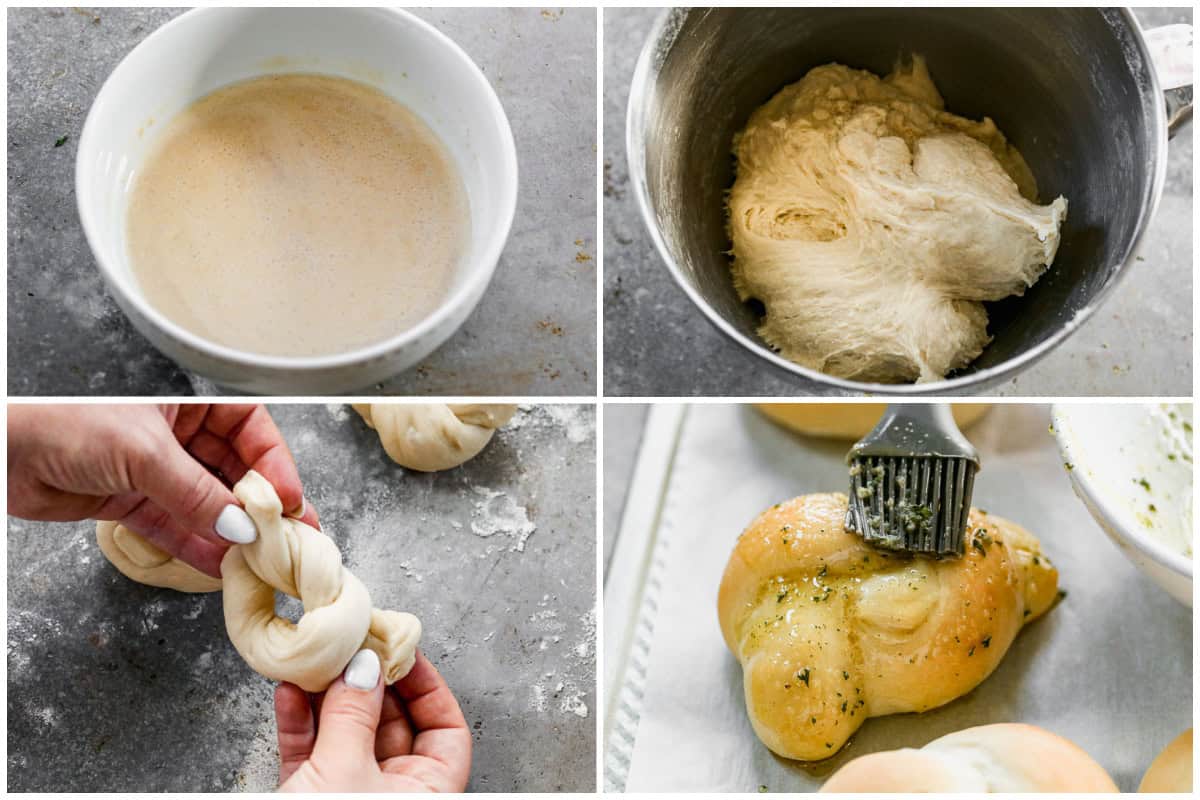
Proof Yeast: In a small mixing bowl, stir together warm water, yeast, and ¼ tsp sugar. Let it rest for 5-10 minutes. It should be foamy on top, this shows that the yeast is good and activated. If it doesn't become foamy, then you will need more fresh yeast or your garlic knots won't rise.
Make Dough: Pour activated yeast mixture into a bowl of an electric stand mixer then dump in remaining ¼ cup sugar, warm milk, egg, butter, and salt. Blend mixture until combined then slowly add the flour, mixing until the dough is smooth and elastic. This usually takes 5-6 minutes. Add the flour slowly because you may not use it all. You are looking for a soft, very slightly sticky dough that is pulling away from the sides of the bowl. When you touch it with a clean finger, it shouldn't leave any dough on your finger.
Rise and Shape: Transfer the dough to a large greased bowl, then flip over once so all sides are coated in the oil. Cover with plastic wrap and let it rise in a warm place until the size doubles (usually takes about 1 hour). Gently punch down the dough then on a flowered countertop, grab a ball of dough about the size of a golf ball. Roll it on the floured surface into a long rope (about ½ inch thick and about 9 inches long). Tie the dough rope into a knot and place on a prepared baking sheet.
Second Rise and Bake: After all the garlic knots are on the baking sheet, cover them loosely with plastic wrap and allow them to rise again in a warm place until double in size (usually takes about an hour). Bake at 400°F for 10-12 minutes, or until the garlic knots are lightly golden on top.
Brush with Garlic Sauce: Mix all sauce ingredients in a small bowl while the garlic knots are in the oven. Right when you take them out, use a pastry brush to gently brush with garlic sauce while they are still warm. Don't skip this step, this makes them so yummy! Serve with your favorite pizza, salad, pasta salad, or dip them in ranch or marinara sauce!
Homemade Garlic Knots
Equipment
Ingredients
- 1/3 cup very warm water, (79g)
- 2 1/4 teaspoon active dry yeast
- 1/4 cup +¼ teaspoon granulated sugar, (51g)
- 1 1/3 cup milk, (332g), warmed
- 5 tablespoons butter, (76g), softened
- 1 large egg
- 1 1/2 teaspoon kosher salt
- 4-4 1/2 cups all-purpose flour, (500g)
Garlic Topping:
- 1 Tablespoons olive oil
- 1 Tablespoons butter, , melted
- 1 teaspoons garlic powder
- 1/2 teaspoon dried parsley flakes
- Marinara sauce, , for dipping (optional)
Instructions
- Proof Yeast: Combine warm water, yeast, and ¼ tsp sugar and stir–allow to rest for 5 minutes until foamy.⅓ cup very warm water, 2 ¼ teaspoon active dry yeast
- Make Dough: Pour yeast mixture into the bowl of an electric stand mixer (or into a large bowl if you plan on kneading by hand). Add remaining ¼ cup sugar, warm milk, butter, egg and salt. Blend mixture until combined.1 ⅓ cup milk, 5 tablespoons butter, 1 large egg, 1 ½ teaspoon kosher salt
- While mixing on low speed, slowly add the flour, mixing until the dough is smooth and elastic, about 5 – 6 minutes. You may not use all of the flour called for. The dough should be soft, very slightly sticky when touched with a clean finger. It should be pulling away from the sides of the mixer.4-4 ½ cups all-purpose flour
- First Rise: Grease a large bowl with cooking spray or a tiny bit of oil. Place the dough in the bottom of the bowl and turn it over once to coat all sides in oil (this helps keep it from drying out.) Cover the bowl with plastic wrap or a light kitchen towel. Allow to rise in a warm place until double in size, about 1 hour.
- Shape Dough: Gently punch the dough down. Add a little flour to your countertop or work surface (or spray it lightly with cooking spray). Grab a ball of dough, about the size of a golf ball, and roll it out into a long rope (about ½ inch thick and around 9 inches long). Tie the rope into a knot and place it on prepared baking sheet.
- Second Rise: Cover shaped dough knots loosely with a light kitchen towel and allow to rise again in a warm place until double in size, about 1 hour.
- Preheat oven to 400° F. Spray a baking sheet with non-stick cooking spray or line it with parchment paper.
- Bake for 10-12 min. or until lightly golden on top.
- Garlic Butter: While they're baking, make the garlic sauce by combining all ingredients in a small bowl. After removing knots from oven, while still warm, brush them lightly with garlic sauce.1 Tablespoons olive oil, 1 Tablespoons butter, 1 teaspoons garlic powder, ½ teaspoon dried parsley flakes
Notes
Nutrition
Nutrition information is automatically calculated, so should only be used as an approximation.
Text me new recipe ideas!
Simple, tasty ideas sent once a week. No spam.
Follow Me
I originally shared this recipe April 2013. Updated April 2019, March 2022 and March 2026.


As with other recipes from Lauren, these are FANTASTIC!!! Recipe is easy to follow and taste great on their on or dipped in the sauce!
Amazing!! Family favorite for sure.
When feeezing. Do i allow dough to rise the first time?
Yes, let the dough finish its first rise, then shape it into knots before freezing. Flash-freeze the shaped knots on the baking sheet for 1-2 hours, then transfer to a freezer bag for up to 3 months. When you’re ready to bake, thaw and let them rise on the counter for about 2 hours, then bake as directed.
I plan to prep them today and bake tomorrow. Would it be better to refridgerate our freeze? If refridgerating, would i do the same thing? Just allow first rise, then when ready to bake, let sit for a couple hours on counter before baking?
Thank you so much.
Yes, you can shape them, cover, and refrigerate overnight, then let them sit at room temp until puffy, usually 30-60 minutes, before baking. Freezing also works: flash freeze the shaped rolls for 1-2 hours, transfer to a freezer bag, then thaw and rise on the counter for about 2 hours when ready to bake.
Can I proof the dough overnight in the fridge?
Yes! Shape them, cover, and pop them in the fridge overnight. Then let them sit out the next day for 30 to 60 minutes, or until they look nice and puffy, before baking. Super easy way to prep ahead
I️ see freeze instructions, but I’m assuming I️ can shape and then place in fridge overnight to rise and bake? Take out of fridge 30 mins before putting in oven?
Yes! You can shape them, cover, and refrigerate overnight. The next day, let them sit at room temp until they’ve had a little time to warm up and look puffy, usually about 30 to 60 minutes, then bake. If they still look a little tight, give them more time.
Fantastic bread . Just wondering if you could add garlic to the dough to give it even more garlic flavor ?
Yes! I’d add a little garlic powder to the dough, then still brush with the garlic butter after baking for even more garlic flavor
Amazing recipe! Soft, fluffy and super easy recipe. I did the braided version instead of knots for a pull apart style and also made some bread sticks and a couple of buns for lunches. Very versatile! Thank you ✌️
These were amazing!! Even my husband that dislikes most of the bread products loved them!