This post contains affiliate links.
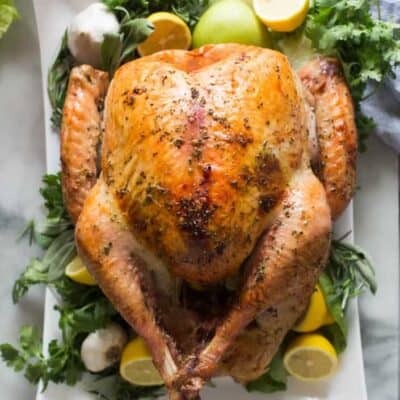
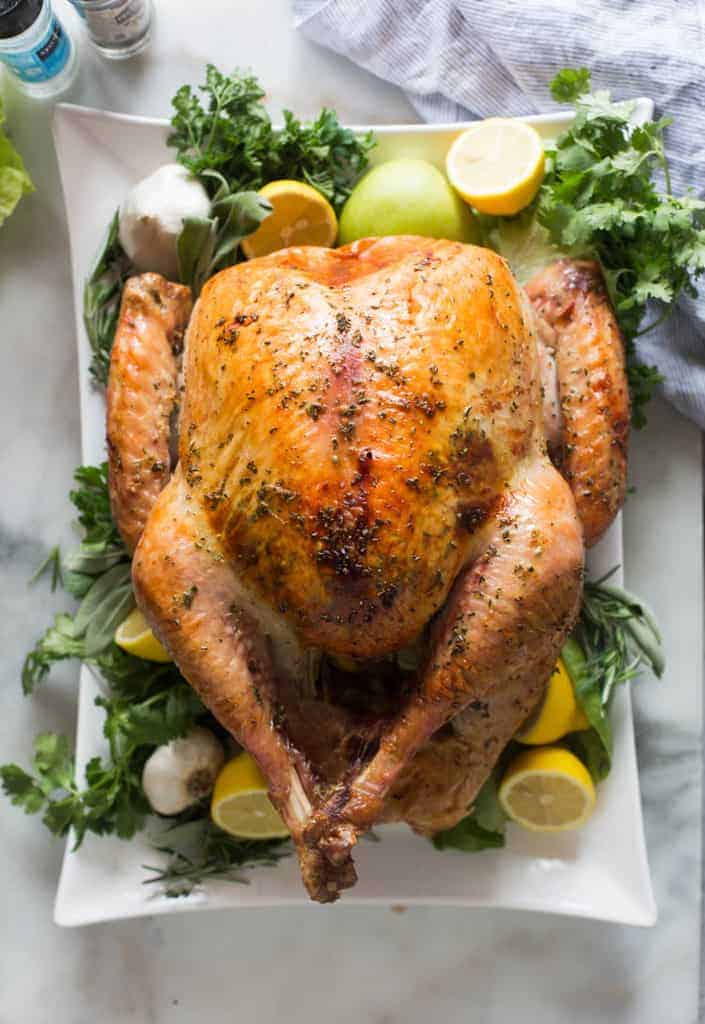
The BEST Thanksgiving Turkey recipe that packs all of the flavor and juiciness you expect from the perfect Thanksgiving turkey, with none of the stress! Plus a step by step tutorial for how to cook the perfect turkey.
Not only is this roasted turkey recipe fool-proof and easy to make, it will exceed expectations as the centerpiece of your Thanksgiving feast!
Thanksgiving Turkey
Why in the world do people stress so much over their Thanksgiving Turkey? Ok, I guess it IS the centerpiece of your Thanksgiving meal. And that usually means you have a table full of people not to disappoint. Ok, I get it. It's a big deal.
My hope is to squash any fears or insecurities you might have about cooking a perfect, beautiful Thanksgiving Turkey. This method is completely fuss-free and EASY. There’s no brining or basting the turkey, no cooking it upside down, or anything weird.
You don't even need an expensive roasting pan. I'm convinced that this recipe is not only the simplest way to cook a Thanksgiving turkey, it also yields a gorgeous, super juicy, perfectly cooked turkey.
The real KEY to baking a perfect Thanksgiving Turkey is not to overcook it–that's what dries out the meat, and you want to carve into a juicy, moist turkey on Thanksgiving! So, just plan ahead to get the timing right. If you have a smaller group, try my Roasted Turkey Breast recipe!
Let’s go ahead and go over the basics– the do’s, and the don'ts– for How to Cook a Thanksgiving Turkey:
What size turkey to buy for Thanksgiving dinner:
First things first: Buy about 1.5 pounds of turkey per person. (So if you're feeding 6 people, buy at least a 10 lb. turkey). That way you'll have leftovers.
How to thaw your turkey:
Make sure and allow plenty of time for your turkey to thaw! A good rule of thumb is to allow one day in the fridge for ever 5 pounds of turkey. I always give myself one extra day, just to be safe. Set the turkey on a cookie sheet or pan, to catch any liquid the turkey may drip as it defrosts in the fridge.
Don’t wash the turkey.
If you wash your turkey in your sink you will just contaminate your sink. Remove the turkey from it’s packaging, dry it off with some paper towels, and then prepare it for the oven. Any bacteria on the turkey will be killed in the hot oven while it bakes.
Don’t brine the turkey.
If you buy a high-quality turkey from the store (like Butterball or Norbest), then brining the turkey is an unnecessary step. You can do it if you want, but you can still achieve a deliciously moist turkey without brining it. However, if the turkey is wild, you should brine it the night before to make sure it will be moist and flavorful.
Don’t baste the turkey.
Basting is really unnecessary to produce a beautiful golden brown turkey. It also requires you to constantly open the oven, which causes the oven to loose heat and the turkey to take longer to cook–which could lead to a dry turkey. By smearing an herb butter mixture over the outer and inner skin of the turkey you will ensure the skin will brown beautifully, and taste amazing.
Don’t cook stuffing inside the turkey.
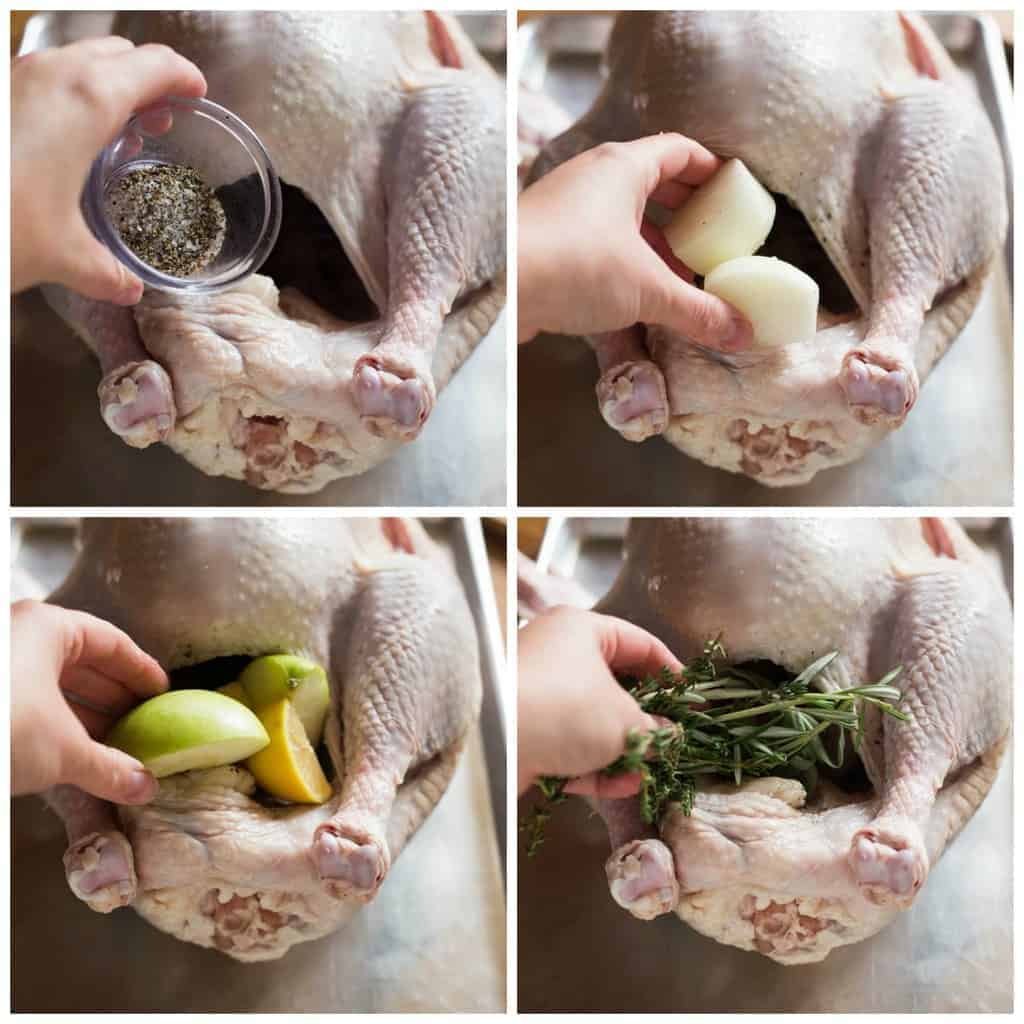
If you try to put stuffing/dressing inside the cavity of the bird, the turkey will be overcooked by the time the stuffing reaches a temperature that’s safe to eat. Instead, cook your stuffing in a casserole dish. Then you can fill the cavity of the turkey with things that will give it flavor (and add flavor to the drippings/stock): salt and pepper and any mixture of onion, apple, carrots, celery, or citrus.
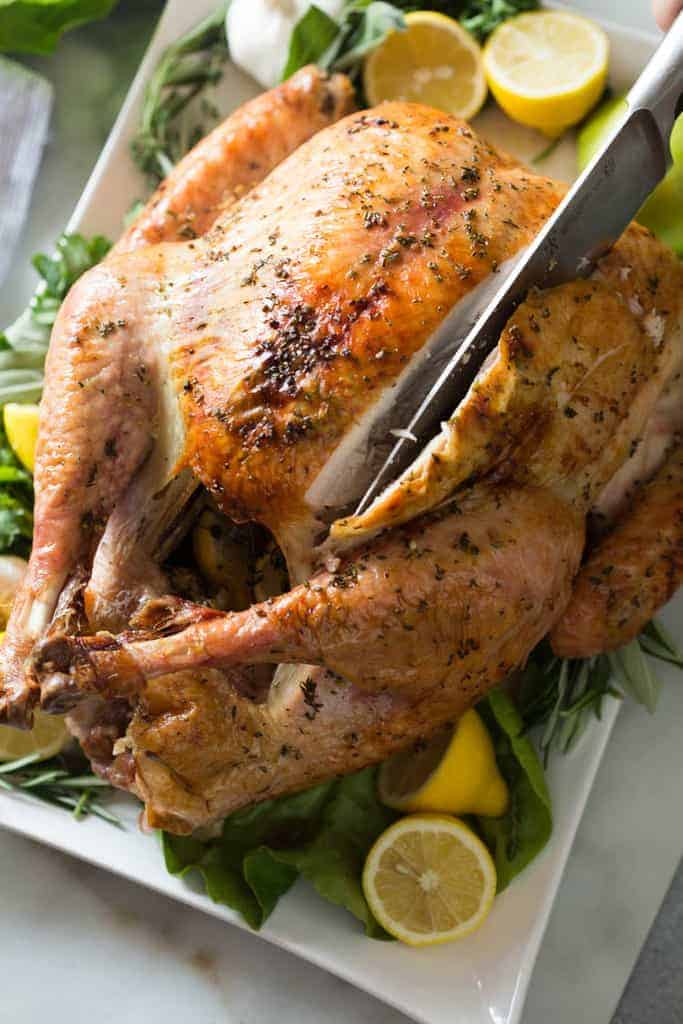
Do test the turkey with a thermometer.
The only way to really tell if the turkey is cooked (165 degrees F), is by using a thermometer (I love this one). Test the turkey right from the oven—if it reaches 160 degrees F, I take it out and tent it with foil. It will continue to cook inside the foil tent to make up that extra 5 degrees.
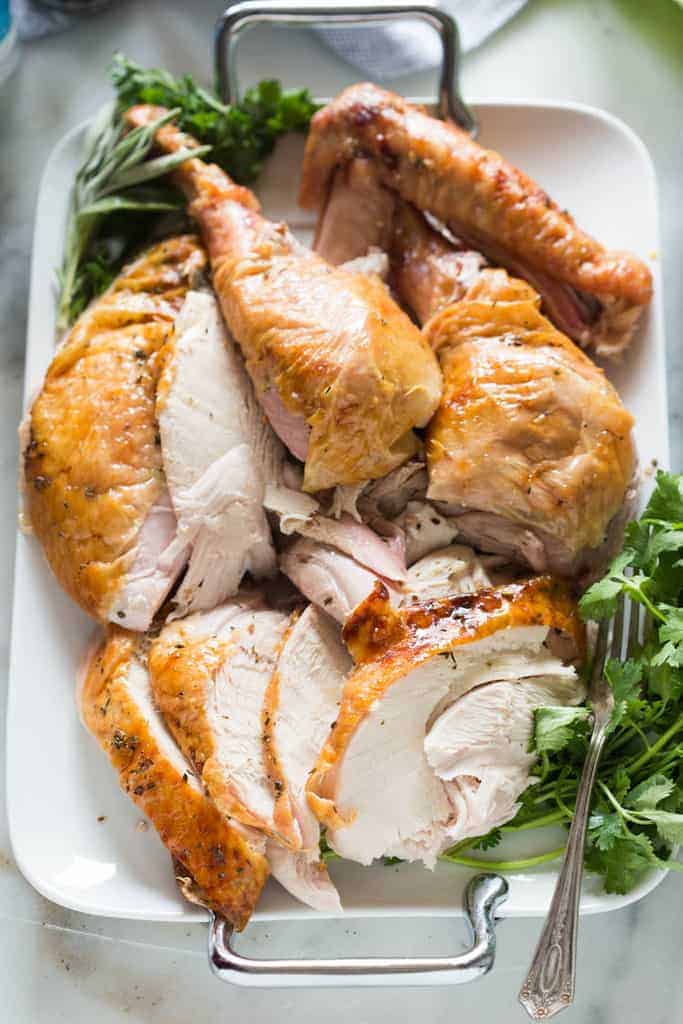
Do let the turkey rest.
After removing the turkey from the oven, let it rest for at least 15 minutes, or up to 40 minutes (that gives you some extra time if you need to bake or warm anything else in the oven). If you’re using the drippings for gravy, remove the turkey from its pan, to a cutting board and tent it with foil while it rests there. If you’re not using the drippings, then just leave the turkey in the pan and tent with foil.
You don't need an expensive roasting pan.
If you have a big metal roasting pan, great! If you don't, no worries. Just use a casserole dish big enough to fit the bird, or buy a $1 disposable foil roasting pan from Walmart (then you can throw it away after). Place a bunch of chopped veggies on the bottom of your pan. The veggies will act like the wire rack in a regular roasting pan by elevating the turkey slightly. Place the turkey right on top of the chopped veggies.
Do save the turkey drippings.
After the turkey is finished cooking there will be juice and browned cooked bits at the bottom of your roasting pan. You can reserve all of it for making turkey gravy. You can also use the leftover neck and giblets you pull from the turkey when you remove it from the packaging, to make giblet gravy. The most flavorful gravy! Your grandma would be proud 😉
How to prepare a simple roasted Thanksgiving turkey:
First, remove the thawed turkey from it's packaging. Remove the neck (usually found in the large cavity of the bird) and the bag of giblets (sometimes found in the smaller neck cavity of the bird). Discard them, or save them for gravy. Pat the turkey dry with paper towels.

Next, season the cavity of the turkey with salt and pepper. Stuff it with the quartered lemon, onion, apple and herbs.
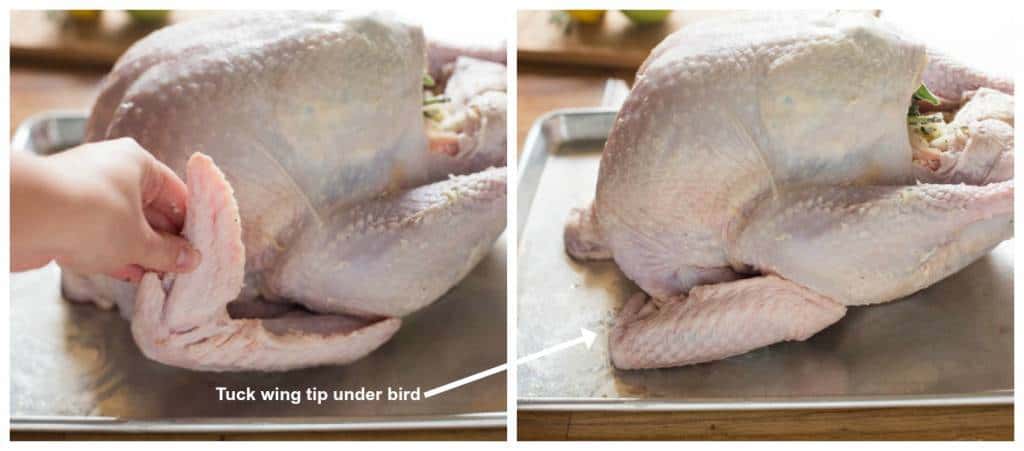
Tuck the wings of the turkey underneath the turkey and set the turkey on a roasting rack inside a roasting pan (or on top of a bed of chopped veggies —carrots, onion and celery work well—in a disposable roasting pan). Tucking the wings prevents them from burning, and helps the turkey sit flatter.
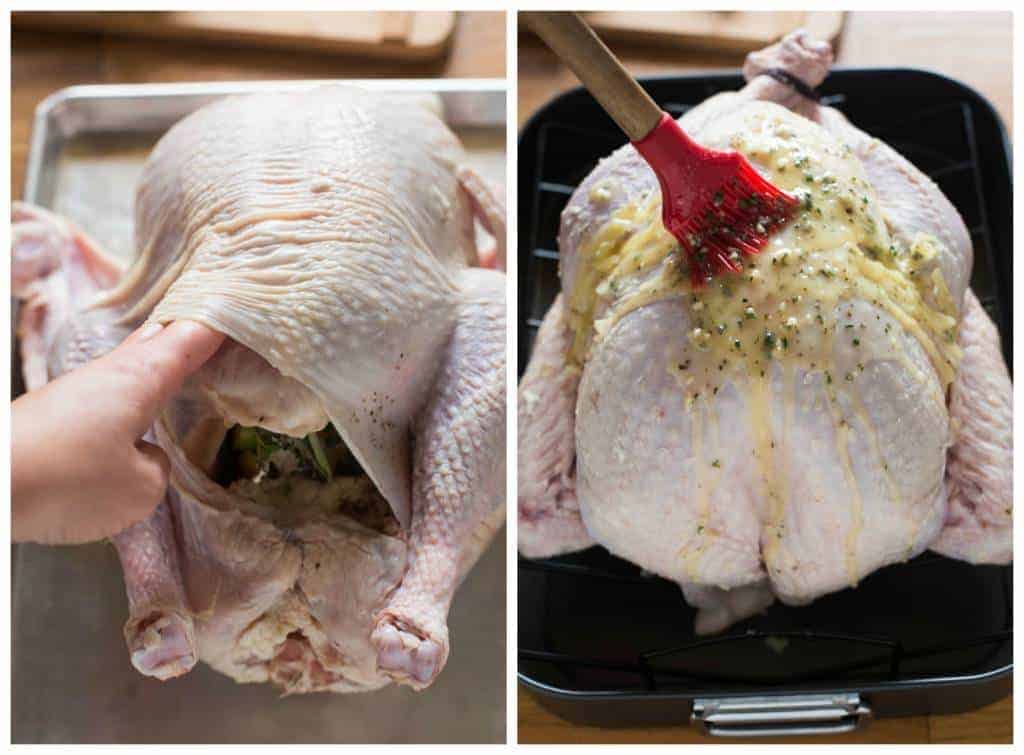
Use your fingers to loosen and lift the skin above the breasts (on the top of the turkey) and smooth a few tablespoons of the herb butter underneath. Use some twine to tie the turkey legs together. Then slather the outside turkey in the rest of the herb butter. That's it! You are ready to let your oven do the rest of the work!
You will want to check the turkey about half way through cooking. Use your oven light to see if the skin is golden, and then place a large piece of tinfoil over the breast meat of the turkey to help keep it from overcooking.

Whether this is your first time cooking a turkey, or you just decided to give this method I try, I would love to hear from you! Rate the recipe and comment below with your experience.
Consider Serving this With:
- Best Homemade Rolls
- Green Bean Casserole
- Perfect Mashed Potatoes
- The BEST Stuffing
- Sweet Potato Casserole
- Cranberry Fluff Salad
- Triple Berry Pie
- Other pie recipes
You can also FOLLOW ME on FACEBOOK, TWITTER, INSTAGRAM and PINTEREST for more great recipes!

Easy, No Fuss Thanksgiving Turkey
Ingredients
- 1 12-20 pound turkey*
- 1 onion, , peeled and quartered
- 1 lemon, , quartered
- 1 apple, (your favorite kind), quartered
- .75 ounce container fresh rosemary*
- .75 ounce container fresh thyme*
- .75 ounce container fresh sage*
For the herb butter:
- 1 cup unsalted butter, , softened
- 1 teaspoon salt
- 1/2 teaspoon freshly ground black pepper
- 6-8 cloves garlic, , minced
- fresh chopped herbs
Instructions
- If the turkey is frozen: Thaw in the fridge, 24 hours for every 5 pounds of Turkey. I like to give myself 1 extra day, just to be safe.
- Remove the thawed turkey from the fridge 1 hour before roasting, to let it come to room temperature.
- Adjust your oven rack so the turkey will sit in the center of the oven. Preheat oven to 325 degrees F.
- Make the herb butter by combining room temperature butter, minced garlic, salt, pepper, one tablespoon fresh chopped rosemary, one tablespoon fresh chopped thyme, and half a tablespoon of fresh chopped sage. (You’ll use the remaining fresh herbs for stuffing inside the cavity of the turkey)
- Remove turkey from packaging and remove the neck and giblets from the inside the cavities of the bird. (Reserve them for gravy, if you want, or discard them). Pat the turkey very dry with paper towels.
- Season the cavity of the turkey with salt and pepper. Stuff it with the quartered lemon, onion and apple and leftover herbs.
- Use your fingers to loosen and lift the skin above the breasts (on the top of the turkey) and smooth a few tablespoons of the herb butter underneath.
- Tuck the wings of the turkey underneath the turkey and set the turkey on a roasting rack inside a roasting pan*.
- Microwave the remaining herb butter mixture for 30 seconds (it doesn’t need to be completely melted--just really softened). Use a basting brush to brush the remaining herb butter all over the outside of the turkey, legs and wings.
- Roast at 325 degrees F for about 13-15 minutes per pound, or until internal temperature (inserted on middle of thigh and breast) reaches about 165 degrees. I tent it with foil and let it rest on the counter then move it to a large cutting board inside a sheet pan to catch any extra turkey juices while carving.
- ***Check the turkey about halfway through cooking, and once the skin gets golden brown, cover the top of the turkey with tinfoil, to protect the breast meat from overcooking. Alternately, you could start cooking the turkey with it tented in foil, then during the last hour or so of cooking you can take the foil off to let the turkey brown.
- Allow turkey to rest for 20-30 minutes before carving. https://tastesbetterfromscratch.com/how-to-carve-a-turkey/
- Reserve any drippings and juice remaining in your roasting pan to make turkey gravy.
Notes
Nutrition
Nutrition information is automatically calculated, so should only be used as an approximation.
Text me new recipe ideas!
Simple, tasty ideas sent once a week. No spam.
Have you tried this recipe?!
RATE and COMMENT below–I would love to hear your experience.
*This post contains affiliate links. I love sharing my favorite products with you!


My family is very particular about their turkey…they said this was THE BEST TURKEY! They said it was so juicy and extremely easy to make! Thanks for sharing! This will be my go-to turkey recipe from here on out!
I’ve been making this every year for 6 years now. Literally the best turkey ever 😋
This will be my third year using this recipe, and my family raves about it. The non turkey lovers have been converted because this turkey is so flavorful and moist!
This is my go to recipe since I started making my own turkey 5yrs ago! It comes out beautifully and full of flavor every time
This recipe is 🔥. I found this about 3 years ago and it never disappoints and my family are always pleased with how tender and juicy the WHOLE bird comes out! You don’t need to substitute or change anything! And the gravy that comes out of it is soooo good!
This will be my 3rd time making turkey for Thanksgiving!! This is my go-to recipe. I follow the exact recipe. No changes needed. Turkey is always juicy, tender, and flavorful!!
SO good – the BEST Thanksgiving turkey. Guests were raving about the smell as it cooked (and the taste when it was time to eat!).
Delicious! I was looking for an easy turkey recipe as the last time I made turkey, it came out awful. This recipe was super easy and the turkey came out juicy & flavorful! Thank you for your easy, detailed instructions as well as your video. This is my new go-to Thanksgiving turkey recipe!
Love love love this recipe! My turkey came out crispy and delicious! Everyone loved it! Thank-you!!
Easy, quick, and tasty. Would make again. Thanks for the recipe.
I never leave reviews on anything but I knew I had to for this turkey recipe! Absolutely AMAZING. So easy, and so delicious. My whole life I’ve hated turkey for thanksgiving but this was absolutely incredible! My first time making a turkey and it was so easy!
Perfect turkey, and so easy. We’ve done this two years in a row now.
Over the years, I have cooked many turkeys. Each year, varying the recipe slightly. This year, I followed EASY, NO-FUSS THANKSGIVING TURKEY by Lauren Allen. Turkey came out fabulous – so juicy, great flavor and mouthwatering. It is an an easy and no fuss receipe. When I compare this recipe to what I did in the past, it seemed to work very well. Here are a few comparisons. (1) In the past, I washed and brined the turkey. This year, I did not. (note, I did buy an expensive fresh Hoka Turkey- $3.99 lb that also doesn’t require brining) (2) I made the herb butter mix and spread it on. (in the past I spread butter and then sprinkled on the herbs. The mixture Laura uses worked well and tasted great. (3) At first I thought it was confusing – but I did lift of the breast skin with my hand and smeared the herb butter mix inside. (4) in the past, I stuffed the turkey with carrots, celery and onions. I followed the recipe and put lemon, apples and onions. Wow! The apples and lemons were great. Putting the celery and carrots on the bottom of the pan worked so well. I cooked a 28 lb hoka turkey. So, I put up the tin foil tent to start with it. Then, I did not open the oven to baste, and waited until I hit the 3 hour mark and then took off the tinfoil ent to cook for one more hour. The outside of the turkey looked beautiful when served on the dining room table. Everyone was raving on how the turkey tasted this year! I will use this recipe moving forward!
The best recipe ever! Followed it step by step and the turkey was delicious!
The heat is too low for the time amounts! I had to throw the turkey back in 3 times, it ruined the timing of Thanksgiving dinner, such a waste of time letting it sit for 30 mins before carving when it was still pink, & yes it was 160 degrees where we inserted the thermometer! I honestly don’t know how this recipe gets such good reviews unless u delete all the bad ones!
Hi Jill,
I’m so sorry your turkey was uncooked but you need to wait until the temperature reaches 165, not 160. Also, you should make sure that the thermometer is inserted in the thickest part of the breast and the thickest part of the thigh. It will continue cooking as it rests.
I used this for a 25 pound turkey and it was done earlier than i expected!
My 72 year old father said it was one of the best turkeys he’s ever had and that’s a HUGE compliment coming from him! Here are the two things that I think made all the difference for me only because I’ve done similar recipes in the past but they didn’t turn out as well as your recipe. Tenting the turkey in the BEGINNING half of cooking and then removing the foil through the second half. The breast meat was so juicy but had the skin perfectly crisped. Also…the butter I used this time was the Irish cream butter. Yes, it’s probably not as healthy as a salt free butter but you only live once 😬 my 10 year old also voted mommy’s turkey as the number 1 winner. Thanks for the tips and for giving such clear direction! It’s no wonder your recipe still has 5 stars with that many reviews! Kudos to you!!
Cooked my first Turkey with this recipe! My brother even commented that it was juicy but cooked faster and seemed to be less stressful than how my parents cook the bird! Very pleased with the results!
I used this recipe for this years turkey & it was the best tasting turkey I’ve ever made! Will definitely keep this! Thank you!!