
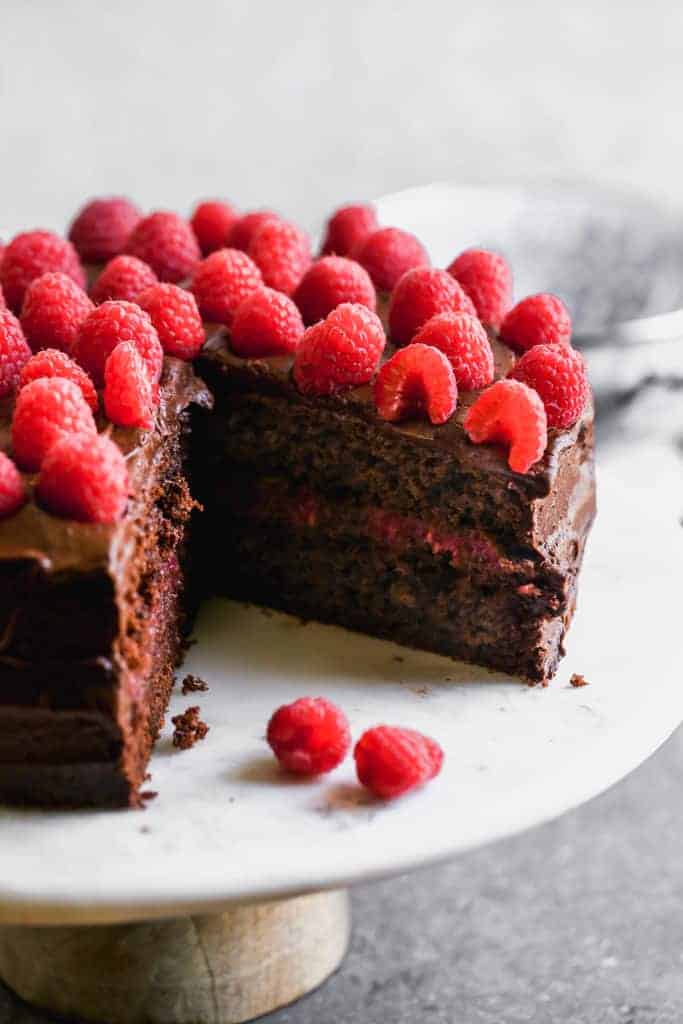
This is one of my go-to party cake recipes that makes a great, moist and delicious chocolate cake that's impressive looking, but simple.
Baking tips for beginners:
Use Room temperature ingredients, particularly room temperature eggs and butter in any recipe. The ingredients more easily whip and emulsify, allowing the batter to properly bake.
Don't over-mix: Over-mixing the batter is a common mistake and one of the biggest culprits of a dense, dry cake. Once you combine the wet and dry ingredients, use a spatula to gently mix just until the ingredients are combined.
Spoon measure the flour: Be careful when measuring the flour that you don't “pack” it into the measuring cup. Use a spoon to scoop the flour into the measuring up and then level it off with the back of a knife. Too much flour packed into a cake can also cause it to be dense and dry.
No buttermilk? Buttermilk is a really easy ingredient to make yourself, so don't fret if you don't have any on hand!
How to Make Chocolate Raspberry Cake:
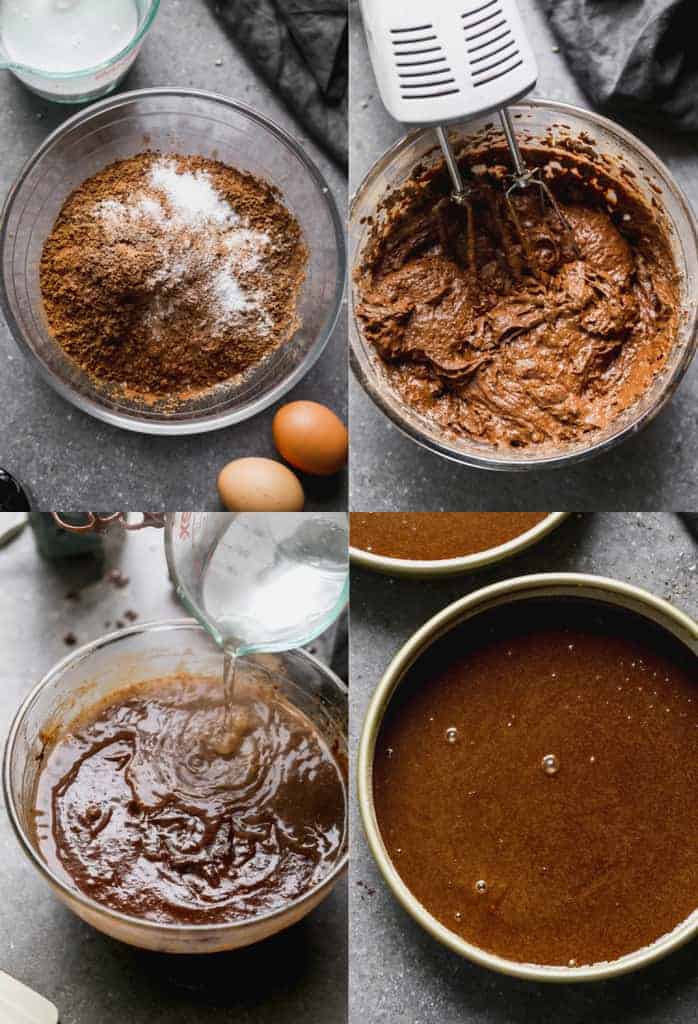
1. Make chocolate cake: Mix dry ingredients–sugar, flour, cocoa, baking powder, baking soda, and salt. Add eggs, vanilla, oil, buttermilk and beat for 2 minutes. Stir in boiling water and stir together, being careful not to over-mix the batter. Pour batter into two 9-inch cake pans and bake at 350 for 30-35 minutes.
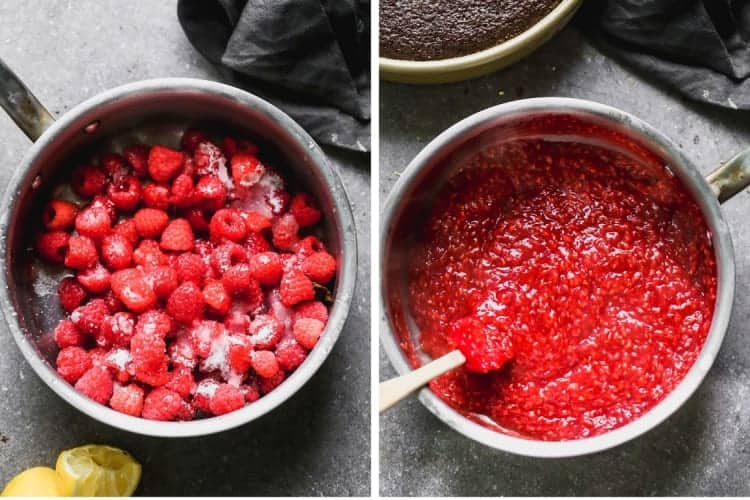
3. Make raspberry filling: Add sugar, water, lemon juice and cornstarch to a medium saucepan over medium heat. Stir well to combine. Add raspberries and cook, stirring often, until raspberries have softened into the sauce and the sauce has thickened. Allow to cool completely before filling cake.
4. Make chocolate frosting: Combine butter and cocoa powder. Add powdered sugar, milk, and vanilla extract and beat until smooth and creamy!
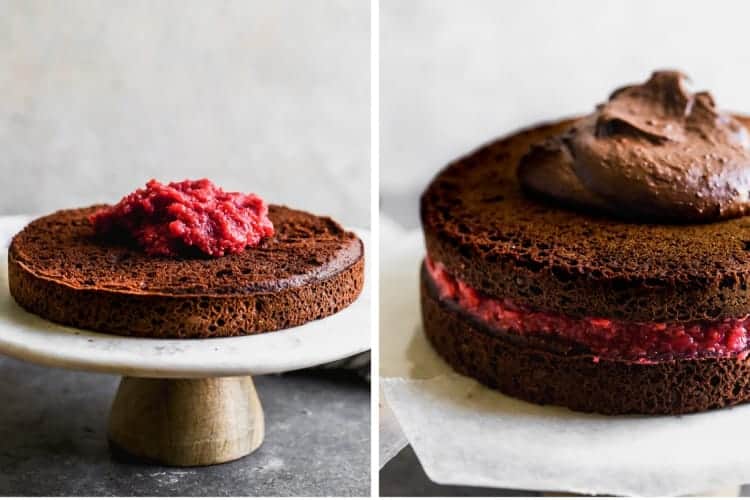
5. Assemble your cake: Spread a layer of raspberry filling in between the two chocolate cake layers. Frost the outside of the cake with chocolate frosting. If desired, spread remaining raspberry filling on top of the cake.
For High Altitude:
Since the air pressure is lower at higher altitudes, more flour is needed to ensure your cake rises appropriately. Increase flour by 2 Tablespoons if you are baking at high altitude.
For Store Bought Raspberry cake filling:
If you don’t wish to make the filling from scratch you could use a can of raspberry cake filling. (I prefer the Solo brand).
For seedless raspberry filling:
Cook the raspberries with only water and lemon juice. Press the mixture through a sieve, and return the seedless strawberry juice/pulp to the pan. Add sugar and cornstarch and cook until thickened.

Make Ahead and Freezing instructions:
The cake can be made and assembled up to 1 day in advance. Cover and store at room temperature or in the fridge.
Chocolate frosting will last for 2-3 weeks in the refrigerator and can be frozen for 2-3 months in a freezer-safe container. Thaw overnight in the fridge and bring to room temperature before frosting.
To freeze the chocolate cake, cover each cooled cake layer with plastic wrap and place in a freezer-safe container or gallon bag. Freeze for up to 1 month. I think frozen cakes are easier to frost!
Consider trying these popular desserts:
- German Chocolate Cake
- Better Than Anything Cake
- Mississippi Mud Brownies
- Snickerdoodles Bars
- Perfect Chocolate Chip Cookies
- Tres Leches Cake
You can also FOLLOW ME on FACEBOOK, TWITTER, INSTAGRAM and PINTEREST for more great recipes!
Recipe

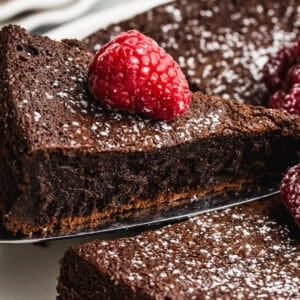
Chocolate Raspberry Cake
Equipment
Ingredients
Chocolate Cake:
- 2 cups granulated sugar
- 1 3/4 cups + 2 Tablespoons all-purpose flour
- 3/4 cup unsweetened cocoa powder
- 1 1/2 teaspoons baking soda
- 1 1/2 teaspoons baking powder
- 1 teaspoon salt
- 2 large eggs
- 1 cup buttermilk
- 1/2 cup oil (vegetable or canola oil)
- 2 teaspoons vanilla extract
- 1 cup boiling water
Chocolate Frosting:
- 1/2 cup butter , melted
- 2/3 cup unsweetened cocoa powder
- 3 cups powdered sugar
- 1/3 cup milk
- 1 teaspoon vanilla extract
Raspberry Filling:
- 2 cups raspberries (fresh or frozen)
- 1/4 cup sugar
- 1 tablespoon + 1 teaspoon cornstarch
- 1 tablespoon water
- 1 tablespoon lemon juice
- Fresh raspberries for topping on the cake , optional
Instructions
Chocolate Cake:
- Preheat oven to 350 degrees. Grease two 8 or 9 inch round baking pans (I also like to line them with parchment or wax paper).
- Stir dry ingredients together: sugar, flour, cocoa, baking powder, baking soda, and salt.
- Add eggs, vanilla, oil, buttermilk and beat for 2 minutes. Stir in boiling water, which will make the batter very thin. Pour batter into prepared cake pans.
- Bake for 30-35 minutes or until a toothpick inserted into the center of the cakes comes out clean. Cool for 10 minutes. Run a knife around the edges to loosen cake from sides of pan. Invert cakes onto cooling racks.
- Once cooled completely you can wrap them with plastic wrap and store them room temperature for one day, or you can wrap them with plastic wrap and store in a freezer bag to decorate them another day.
Raspberry Cake Filling:*
- Add sugar, water, lemon juice and cornstarch to a medium saucepan over medium heat. Stir well to combine. Add raspberries and cook, stirring often, until raspberries have softened into the sauce and the sauce has thickened. Allow to cool completely before filling cake. (See notes for seedless raspberry filling.)
Chocolate Frosting:
- Combine butter and cocoa powder. Add powdered sugar, milk, and vanilla extract and beat until smooth and creamy! Add additional powdered sugar, to thicken, or milk, to the the frosting, if needed.
Assemble your cake:
- Place one cake round on plate or cake stand. Add desired amount of raspberry filling and spread into a smooth layer. Top with second cake round. Frost the outside of the cake with chocolate frosting. Add fresh raspberries on top, if desired.
Notes
Nutrition
This Chocolate cake and chocolate frosting are Hershey's recipe.
I originally shared this recipe March 2013. Updated April 2020 with process photos and instructions.
Have you tried this recipe?!
RATE and COMMENT below! I would love to hear your experience.
This post contains affiliate links. I love sharing my favorite products with you!
This post contains affiliate links.

Can you do vanilla buttercream with this chocolate raspberry recipe? Chocolate frosting would make it super rich for me, just wondering!
Sure sounds amazing!
making this for my moms birthday I’m 11 years old hope it turns out well
That’s so awesome—you’re going to make your mom’s birthday extra special!
This was SO GOOD
What about making this with 3 6″ pans?
Great idea! Yes, you can use three 6″ pans—just divide the batter evenly and reduce the bake time. Start checking around 22–25 minutes, or until a toothpick comes out clean.
This cake was fantastic. Every bite of it was eaten when I made it for my friend’s birthday party. I can’t wait to make it again. No notes on the recipe at all. It was very clear.
Need to make this a 1/2 sheet size. Do I need to double the recipe?
Great question! 😊 Yes, you will want to double the recipe! Just keep an eye on the baking time—it may need a bit longer in the oven. Let us know how it turns out!
I made this as a practice run cake for my birthday. I like to try the recipe first to make sure I like it. I switched out the flour for gluten free flour and it still tasted amazing. My brothers who are tough critics and not gluten free loved it too! The cake is bouncy and rich, the raspberry filling is also so yummy. I added a little bit of honey as well when sautéing the filling. My brothers didn’t even say “is this gluten free” which is the first time ever and a huge compliment haha!
Could this cake be made into cupcakes instead?
Absolutely! You can totally turn this into cupcakes. Just fill the liners about ⅔ full and bake at 350°F for 18-22 min (keep an eye on them). Let them cool, scoop out a little center, add that raspberry goodness, and frost away. Sounds amazing!
-Stacy
If I wanted to bake in sheet pan so I can stack more layers, how long would it need to cook?
If you’re baking the chocolate cake batter in a standard 18×13 sheet pan, start checking it around 18–22 minutes at 350°F. The batter is thin, so it bakes faster when spread out. You’ll know it’s done when the center springs back lightly and a toothpick comes out clean or with a few moist crumbs. Let it cool completely before slicing and stacking!
-Stacy
Did not turn out for me. Very odd tasting, did not rise well, threw it out.
I’m sorry to hear that! Was your baking powder fresh by chance? That makes a big difference with cakes. Let us know if we can help you troubleshoot what went wrong.