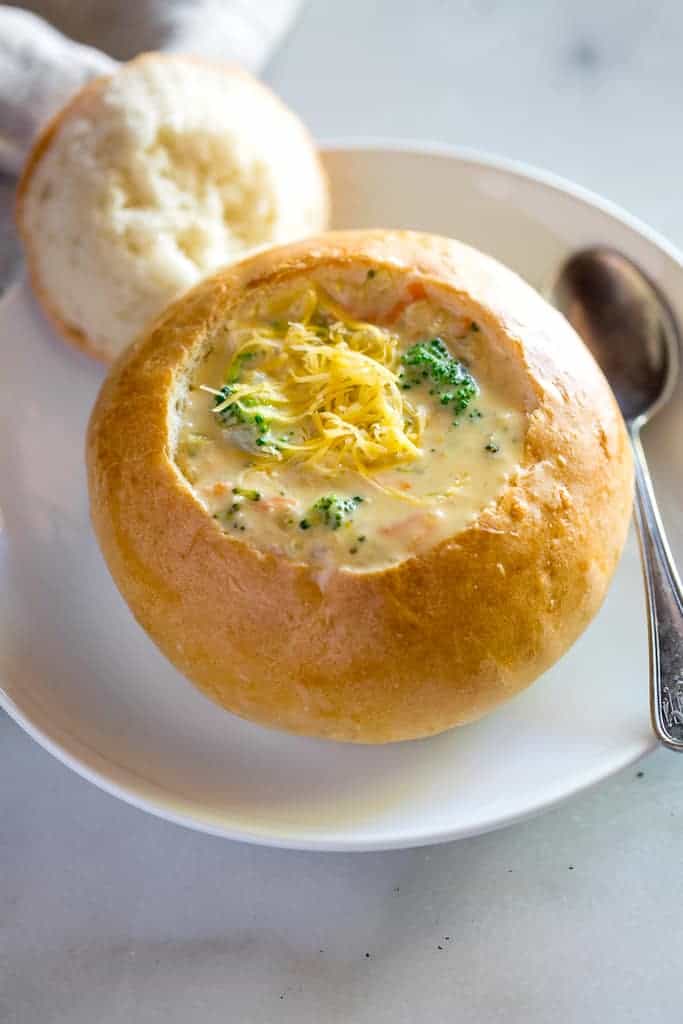
Homemade Bread Bowls
My goal with this recipe is to instill confidence in even the most amateur bread makers out there. Homemade bread is soo EASY and anyone can do it! I love that I usually always have the pantry ingredients I need to make it, and it tastes way better than anything you could buy at the store. Follow these simple steps and you’ll feel like a professional baker!
I adapted this recipe from the Food Nanny, as I knew I wanted a great base for an Italian bread that was crusty on the outside and soft inside, but had a sturdy enough crumb to hold its own when hot soup was added. The end result is absolutely perfect and will take your soup-for-dinner experience to a new level!
6 Pantry Ingredients:
- Active dry Yeast
- Granulated sugar
- Salt
- Butter
- All-purpose flour
- Eggs
8 Simple Steps for Homemade Bread Bowls:
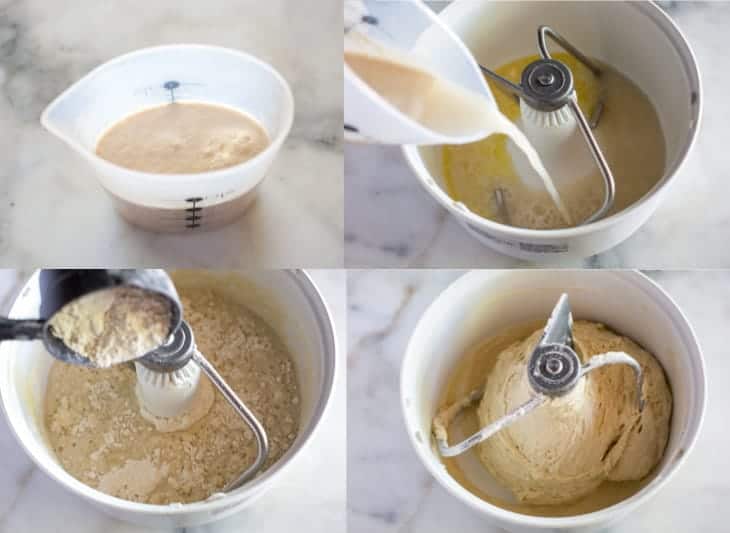
- Proof the yeast – Combine the water, yeast, and ½ teaspoon of the sugar in a small bowl. Stir just until the yeast is dissolved. Cover with a towel and let stand until the mixture is foamy, about 5 minutes.
- Mix the dough ingredients – In a large bowl, add the salt, remaining sugar, butter, yeast mixture, and 3 ½ cups of the flour, and mix.
- Knead the dough – Slowly keep adding more flour (about 1 cup at a time) until the dough starts to pull away from the sides of the bowl. Knead/mix the dough for about 5 minutes. Stop and touch the dough with a clean, dry finger. The dough shouldn’t be “sticky”, but may barely stick to your finger. Add a little more flour, as needed, until you reach that consistency. Knead for 2-3 more minutes.
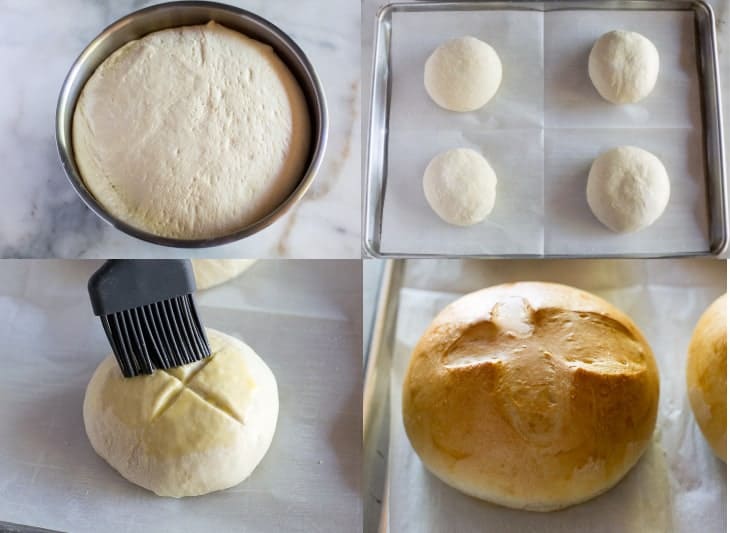
- Allow dough to Rise – Lightly spray another large bowl with nonstick spray and transfer the dough to that bowl. (Flip the dough over once so both sides are coated with spray). Cover the bowl with a dish towel and let it rise until doubled, about 30-45 minutes.
- Divide the dough. Punch down the risen rough, and divide it into 8 equal pieces. Pat them down well to remove any air bubbles and fold them into a tight ball. Make a very small “X” slit on the top of the dough rounds with a serrated knife.
- Brush with egg wash. Beat an egg with 1 tablespoon of milk to make an egg wash. Lightly Brush the tops of each dough ball with a very thin layer of egg wash.
- 2nd Rise – Cover the rolls really lightly with a piece of plastic wrap and allow to rise until doubled, about 30-40 more minutes.
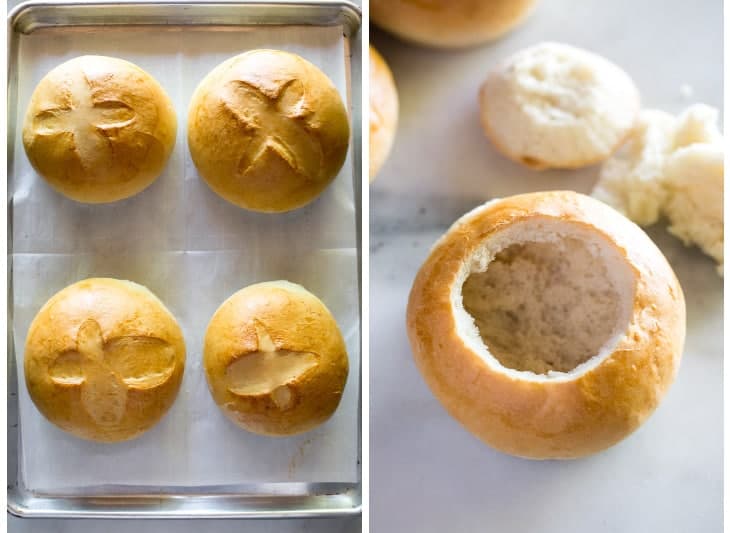
- Bake at 400 degrees for about 30 minutes.
Do I need any Special Equipment?
NO! The bread bowls bake on a regular baking sheet and can be mixed by hand or in a stand mixer. Anyone can make this easy recipe!
The BEST soups to serve in a bread bowl:
I think bread bowls are especially delicious served with cream based or thicker soups. These soups have a slightly thicker consistency that won’t cause the bread to get soggy as quickly.
- Clam Chowder
- Broccoli Cheese Soup
- Classic Homemade Chili
- Creamy Chicken and Wild Rice Soup
- Chicken Enchilada Soup
Eat the Bread Bowl!
This bread bowl is more than just edible, it’s absolutely delicious! So don’t just scoop your soup out of it with a spoon; tear it, dip it and enjoy it!
Storing and Freezing Bread Bowls:
To freeze the dough, punch it down after the first rise and store in an airtight, freezer safe container or bag for up to 2 months. Thaw overnight in the refrigerator and then continue with step 5, dividing the dough.
To freeze the baked bread bowls, store them in an airtight, freezer safe container or bag for up to 3 months. Allow them to thaw on the counter and then warm them in the oven before serving.
You can also FOLLOW ME on FACEBOOK, TWITTER, INSTAGRAM and PINTEREST for more great recipes!
Recipe
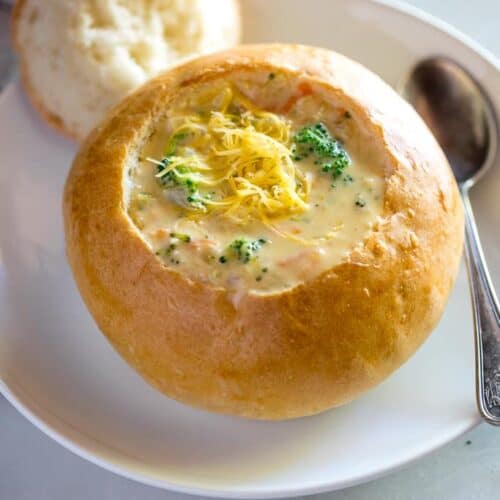
Homemade Bread Bowls
Ingredients
- 3 cups warm water
- 1 1/2 Tablespoons active dry yeast (2 packets)
- 2 Tablespoons +½ teaspoon granulated sugar , divided
- 1 Tablespoon salt
- 4 Tablespoons butter , melted
- 7 to 9 cups all-purpose flour , divided
- 1 tablespoon milk
- 1 egg white
Instructions
- Combine the water, yeast, and ½ teaspoon of the sugar in a small bowl. Stir just until the yeast is dissolved. Cover with a towel and let stand until the mixture is foamy, about 5 minutes.
- In a large bowl, add the salt, remaining sugar, butter, yeast mixture, and 3 ½ cups of the flour, and mix. Slowly keep adding more flour (about 1 cup at a time) until the dough starts to pull away from the sides of the bowl.
- Knead the dough (with your stand mixer, or using your hands) for about 5 minutes. Stop and touch the dough with a clean, dry finger. The dough shouldn't be "sticky", but may barely stick to your finger. Add a little more flour, as needed, until you reach that consistency. Knead for 2-3 more minutes.
- Lightly spray another large bowl with nonstick spray and transfer the dough to that bowl. (Flip the dough over once so both sides are coated with spray). Cover the bowl with a dish towel and let it rise until doubled, about 30-45 minutes.
- Divide the dough into 6 or 8 equal pieces (for large or small bowls). I like to use a scale to make sure they're all the same size. Pick up one section of the dough and pat it down with your hands to remove any air. Use your hands to gently fold the dough into a tight ball. Place the dough ball on a baking sheet lined with parchment paper. Make a very small "X" slit on the top of the dough rounds with a serrated knife.
- Beat an egg with 1 tablespoon of milk to make an egg wash. Lightly Brush the tops of each dough ball with a very thin layer of egg wash.
- Cover the rolls really lightly with a piece of plastic wrap and allow to rise until doubled, about 30-40 more minutes.
- Bake at 400 degrees for about 25-30 minutes. Allow to cool for at least 15 minutes before cutting for bread bowls.
Notes
Nutrition
Did You Make This Recipe?
Tag @TastesBetterFromScratch on Instagram with #TastesBetterFromScratch!
Have you tried this recipe?!
RATE and COMMENT below! I would love to hear your experience.
I originally shared this recipe December 2013, Updated August 2019.
This post contains affiliate links.




Well, I made the bread bowls! I only used 7 cups of flour and used my stand mixer. I feel like I should have kneaded more for a second rise BUT I DIDN’T!! They look ok but haven’t tasted any yet!!
My go to recipe for bread bowls, thank you!
Love this recipe l only had bread flour so l just used that. I love how east it was to make. My family loved it…
Delicious! I made in such a hurry, noticed I had forgotten melted butter after I kneaded & ready to rise. Threw about half the melted butter into dough, kneaded some more…and as expected not super fluffy but still delicious. Thank you!!
I have made this 3 times and surprisingly the 1st time produced the best bowls. I expected to get better not worse. That said taste was good each time. I wonder if anyone has suggestions to make bowls not spread. My second 2x they ended up more like saucers than bowls. No trouble getting dough to double in size but doubled in width not any in height.
Thanks
I am just a home baker but I do make homemade bread a lot but this was my first time making bread bowls. They turned out perfect. Your recipe was easy to follow and I even novice bakers shouldn’t have a problem making these. The only problem I had was making the serrated cross on top but that’s because I have cheap knives. Lol
Today is a snowy day and thought it’s a perfect day to try this recipe and I’m so glad I did! They are delicious. The recipe is added to the recipe box. Thank you for sharing the recipe
The how-to instructions are helpful BUT I would add more of the sugar to the yeast activation step and less to the dry ingredients initially. Also I think 2 packets of yeast is too much. Dough rose like crazy 3 times and over proofed really bad because it just wouldn’t stop rising even in the fridge.
I have made this 3 times and surprisingly the 1st time produced the best bowls. I expected to get better not worse. That said taste was good each time. I wonder if anyone has suggestions to make bowls not spread. My second 2x they ended up more like saucers than bowls. No trouble getting dough to double in size but doubled in width not any in height.
Thanks
Amazing great taste and such an easy recipe to make. Everyone loved the bread bowls.
Amazing!! I made 1/2 the recipe for my family of 3, and we all enjoyed these immensely (including my 3-year-old). My husband can’t wait until the next time we have these for dinner, and even requested them for Christmas Eve dinner next weekend. I paired these with our favorite soup (chicken enchilada) but I think I want to try these with loaded baked potato soup next time I make them—they are so tasty that the possibilities of soups to pair them with are endless. I can’t say enough good things about them!
I am making these for loaded baked potato soup tonight!
I wonder if I can use bread flour instead of AP? We’re going to find out! I’ll let you all know tomorrow!!
How did they turn out with the bread flour? I was going to make the same substitution.
I’ve never made bread before but these came out so good!!!! Soft and tasty! I put chili in mine
I tried your recipe, but my dough didn’t seem to rise, any suggestions?
Maybe your yeast was not good? If your water isn’t hot enough, it won’t activate your yeast, which will have a hard time rising. So I make sure my water is about 110 degrees, I put that in with my yeast and if I see it getting foamy, I know the yeast is good. Just follow the directions as above, but this is what I do. Plus keep your yeast in a airtight container and in the fridge or the extra in the freezer to maintain its freshness.
If your water was too hot it could kill the yeast as well. It can be temperamental. I turn my water on hot and then let it run for a bit to actually get hot and then fill a small bowl, then gather all my ingredients, THEN mix my yeast with sugar and water since it’s had time to cool down. Make sure its foamy and let it sit a little more if not.
Also if you over or under knead it can happen too.
Also, also, you might have to wait longer for it to rise. Mine took longer than the recipe time suggested. My trick is to preheat the oven to its lowest temp. Once at temp, turn off. Then I put a dish of water on the top shelf and my bread bowl with a towel on, on the bottom. Then close the oven door, leaving open a crack. The additional heat/moisture really does wonders for it.
Hope one of these tricks help!
I tried this bread recipe and I also folded some cheddar cheese into it, great with cheddar broccoli soup
I made the soup, I’ve been making it for years. I also made the bread bowls. It was the first time in my life it turned out perfect. In the past it was always doughy in the center, but this bread was easy and perfect. I’ll continue to make it. My family loved it!
Perfect! I cut the recipe in half and made 3 bread bowls. Also I added rubbed sage and some granulated garlic for added flavor. They are wonderful and this recipe was so easy and yummy to make. Definitely a new go to recipe. Love it!
My family loves this bread and I want to make it as one whole bread instead of rolls.
Has anyone tried to make it in a Dutch oven. If so at what temperature? For how long? Does the recipe change any? Thanks so much!
Unfortunately I struggled with the bowl shape and my dough stuck to the plastic during the second rise. But the bread itself is delicious. I have been making it just about every weekend for a couple months now as loaves and buns. Now I lightly spray the plastic with oil and then brush the egg wash on after the second rise just before going into the oven, that has worked wonderfully for me. This was an easy recipe to dip my toe into yeast baking. Goodbye store-bought bread! Thanks so much for sharing(:
All went well until I followed your instructions and lightly put the plastic wrap on the bowls for the second rise. The fricking plastic stuck to the dough, and while trying to remove it, the bowl flattened on a couple of them. Why would you recommend this?!! A lot of work for nothing, I am so angry!! Next time I might cover with either parchment paper or nothing at all.
I’m so sorry Patricia, but did you brush the rolls with egg wash first? The plastic wrap wont stick to the dough if the egg wash is applied first.
I spray plastic wrap with cooking spray when I cover dough, it works great and never sticks!
I learned that if you apply oil to the plastic wrap it won’t stick. I use this for sourdough also.
Mine all look flat but I think because I didn’t use enough flour. My dough was not as firm as the video…. that’s what I get for not watching the video first lol
It’s always helpful when dealing with dough to spray canola oil on the plastic wrap and on the parchment paper.
I lightly spray my saran wrap with cooking spray then lightly put it on the bread, then it won’t stick.
You have to cover them or they won’t rise spray the plastic wrap with cooking spray and remember baking takes trial and error
For my daughter’s 18th birthday party, she wanted soup in bread bowls. These turned out perfect! I made them in advance and froze them, then reheated them straight from frozen at 325 for maybe 40 minutes.They were crusty on the outside and fluffy on the inside. The kids carved out the holes themselves. The bread bowls held up great to soup, one kid came back for at least 3 servings, refilling the same bowl! Thank you so much for the wonderful recipe, it helped make my daughter’s party really special.
I cut the recipe in half. They came out perfect for a first timer. I will make them smaller next time and freeze them since I have no control and I ate the whole bowl, my husband much more restraint than I have has saved half of his for another meal that will require bread and butter. A definite must for a fun, play with your food party.
Loved this recipe! First time making bread and this was easy to do. I only needed 3 so I froze the rest but when I tried to make the frozen rest after they defrosted they wouldn’t rise for the second time. I don’t know what I did wrong. Any suggestions?
These bowls were amazing! I used 1/3 fresh ground white wheat and I bleached all purpose flour. I omitted the egg wash and used the clam chowder base and the bread was beautiful and soft yet sturdy enough for bowls! Tasted like store bought French bread but better bc it was home!
I always wanted to make bread bowls since Panera Bread lol. I made this for my family and my little girl said this is her favorite meal and that she loves fancy foods. Haha! The bread turned out really really well!
First time making a bread bowl and this recipe was super easy and delicious! We had homemade broccoli cheese soup in it and will definitely make it again.
Excellent Recipe!!!
I want to make have the recipe because their are only two of us in the family
I would encourage you to make the whole recipe, and freeze the second loaf for later!
These came out nicely, even though I was uneasy using a recipe that called for flour by volume vs. weight (I didn’t see the metric option until afterwards, but that weight seems a little low anyway). I used a dough hook in my kitchenaid mixer for the amount of time indicated in the recipe, but they also worked the dough for awhile using the Bertinet method of slap and fold kneading and using a bench scraper to keep the dough neat. When forming the final balls, I found I got the best baked shape when I aggressively worked the dough by repeatedly taking the outside edge of the disk with two fingers and folding it to the center, pushing it down solidly to stick it, then rotating the disk a tiny bit and repeating enough to go around the circle several times over. This renewed the dough’s elasticity and tightened it up enough to get a beautifully domed orb after baking.
I have made bread bowls dozens of times and they NEVER rise into nice round bowls. They turn into 1 1/2″ thick bread blobs. Why is that?
Janet, I had the same problem until I watched videos on YouTube where they were demostrating the technique. It was easy after that.
It’s possible that your water was too hot in the beginning and killed the active yeast. I’ve done this before too, super frustrating. Next time make sure the water is only 100F or that your yeast hasn’t expired.
We all loved it, perfect for Clam Chowder.
Time needs to be adjusted. All told these took three hours, not two. I’d also say these really make six bowls not 8, if you plan to actually put soup into them. I also did not use plastic wrap for second rise, but stayed with the towel.
But its a good recipe otherwise!
Somewhat at the last minute (when I faced the world at 5:30am) I decided bread bowls hoping they won’t leak would be perfect for my anticipated super cream of Chicken soup I was concocting for our Fresno UU Men’s Fellowship intellectual(?) discussion session.
2 batches of this dandy recipe made 16 of absolutely perfect bread bowls. Not bad for this 87yr old geezer’s first attempt at such an adventure. Thanks so much for the articulate accurate directions and encouragement.
Yea!!!
Easy to make! This was fun!
I followed the recipe, adding only rosemary and garlic.
My family loved these bowls!
I served them with brocoli cheddar chowder topped with bacon! I’ll be making these again!
Thanks for a great recipe!
I made this exactly following your recipe and the bread bowls came out perfect! This was my first time making bread bowls- I have made breads before and pizza dough. Thanks for the excellent recipe and the video! The video was helpful!
Wow! I usually don’t rate recipes, but we really loved this one tonight! I used unsalted butter (I think more salt would have been too much) and bread flour. Great flavor and texture! This one’s a keeper!
Just made these today. I followed the metric version, as I find weighted recipes much more accurate. The only thing I changed was I did not use the milk egg wash. The bowls were perfection! This recipe is def a keeper
These bread bowls were easy, gorgeous and perfect for a spicier soup. I took one star off because I considered the taste to be somewhat blah. I always make a recipe as written the first time so I will alter this one now to add some flavor.
Ridiculous! I’m a skilled baker and should have known better than to cover the rolls for the second rise “loosely” with plastic wrap. The rolls rose beautifully, then collapsed into puddles when I tried to ease the plastic off! A waste of time and ingredients.
I’ve never had that problem but you can lightly spray the plastic wrap to help!
Love love love!!! Great recipe.
I wish I would have read through comments before the second rise. The plastic wrap made mine not release the air and it just spread out instead of rising up, except for the edges that were not completely covered. I also should have known better. I’m going to attempt a shortened third rise and pray, since I don’t have time to start over to have bread with our soup for dinner.
I also had that problem, the plastic stuck and they deflated like a popped balloon. Never had this happen before. Bread bowls are plates, so disappointing
These look perfect! Has anyone used bread flour rather than all purpose?
Yes, I used bread flour! They worked perfectly! Although, I covered with a damp towel for the second rise instead of plastic.
I’m curious if it would work to make 10 rolls? Do you think they would be way too small? I have a family of 5 so I’d like to get two meals out of it!
Made this today. They were spectacular. Thanks for sharing!
Amazing! This recipe was so easy to follow. The bread bowls turned out absolutely perfect. My family and I loved them. Thanks so much for creating and sharing this wonderful recipe!
Have you ever doubled the recipe? Or is it better to just make two batches?
Yes, you can double the recipe!
These out of the oven. In the video, they looked awfully small dividing them into eight so I only did four. Big mistake. They’re way too big. So next time I will do probably 5 to 6 bowls and that should be the right size for us. Wish I could post a picture because these are gorgeous. I did post it elsewhere but I weigh my flour so while I was measuring it out for this recipe, I add it up by weight how much it took to get the right consistency. Ended up being 44.6 ounces of flour.
For those having trouble getting the right consistency of dough, I just made a batch of this and weighed my flour as I went because volume measurement leaves too much room for error, especially for novice speakers. So I ended up using 44.6 ounces of bread flour. Shouldn’t matter if you’re using all purpose. At 4.5 ounces per cup which is industry standard, that is almost 10 cups of flour. At 7 1/2 cups it was still a batter. So if you change the flour to ‘ounces, that should solve your problem with sticky bread dough and with no that doesn’t have enough flour in it to support the round shape.
Just got them out the oven and oh my! They are fluffy with crunchy sides and smell amazing!! In love so far, I did half the recipe and made no other changes. Thank you for sharing this!!! <3
This recipe was amazing! I used Costco roasted bell pepper tomato soup! The only things I would suggest is to use about 8 cups of flour or more. Also, I would use a pie dish to cook the bread bowls because mine came out a little flat. It might have been because I didn’t use enough flour, but other than that it was so good! I totally recommend this recipe! Awesome!
How do I cut this recipe to make only 4 bowls
Hi Richard, you will cut all the ingredients in half! Also, cut the ingredients listed in the instructions in half.
Lmao are you serious
These were amazing! After many failed attempts at making any type of bread, I was sure this was going to fail too. I was very wrong! These bread bowls tasted and looked awesome.
I gave this 4 stars because it didn’t come out the right consistency, even though I followed the recipe to a T. I even added extra flour, to see if I could thicken it a bit, but it still wouldn’t go into balls. As soon as I put it on parchment paper it kind of ran.
The bread is still good, but I wanted bread bowls, not a loaf of bread.
Definitely sounds like not enough flour. There are so many variables that go into bread baking, that you just have to use your best judgment sometimes. You need to have the typical consistency of bread though. That means keep adding flour until you get it there. I love recipes where the flour is always by weight because the recipes are more consistent.
These were PERFECT! I loved the whole process and your directions were spot on! Thank you for sharing! We are forever fans of your bread bowls.
It’s hard to know how to rate this recipe. It’s the 3rd time I’ve tried it and every time, follow directions to a T, this time I looked up the YouTube video for boule … as usual, they are rock hard and flat. Not sure what I’m doing wrong. We usually end up just slicing pieces off and dipping in our soup and it tastes okay but would be better as a bowl.
Sorry they aren’t working out for you. Anytime there’s an issue with bread the first thing I check is for fresh ingredients. Does your dough rise during the first and second rise?
Rockhard and flat? The first place I would look is the yeast. Many people use active dry and instant interchangeably but they are not. You can put instant right into the flour without proofing but active dry must be proofed. If you’re using instant, I would proof it as well to see if it bubbles up and gets foamy. If it doesn’t then you have dead yeast..
Just love this recipe, thank you for sharing it. All eight bread bowls turned out tall and round and beautiful. I scored them but didn’t brush the tops of the bread with egg wash until after the second rise when they were ready to go into the oven. For those new to shaping bread that sits open on a cookie sheet, I recommend you look up how to Boule (round ball) so that the bread remains in the desired shape and doesn’t flatten by only rising sideways.
I made these bread bowls 2 days ago, to go with brocolli and cheddar soup. They turned out terriffic. I cant wait to try your recipe for homemade bread.
This is an excellent recipe! Just made as written but added a little Italian herbs and parmesan to my dough. After the bowls were done used them to serve spaghetti and meatballs with melted mozzarella and fresh basil on top. Definitely will make again!!!
I have attempted this reciepe 3 different times and followed the instructions perfectly. And the dough refuses to form instead of a ball of dough i have a thick pancake mix. Very disappointing. Help me! In doing something wrong maybe?? My yeast in expired i just purchased the packets. I’ve never had this problem before i make the best pizza dough 😉 so why can’t i execute this recipe?
The same thing happened to me yesterday when I made them. The balls widened and didn’t rise up
Hi Haylie;
When you make something circular that you want to rise in a ball you need to create a tight skin on top so it will hold its shape. There are videos on YouTube to show you how to shape a boule. It is very effective and very easy to learn. I use it when I make rolls or any round shaped bread that I want to rise and hold its shape.
I have made these bread bowls multiple times and they are my families favorite part of our meal! I end up using about 7 1/2 cups of flour, but I don’t spoon and level the flour off. I scoop and level the 1 cup measuring cups. Also, I see some saying their dough didn’t rise. You have to make sure the water for the yeast is just the right temperature so it blooms appropriately.
It’s our first cold day of the winter season and have potato and ham soup cooking in the slow cooker. After reading through several recipes I decided to try making my first bread bowls with your recipe. I noticed your recipe does not have you punch down the dough after the first rise unless you are going to freeze the dough?? I just wanted to confirm this and was also curious about what skipping this step does for the dough when baked immediately. Thanks 🙂 I will post an update to let everyone know how they turned out.
Just finished baking and they turned out wonderfully! I’m not sure what happened for the negative comments but followed the recipe exactly and they are on the menu tonight!!
I wanted smaller bowls so I cut them into 16 bowls and they turned out great. I have a new convection bake feature on my oven so I baked them at 375 for about 35 minutes.
Not sure what went wrong. I followed the exact measurements and the dough was so wet. Added about another 500g of flour and still really wet and sticky. They’re currently on the baking tray ready to go in the oven but I can’t say I’m happy with this recipe. Maybe the metric measurements are wrong? People seem to have had success with it so I don’t know what’s happened with mine. 875g flour to 750ml water just seems like a lot. Although it was closer to 1.5kg by the time I’d got it to a somewhat usable texture.
I made these and they are wonderful!!!
I do have a question tho. Can they be made with bread flour instead of all purpose flour?
Yes, sure!
Are the bowls as big as the restaurants typically have? Can I separate the dough in 4 instead of 8 and if I do is it the same time and temperature?
Sure you can make them bigger if you want! They may need a bit longer to bake–just keep an eye on them.
I think the other posters did not actually make the bread, they just looked at the pics and posted a comment
went flat, not puffed enough
Thank you for this amazing recipe! Will definitely make these again—so good!
These turned out perfect! A huge hit with my family, will definitely hang on the this recipe.
I have made these twice in 4 days, they were such a huge hit!! I followed the instructions and they came out perfectly both times. Definitely keeping this recipe handy!
My bowls are in the oven now but are not rising. What did I do wrong?
I should have added more flour? I made the recipe with 7 1/2 cups. I thought that was enough, but they didn’t rose/bake high as I had hoped.
I made these tonight to serve chili in for dinner. They came out great, my family loved them. Thank you for sharing, I’m definitely keeping this recipe.
Has anyone put the ingredients I a bread maker on the dough cycle to mix and rise? I was thinking it would be so much easier,if it would still work.
I made these yesterday and they turned out beautifully. Thank you for the recipe! Question: have you ever added herbs or cheddar to the dough? If so, when would be the proper time to add that?
I made the recipe,its perfect it’s a no fail recipe,the only difference is I will make smaller bowls next time,after I brushed it wit the egg white I sprinkled all things bagel on top from Costco it was amazing,thanks for sharing 🙂
that sprinkle is amazing good idea, thanks for mentioning it.
I made this for my family, they are to die for! Thanks for sharing the recipe!
This was sooo delicious and came out perfectly. I will be saving this recipe and making it again in the future. Definitely a keeper, thank you!
I attempted to make this and it was a miserable fail. I thought it went great, but they did not rise at all. I made hockey pucks, instead of bowls.
I just finished making these bowls and I must say they are delicious and so easy!!! I made the mistake of making 4 out of the batch instead of 8. It doesnt look so big until you eat. Then oh my gosh, it was too much!
Thrilled otherwise and my fault for not following the recipe!
First time making bread bowls and these came out great!
Made half recipe for four bowls. Were delicious, but during second rise were a little flat instead of rising. Also recipe ingredients said egg white with milk for wash and recipe instructions say egg with milk. Any suggestions so plastic wrap doesn’t stick to dough after second rise? Thought wash would keep that from happening. All in all will definitely make again.
Made bread bowls the first time and loaves the second. My husband says it is a great bolio recipe! I am going to use this for many breads now! Does it work well to cut the recipe in half? It makes quite a bit of bread for just the two of us.
Thank you
I halved the recipe and it worked out just fine!
Super easy recipe and my first time making bread bowls. Fabulous results!
mine came out a little flat. the first rise was great, then I rolled them into balls, cut my little x’s.covered lightly with plastic wrap and after 2nd rise i baked. not sure where I went wrong.
I had trouble with making the shape into a way that I could hollow out later for soup to go in. Any suggestions on how to get the bread bowl to stay more symmetrically round? Or for loaf making it look like a nice shape?
Turned out amazing! So fluffy and delicious!
Very good – I used 7.5 cups of flour plus another half on the bench and rolled them into 6 bowls instead of 8. They came out perfect.
I made these tonight. The recipe was easy and the bread bowls were delicious. I filled them with clam chowder. Thanks for sharing.
Can I make just one big bowl (instead of 8) with this recipe ?
Sure.
If I make these again I would make 6 instead of 8 they were a little small.
These also had to be taken out at about 23 minutes and we live at 2700 ft.
When I made, they weren’t quite down in the middle. I took the bread out at 25 min because the tops were getting quite brown. Probably should have cooked them longer. How can you check for doneness?
You can check if bread is done by tapping on the bottom. If it sounds hollow it’s done.
I made these today but won’t be using them for two days. How do I store them for two days? Is it ok that I made them in advance?
Yes, I would store them in the freezer (in a freezer safe bag or container).
Can you make them bigger?
Sure! It will just make less.
Love this! I used to have to bring them home from the renaissance festival for my husband! Yay!
What is the ratio for instant yeast?
You can use the same amount of instant yeast. You won’t need to let it “proof” since it’s instant.
Think you could use gluten free flour?
I haven’t tested it! I’d love to hear if you do!
Can the dough be made in a bread maker? Would any adjustments need to be made?
First time ever making bread from scratch. It is Easter Sunday and I wanted to do something different. I was worried but they came out perfect. Fiiled them with made from scratch broccoli cheddar soup. Thanks!
Super yummy!
This recipe is outstanding thank you!
My bowls were excellent, but they flattened out. What can I do to make them remain more ball/bowl like?
Mine as well, Thad! I’m not positive but I think my issue was too little flour. Its quite a wet day today and I think I needed a bit more. I’ll try it again another day and see what happens. Flavor was great! I followed the recipe and added plenty of garlic powder and basil when adding the salt.
adding the herbs sounds delicious
These were perfect!! I made them a little larger and made 6 instead of 8. The insides were nice and soft and the outsides were firm and golden brown. Held up well with the clam chowder. I thought they’d be too small but the size held 3 full ladles of soup. Wonderful recipe! Thank you!
These were delicious! We made them along with your Broccoli Cheese soup (which is so good I wanted to eat until bursting just so I could taste it again!) and they were perfect bread bowls. They’re rather large for one tray (oven constraint), so mine grew together but still worked fine regardless. Nice and soft, like a roll and not like crusty Italian or French bread. Next time I’ll split the dough into ten so I can eat plenty of soup and have room to eat the bowl-I feel so bad when they’re wasted! Delicious, Laur!
Lauren,
As clarification on my earlier comment, the recipe notes “4 Tablespoons butter, melted.” Two lines later recipe notes “butter,” with no quantity noted.
Step 2 notes, “…add the salt,… butter, …” with no quantity noted.
Is the second notation of “butter” as a recipe ingredient superfluous?
Thanks,
Reno Dave
Thanks for bringing this typo to my attention. It’s fixed now!
Oh my! This recipe is really good. Together with Lauren’s /mom broccoli cheddar soup, was enjoyed by the entire family. Thank you for sharing. As I will share with family and friends
Looks yummy, can’t wait to try it. My winter soups r waiting for this, especially onion soup
One of my favorite bread recipes! Bread comes out perfect, not too dense and nice and light :).
Happy to hear it! Thanks for sharing Diane.
Nice recipe. Simple and clear. Me and my wife new to this homemade bread thing. It looks delicious. Surely next bread which we make in our kitchen will be yours.
Can these be frozen?
I’ve never tried freezing these but I think that should work fine.
I made these tonight and they were DELICIOUS! I brushed with an egg white wash at the beginning and half way through baking time and they came out with a perfect crust that held in our soup perfectly. This recipe is a keeper for sure! Thank you!
Lauren, thanks so much for this recipe! I’ve been fiending for a bread bowl recipe into which I can pour some soup, Panera style!
Looks yummy! Thanks.